Documentation
Lernen - LMS Flutter APP
Thank you so much for purchasing our item from Codecanyon.
- Version: 1.1.2
- Author: AmentoTech
- Created : 06 March, 2025
- Update: 18 July, 2025
If you have any questions that are beyond the scope of this help file, Please feel free contact us at Item Support Page.
What is Lernen
Lernen is a Flutter application designed for the Lernen LMS (Learning Management System), offering an enhanced, mobile-centric experience tailored for students and teachers. The app strengthens the platform by streamlining features such as course management, communication, and payment processing, all optimized for seamless use on the go. It facilitates efficient connections between students and teachers, enabling a more engaging and interactive learning environment.
Installation
Downloading
Thank you for choosing the Lernen App! To get started, please log in to your codecanyon account. Once you're logged in, navigate to the "Downloads" section where you'll find all your purchased items. Locate the Lernen App in the list and click on the "Download" button to access your files.

Upon downloading the zip package file from Codecanyon, you'll have all files you need inside. Zip package contains the following files
Files in main-files.zip
- lernen.zip - APP Source code
- documentation.zip - Documentation
Prerequisites
Before beginning, ensure that your development environment meets the following requirements:
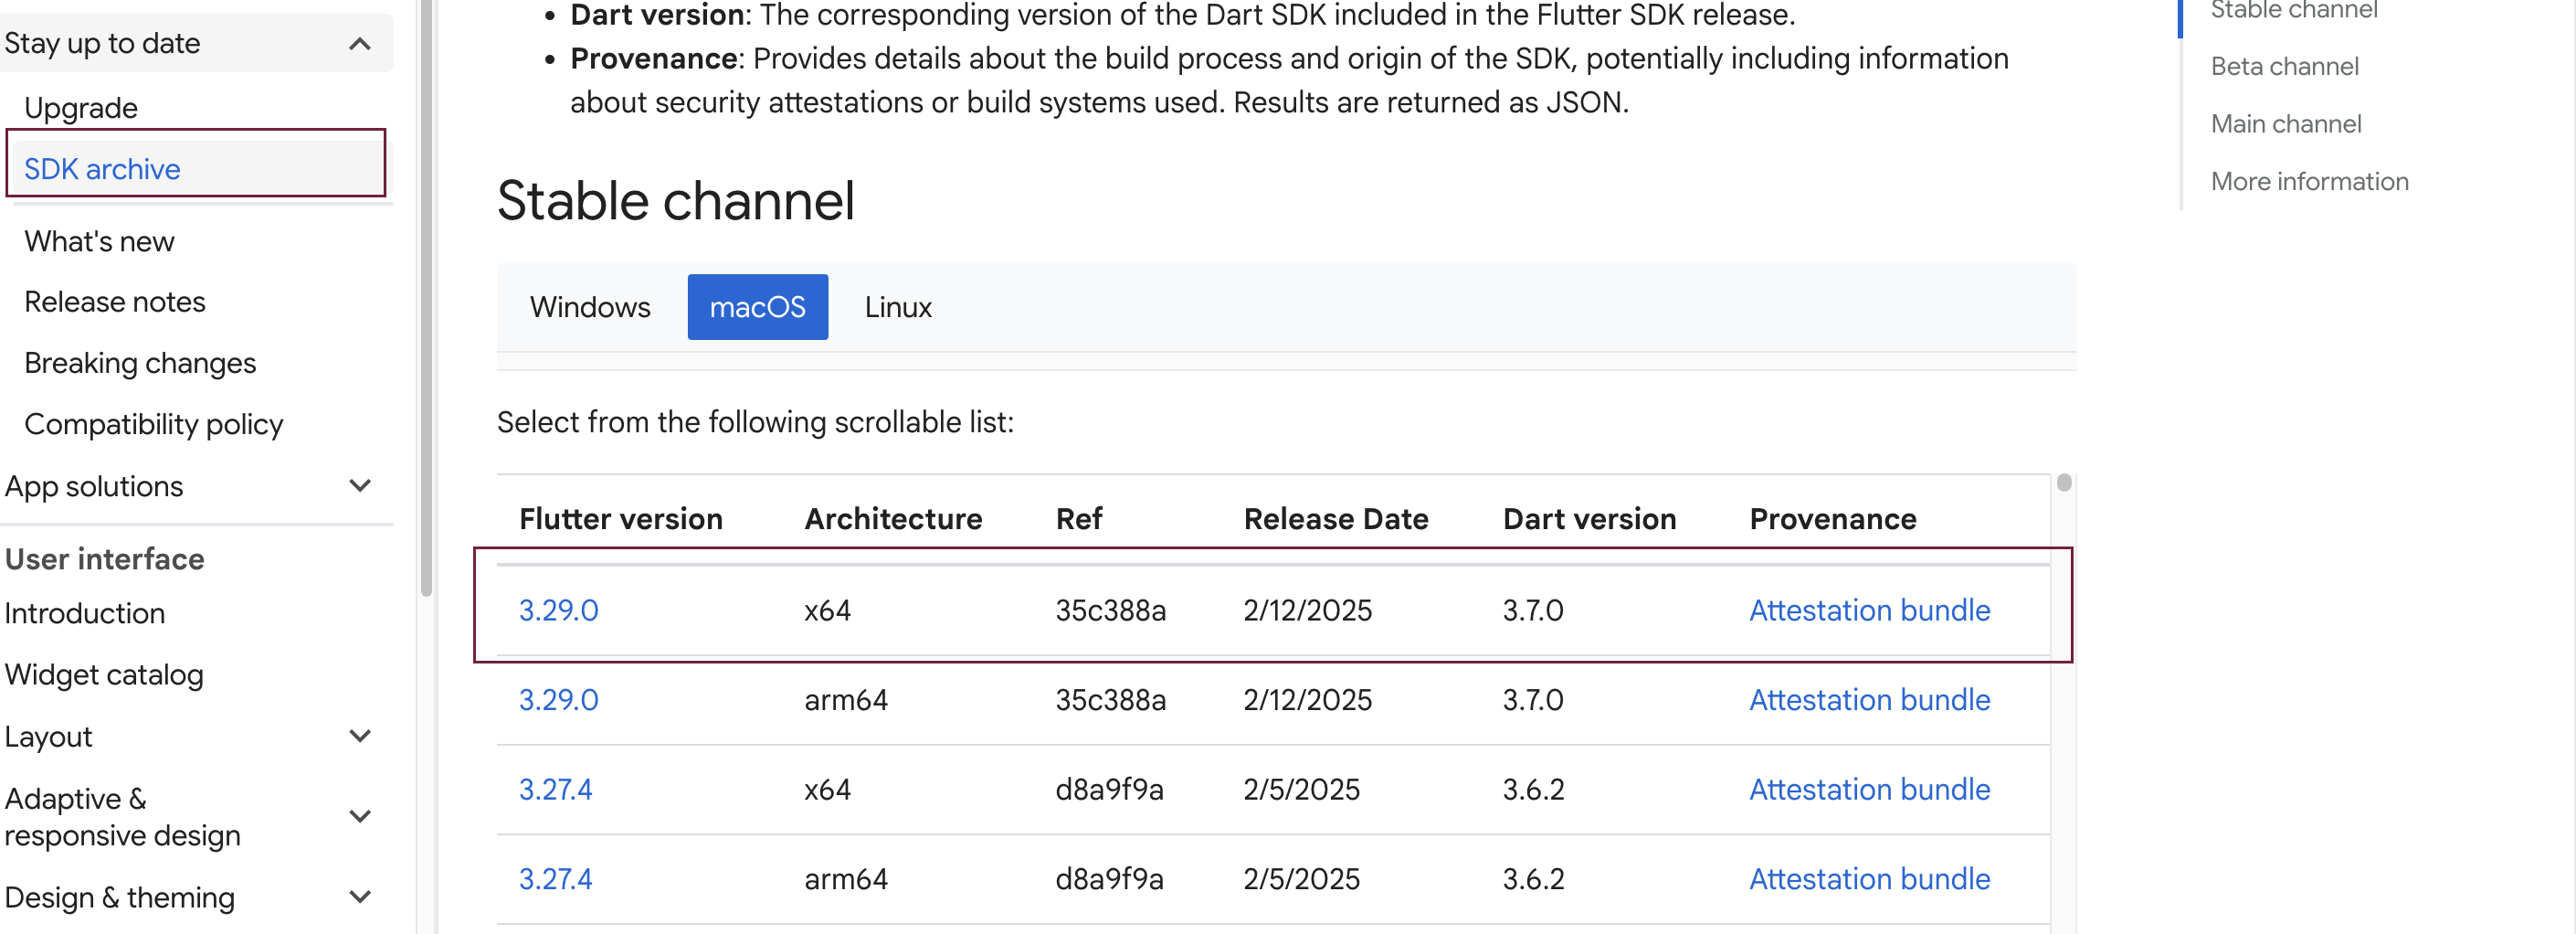
- Flutter SDK: Download and install latest Flutter SDK from docs.flutter.dev/release/archive. Recommended version 3.29.0
- Android Studio: for Android development
- Xcode: for iOS development
- JDK 17.0.10 (Recommended)
-
Flutter SDK: Download and install Flutter SDK from
docs.flutter.dev/release/archive. Recommended version 3.29.0
-
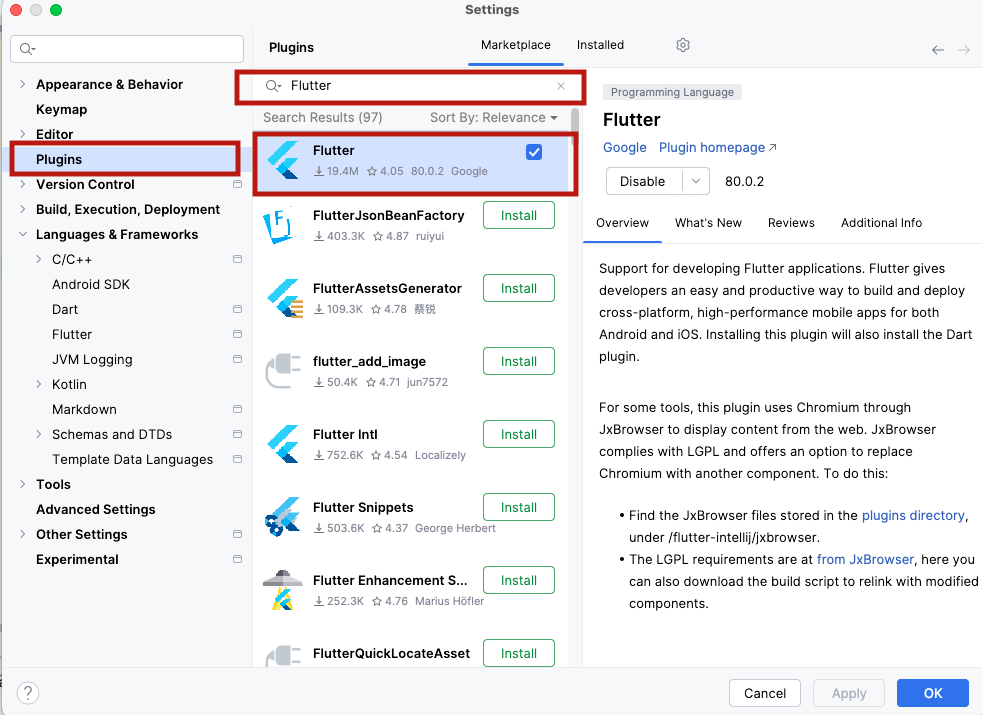
INSTALL Plugin Flutter plugin in Android Studio
-
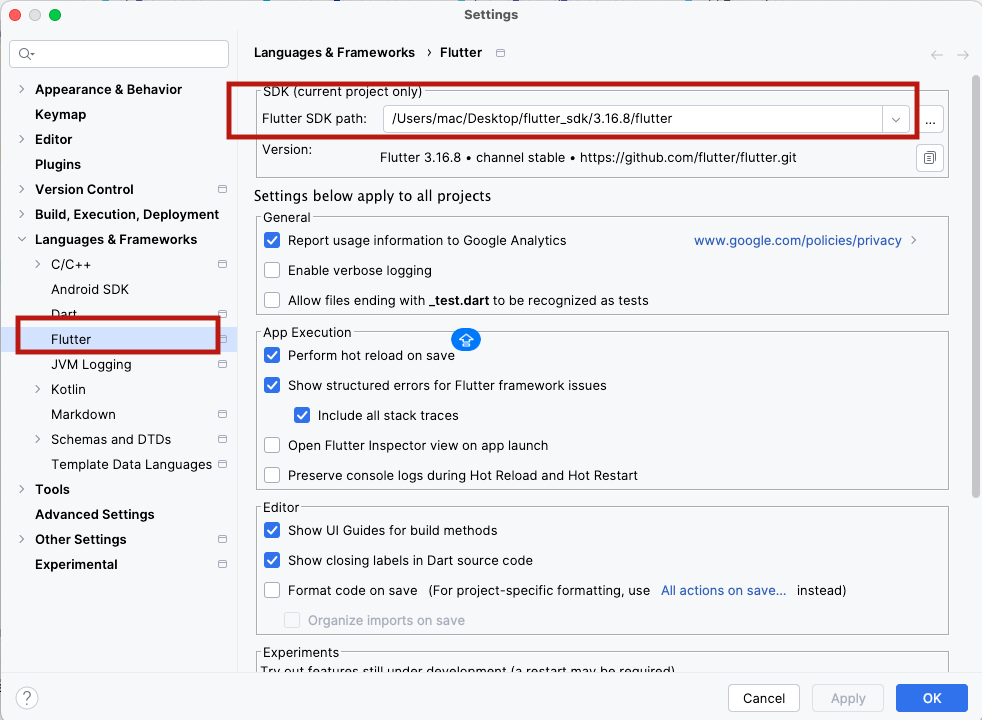
FLUTTER SDK Configure FLUTTER SDK path in Android Studio
-
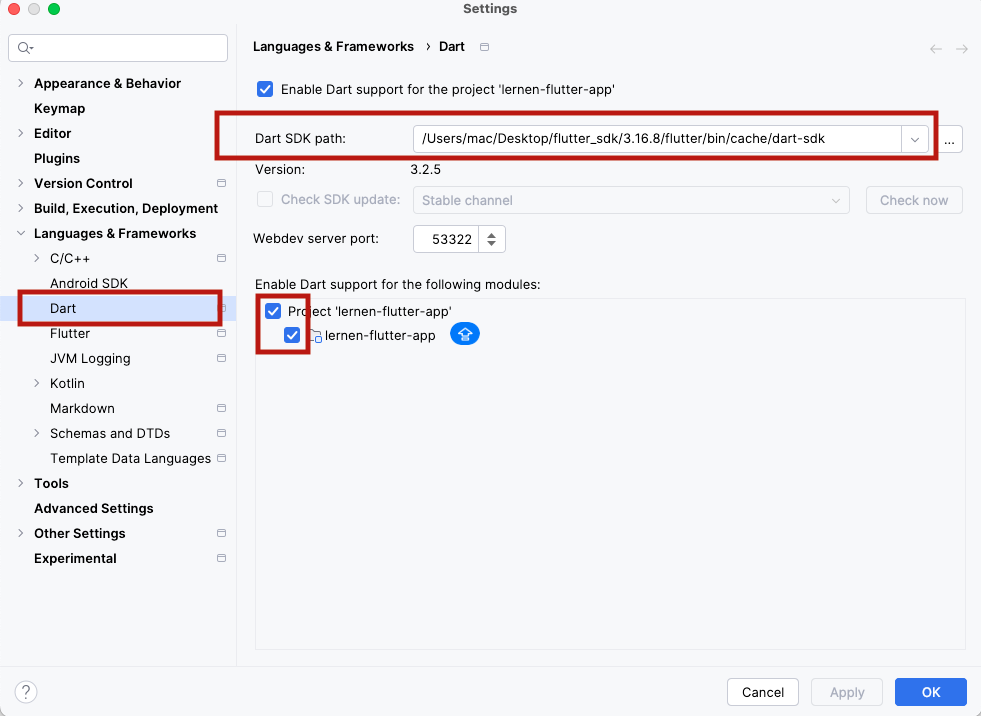
DART SDK Configure Dart SDK path from installed flutter sdk folder in Android
Studio
-
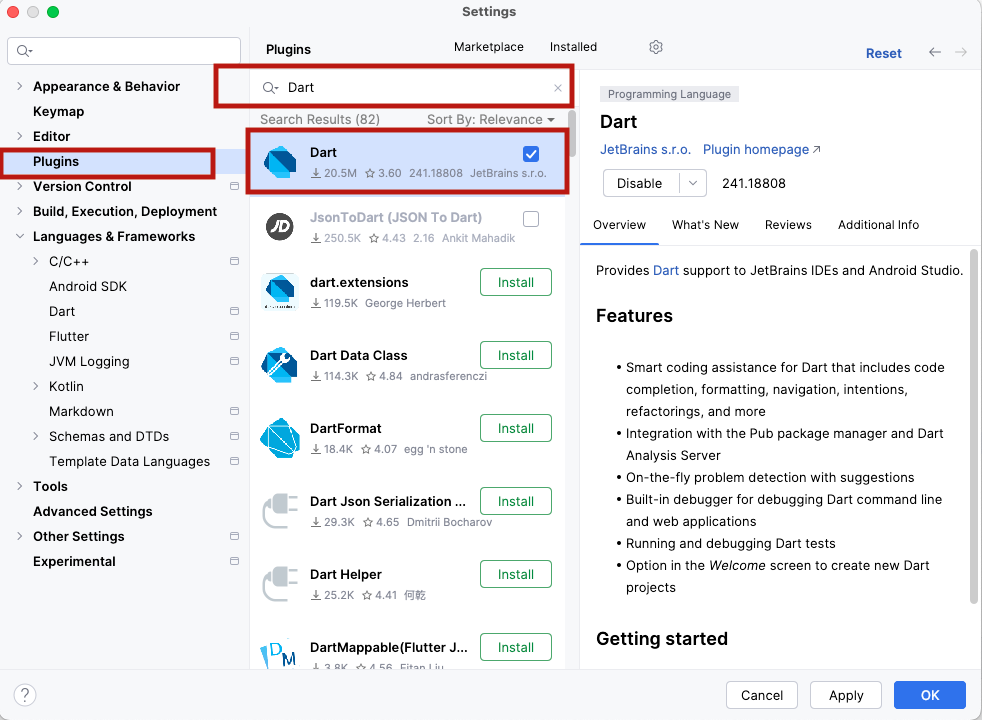
INSTALL Plugin DART Plugin in Android Studio
Installation
Follow these steps to set up your development environment and install the necessary components:
Step 1: Extract lernen.zip
For support: you can send email at help.amentotech@gmail.com
To use this app you must have android studio already installed. For more information regarding installing the android studio, please visit
Tip: To use this app you must have android studio already installed. For more information regarding installing the android studio, please visit Android Studio After Installing android studio, simply unzip app source .zip file and open source code in android studio.
App Configuration
Follow these steps to configure the app in code editor. Start by installing the necessary Node modules and iOS pod files.
Step 1: Open project in Android Studio
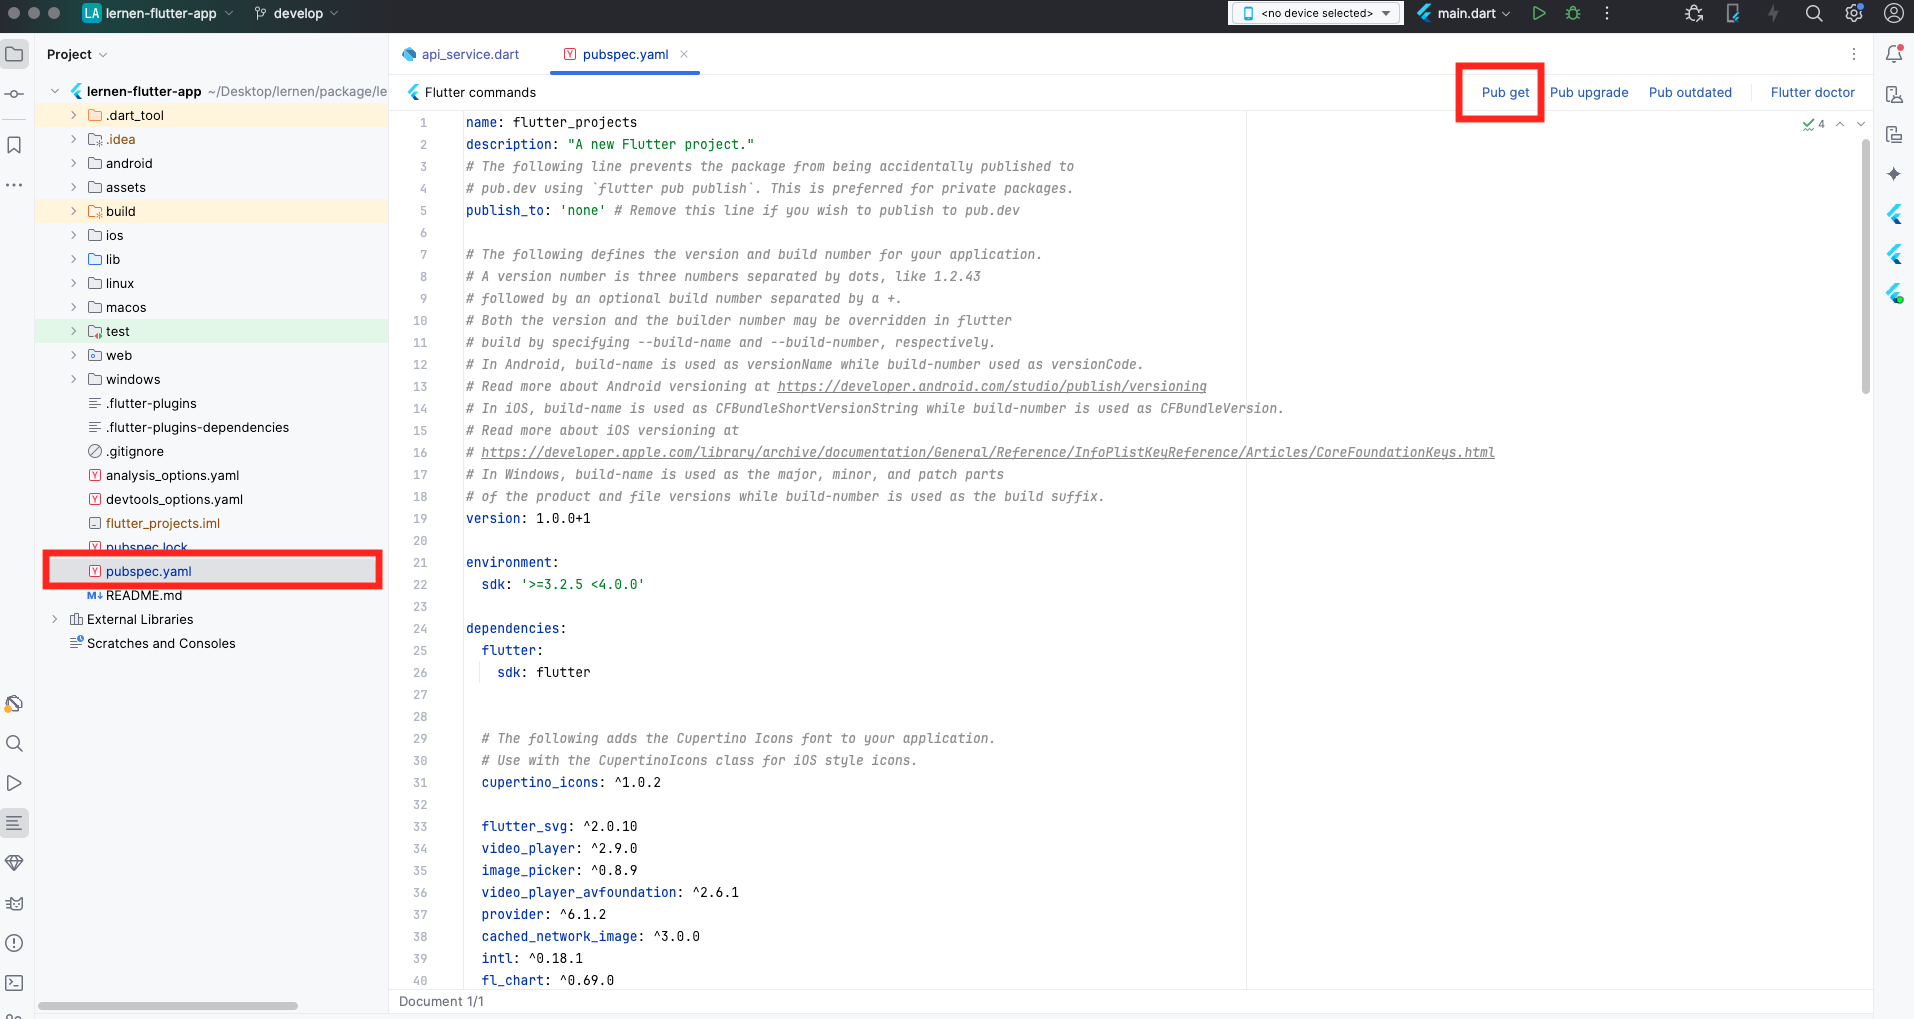
Step 2: Go to pubspec.yaml file and click on pub get as highlighted in below screenshot
Step 3: How to run app in Android Studio Click on highlighted green icon in Android Studio
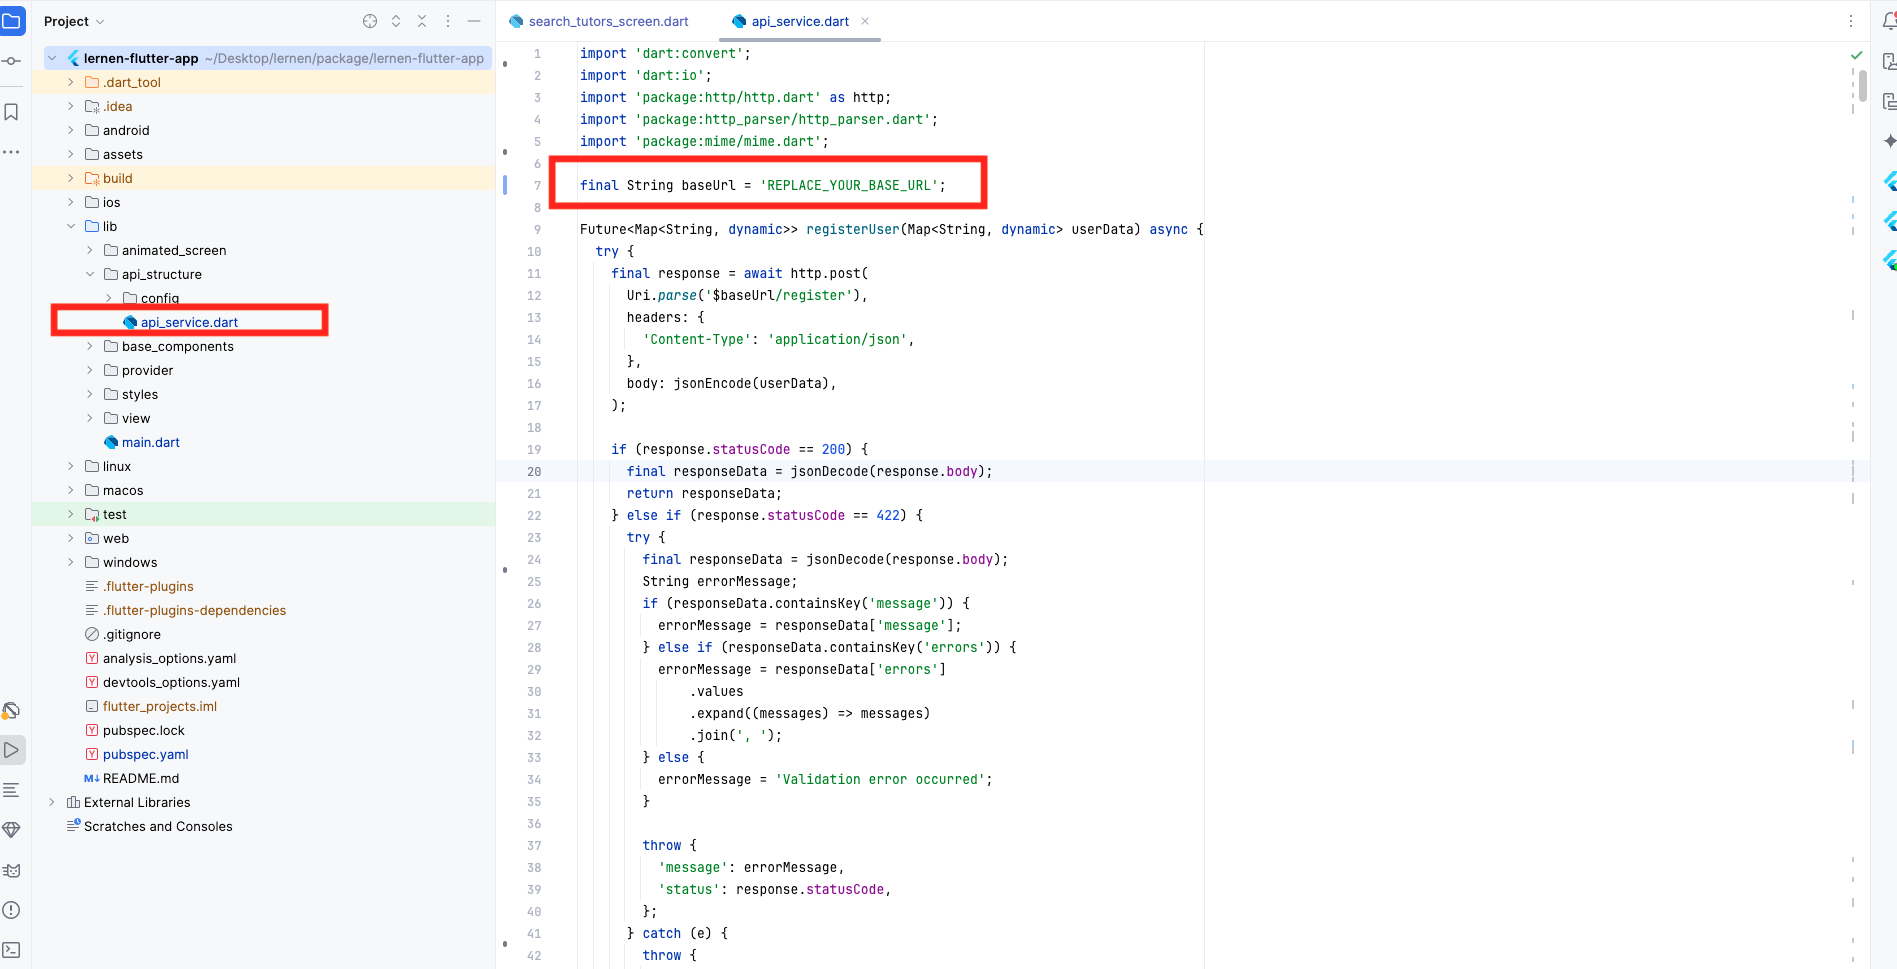
Step 4: Open api_service.dart file under lib/api_structure folder. Make sure Lernen API plugin installed and activated on your site.
Step 5 for IOS: Download Xcode from App store in IOS to test the app on ios device. open ios/yourapp.xcworkSpace file in Xcode and run the project on device
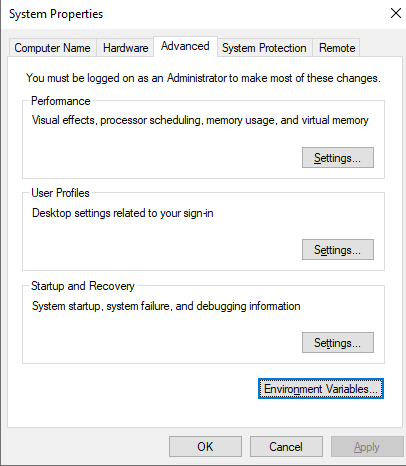
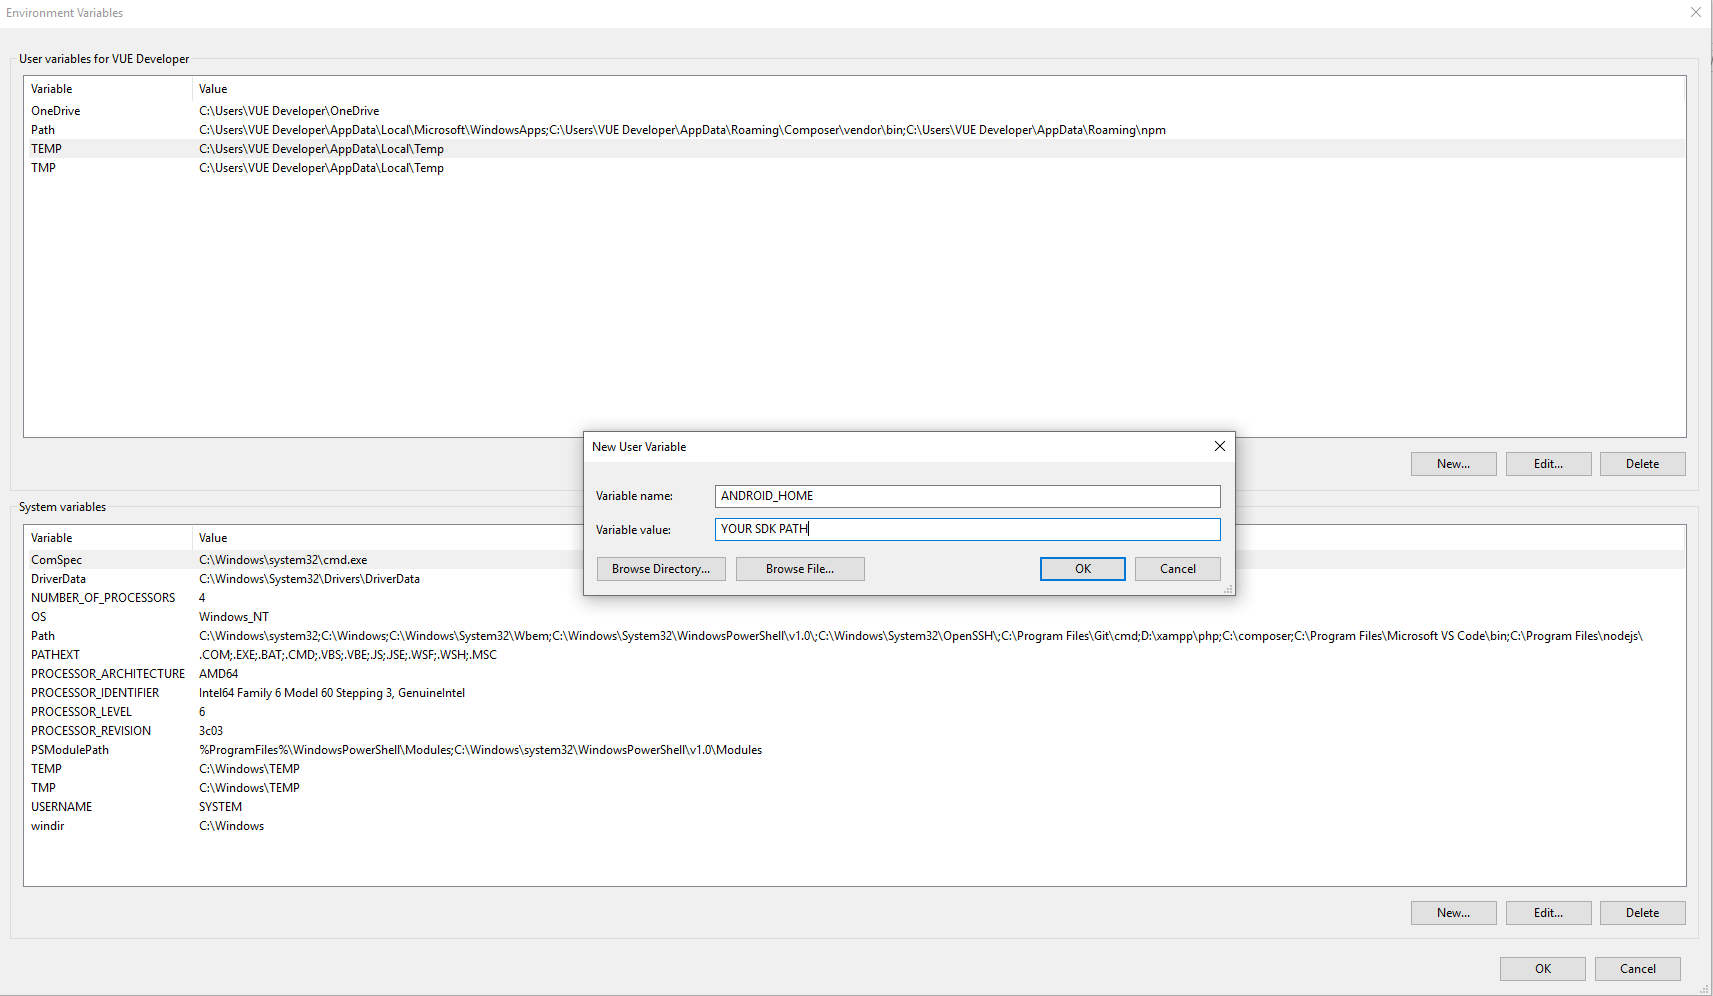
Step 6:Setting ANDROID_HOME environmental variable on Windows
- Where the Android-SDK is installed depends on how you installed it.
- You have to open Environment Variable and add Android Sdk path there
Step 7: Setting ANDROID_HOME environmental variable on MacOS
-
Add the following lines to the end of the file:
export ANDROID_HOME=/Users/your-username/Library/Android/sdkNote: Replace your-username with your actual macOS username and save changes.
General Settings
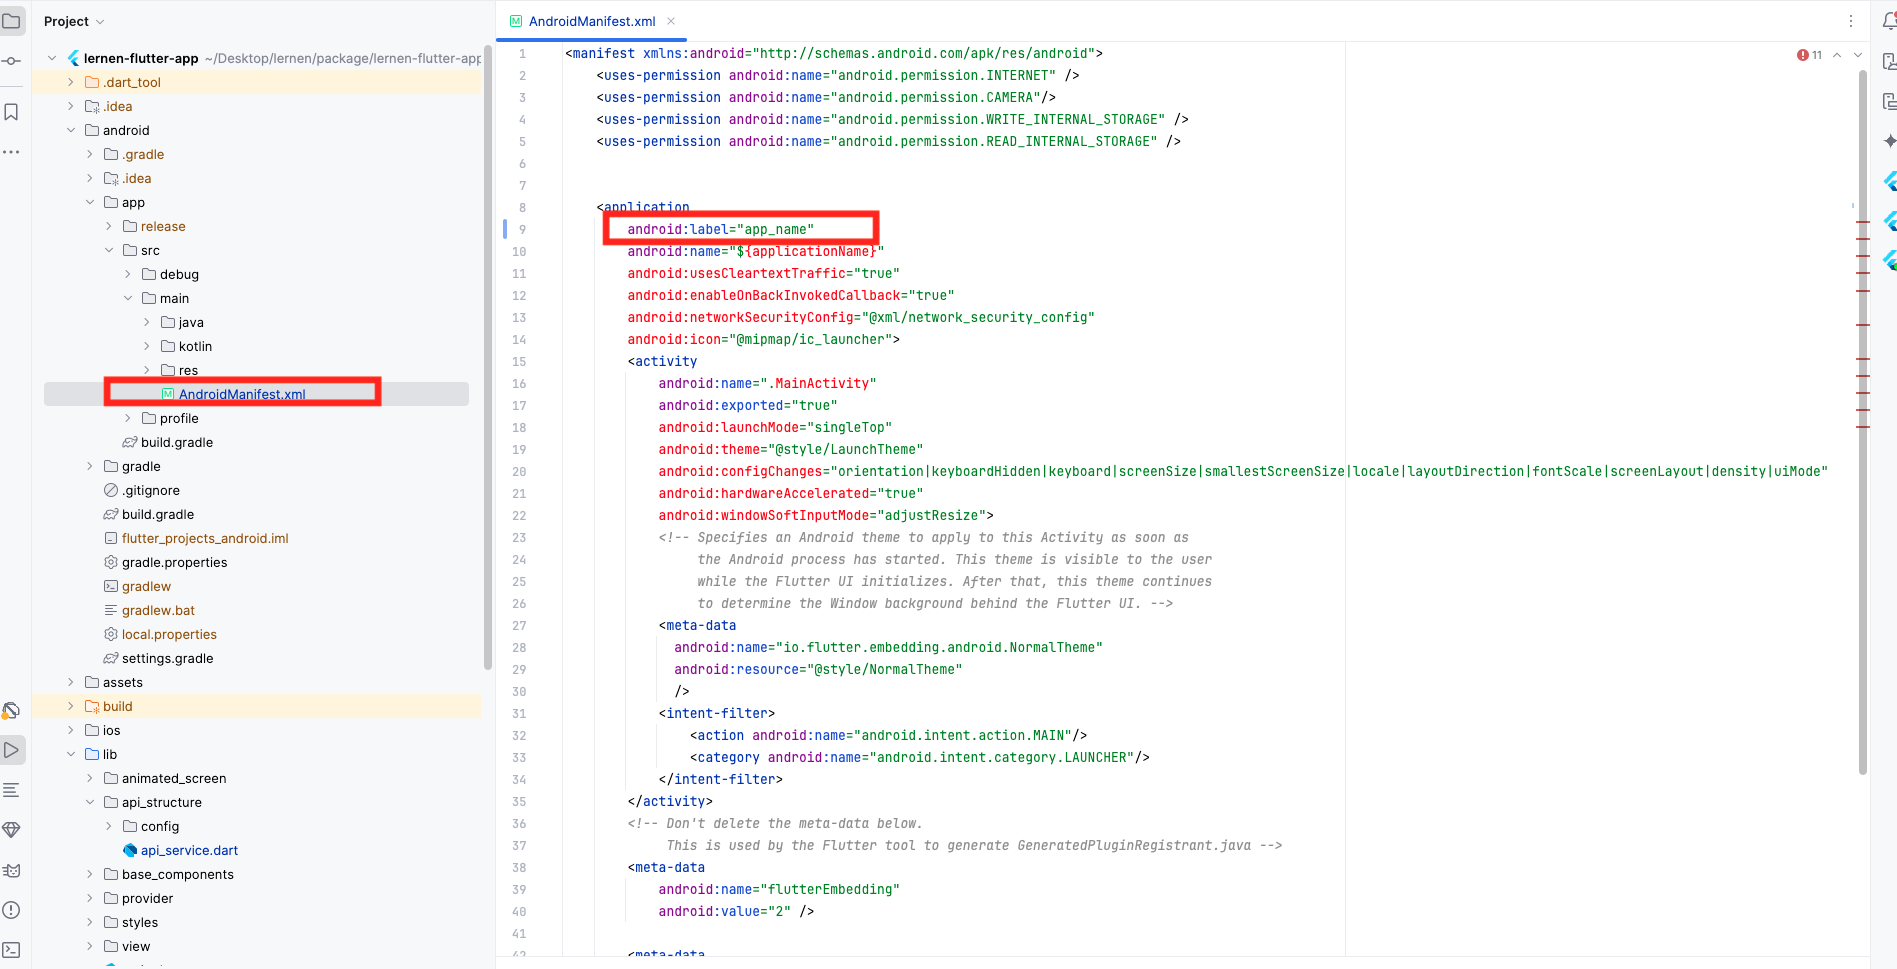
Set name for Android: To change app name, open
android\app\src\main\res\values\AndroidManifest.xml file
and replace android:label key value.
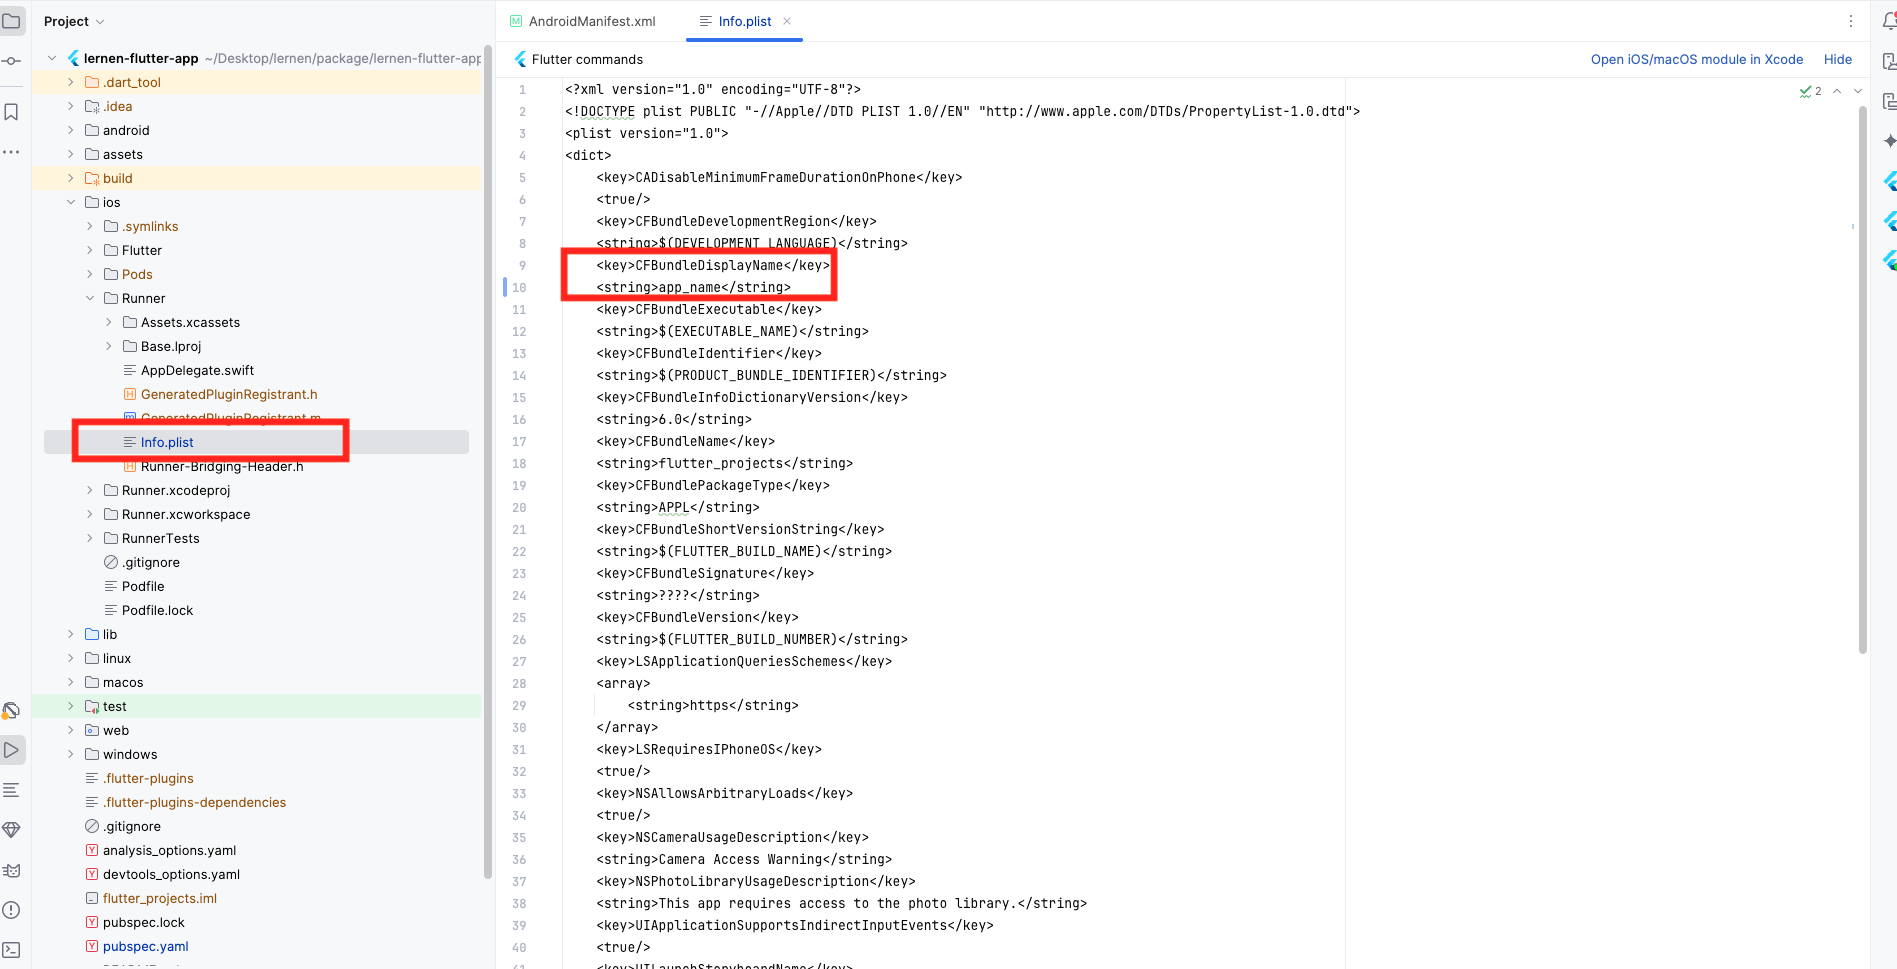
Set name for IOS:To change app name, open ios/Runner/Info.plist under CFBundleDisplayName
Change App Icon for Android: To change app icon, go to android/app/src/main/res/mipmap and replace all mipmap images with your logo
Change App Icon for Ios: To change the application icon for the iOS replace all the content of downloaded makeappicon zip of IOS folder. Go to Xcode YourProject -> Images.xcassets -> Replace all Images from the downloded folder by drag and drop.
Change package name for android: You can modify
app name in file
android\app\src\main\res\values\AndroidManifest.xml
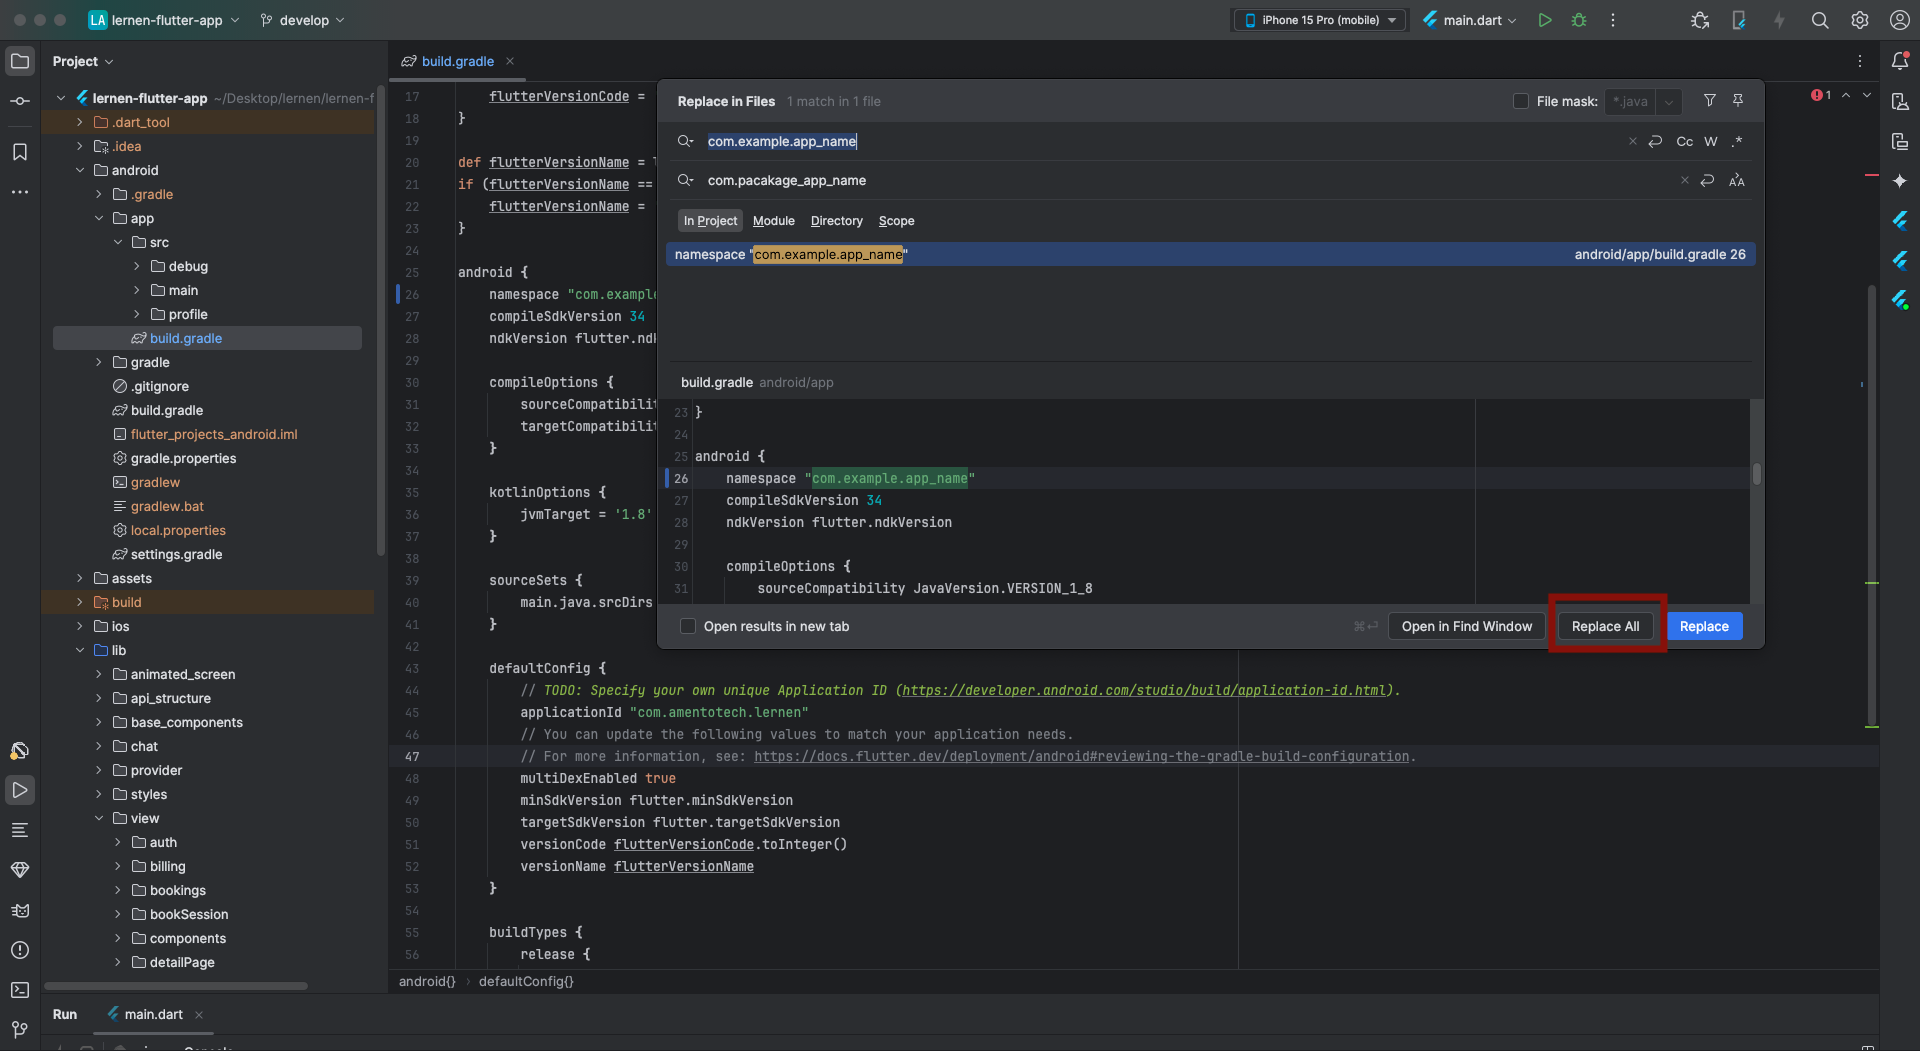
Firstly check package name in android/app/build.gardle folder
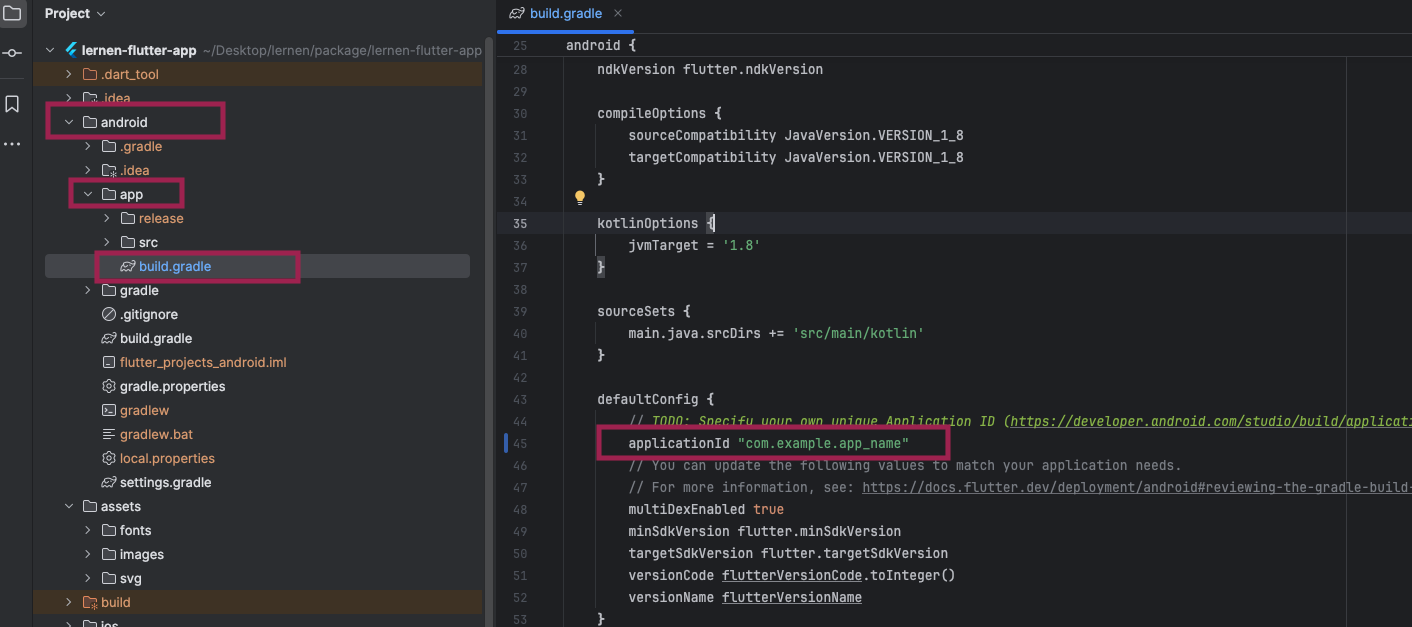
Then you can modify package name like this in windows ctrl+shift+R and in max
command+shift+R then click on Replace All as highlighted
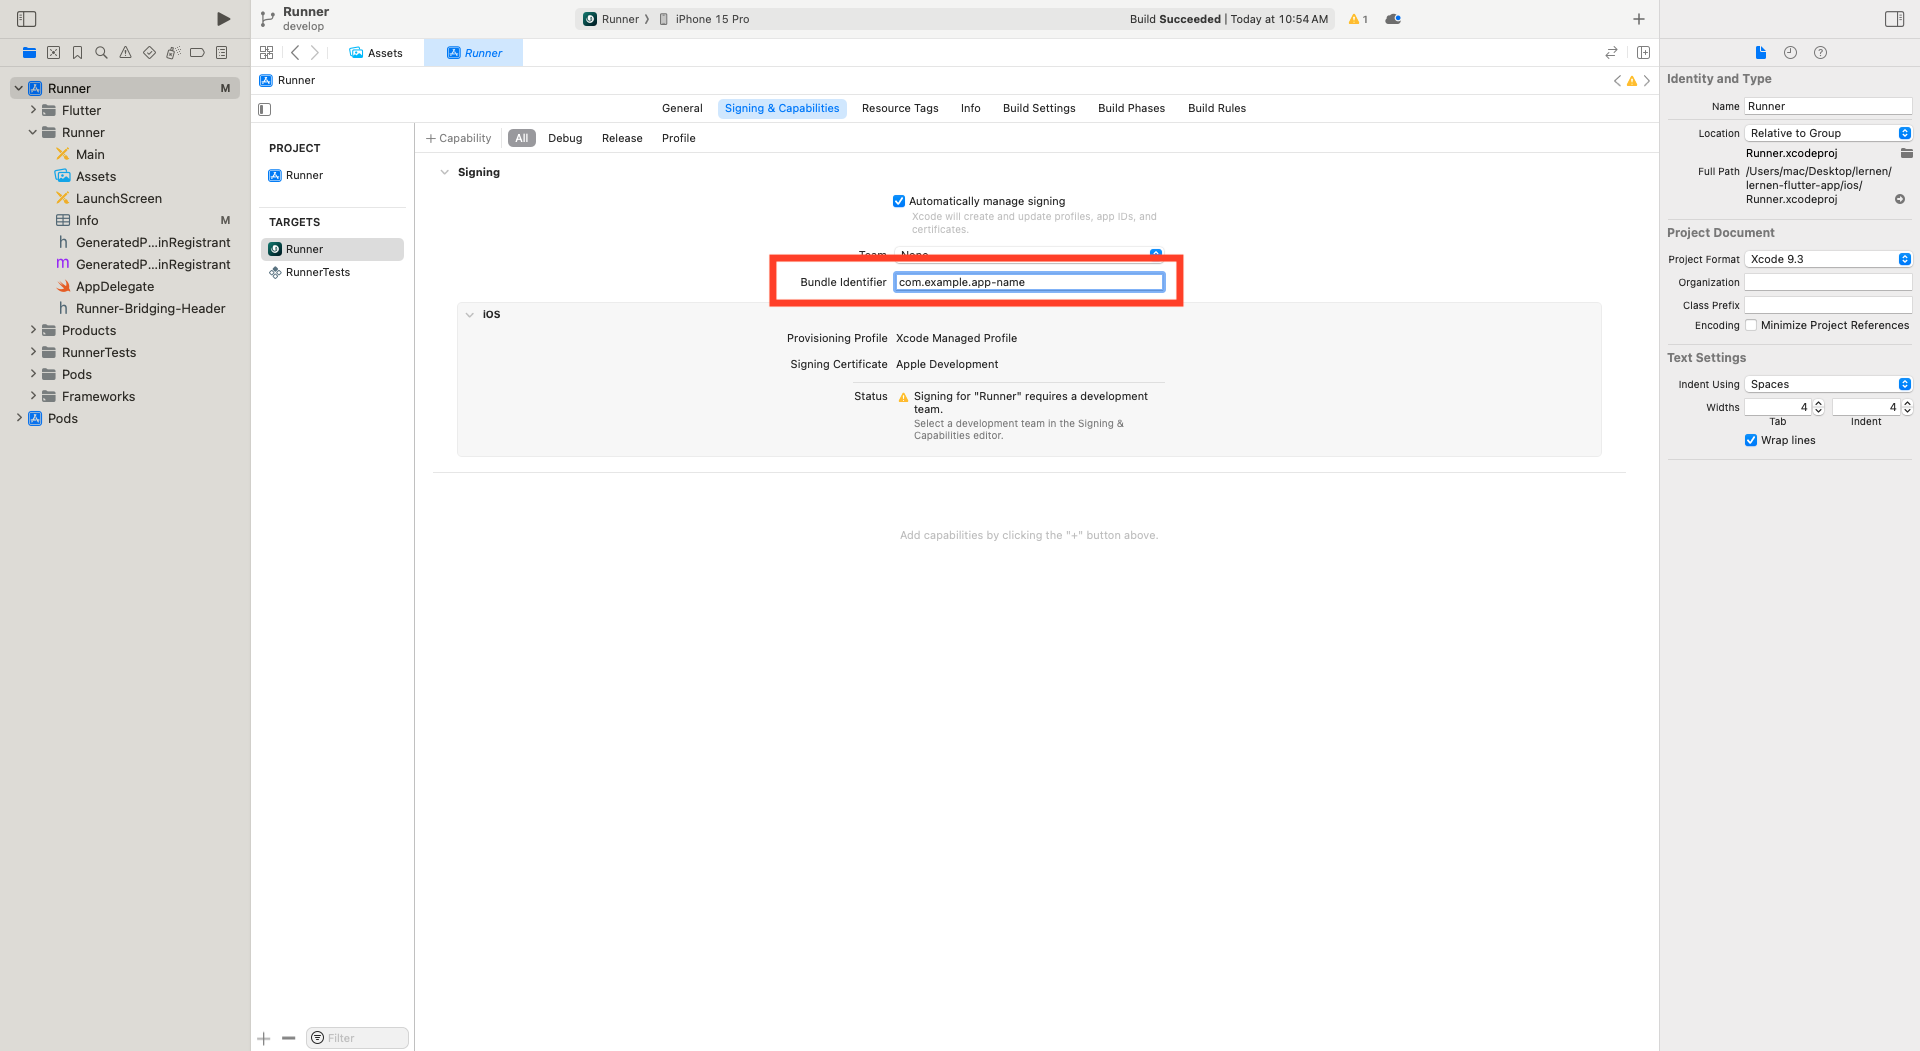
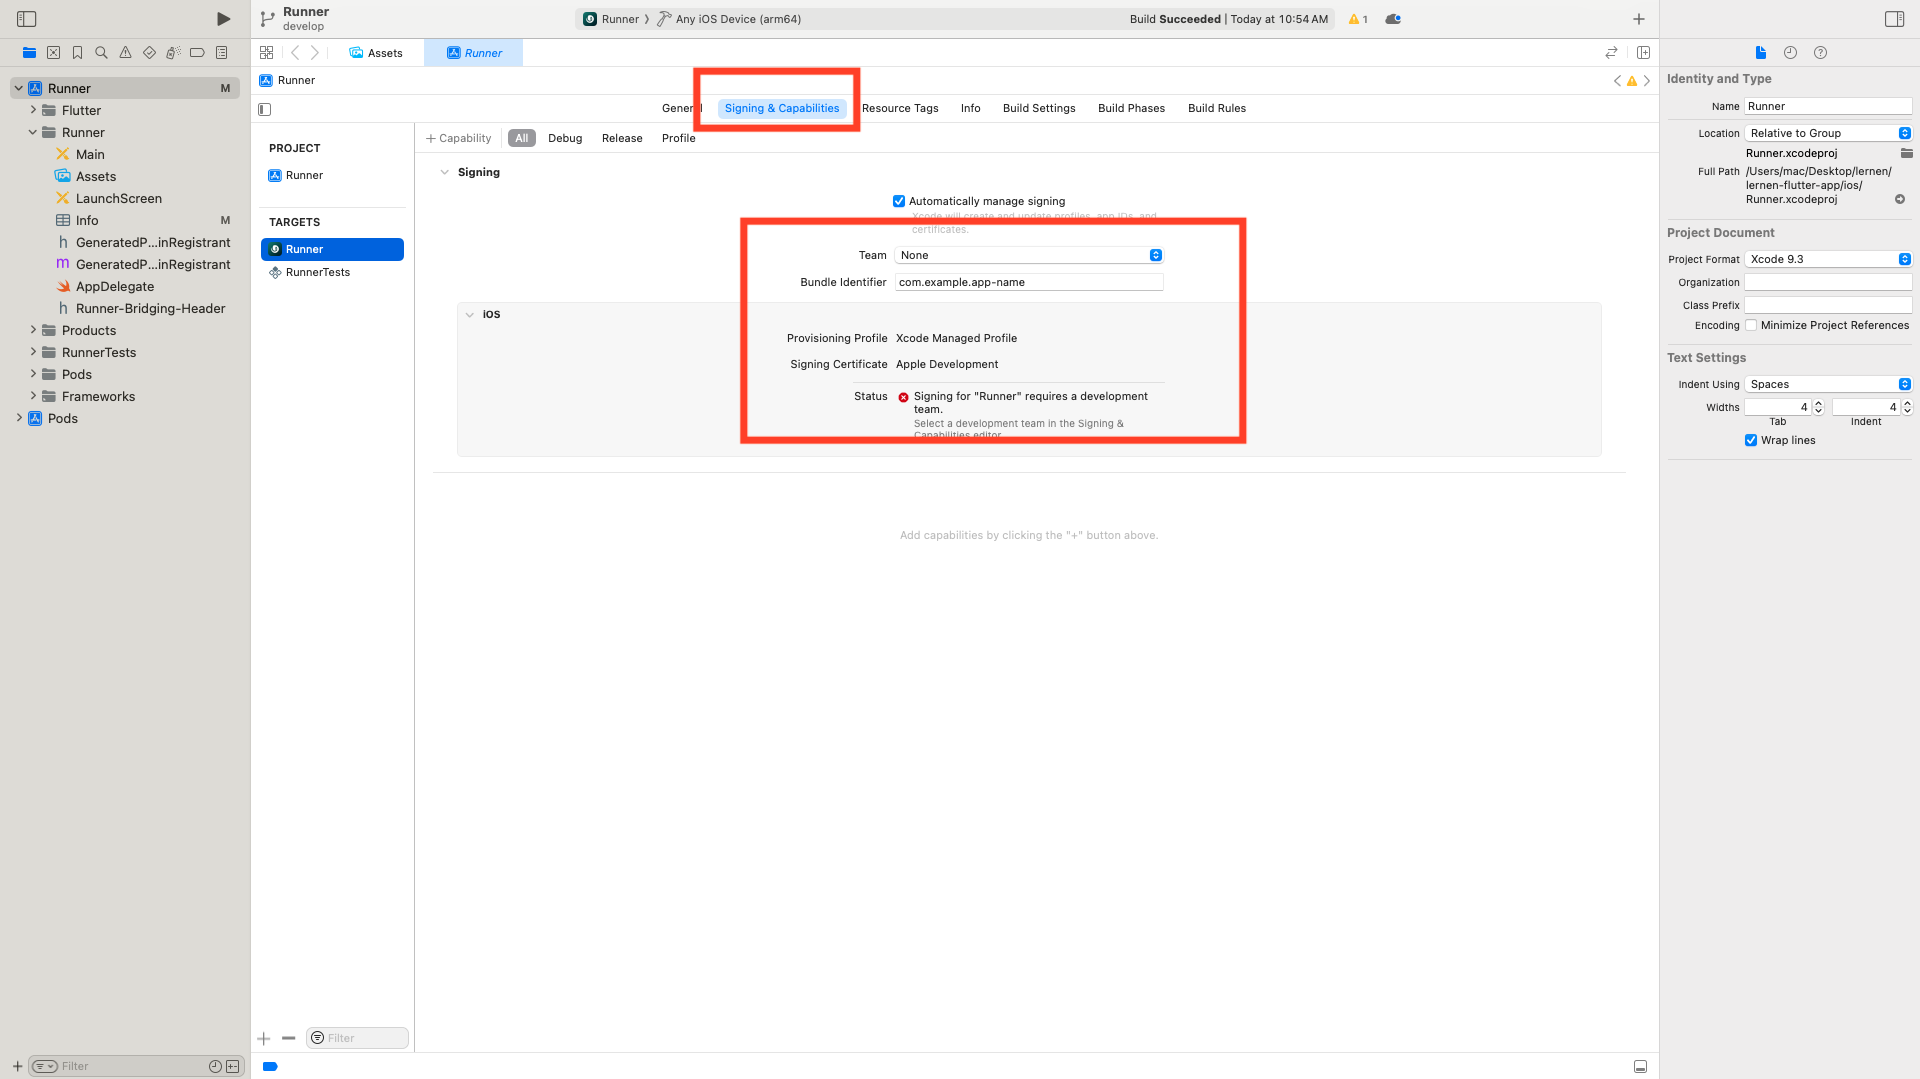
 Change package name in IOS: You can modify
package name in Bundle Identifier
Change package name in IOS: You can modify
package name in Bundle Identifier
Build Apk
Build Apk: You can build and apk like this
First open Flutter project in Android Studio
On Top toolbar Android Studio there is a Build Tab.
Click on Build then it shows multiple options. Then Click on Flutter.

Now Flutter open and it shows build types, then click on Build APK.

Congratulations! After some time apk generated

Now get apk from folder, firstly go to project folder there is build folder, open app folder, open outputs folder and open flutter-apk folder then use app-release.apk

Release Build
For Android: You can generate build for Android like this
Clean Project: After development You can clean your project like this
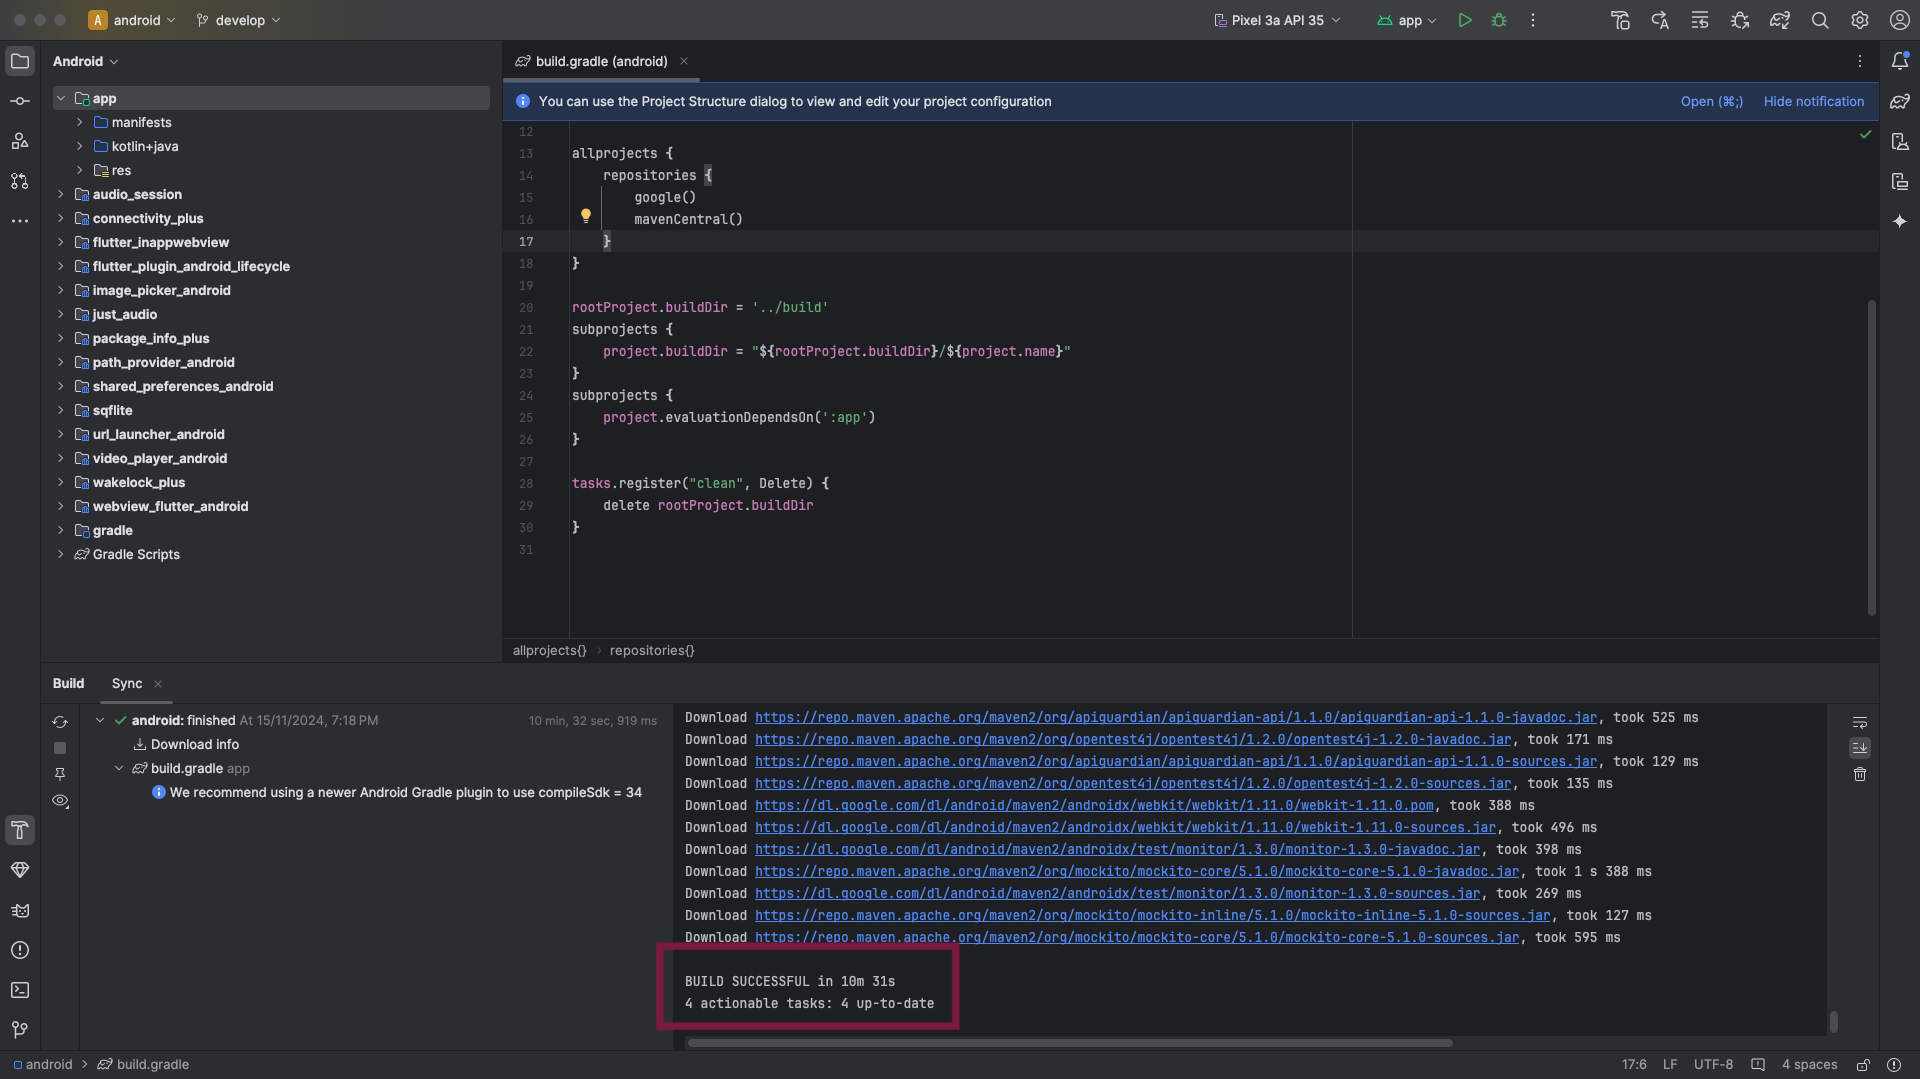
First open Flutter project android folder in Android Studio then it will take some time to gradle syncing

android folder seperately open in Android studio then syncing take some time
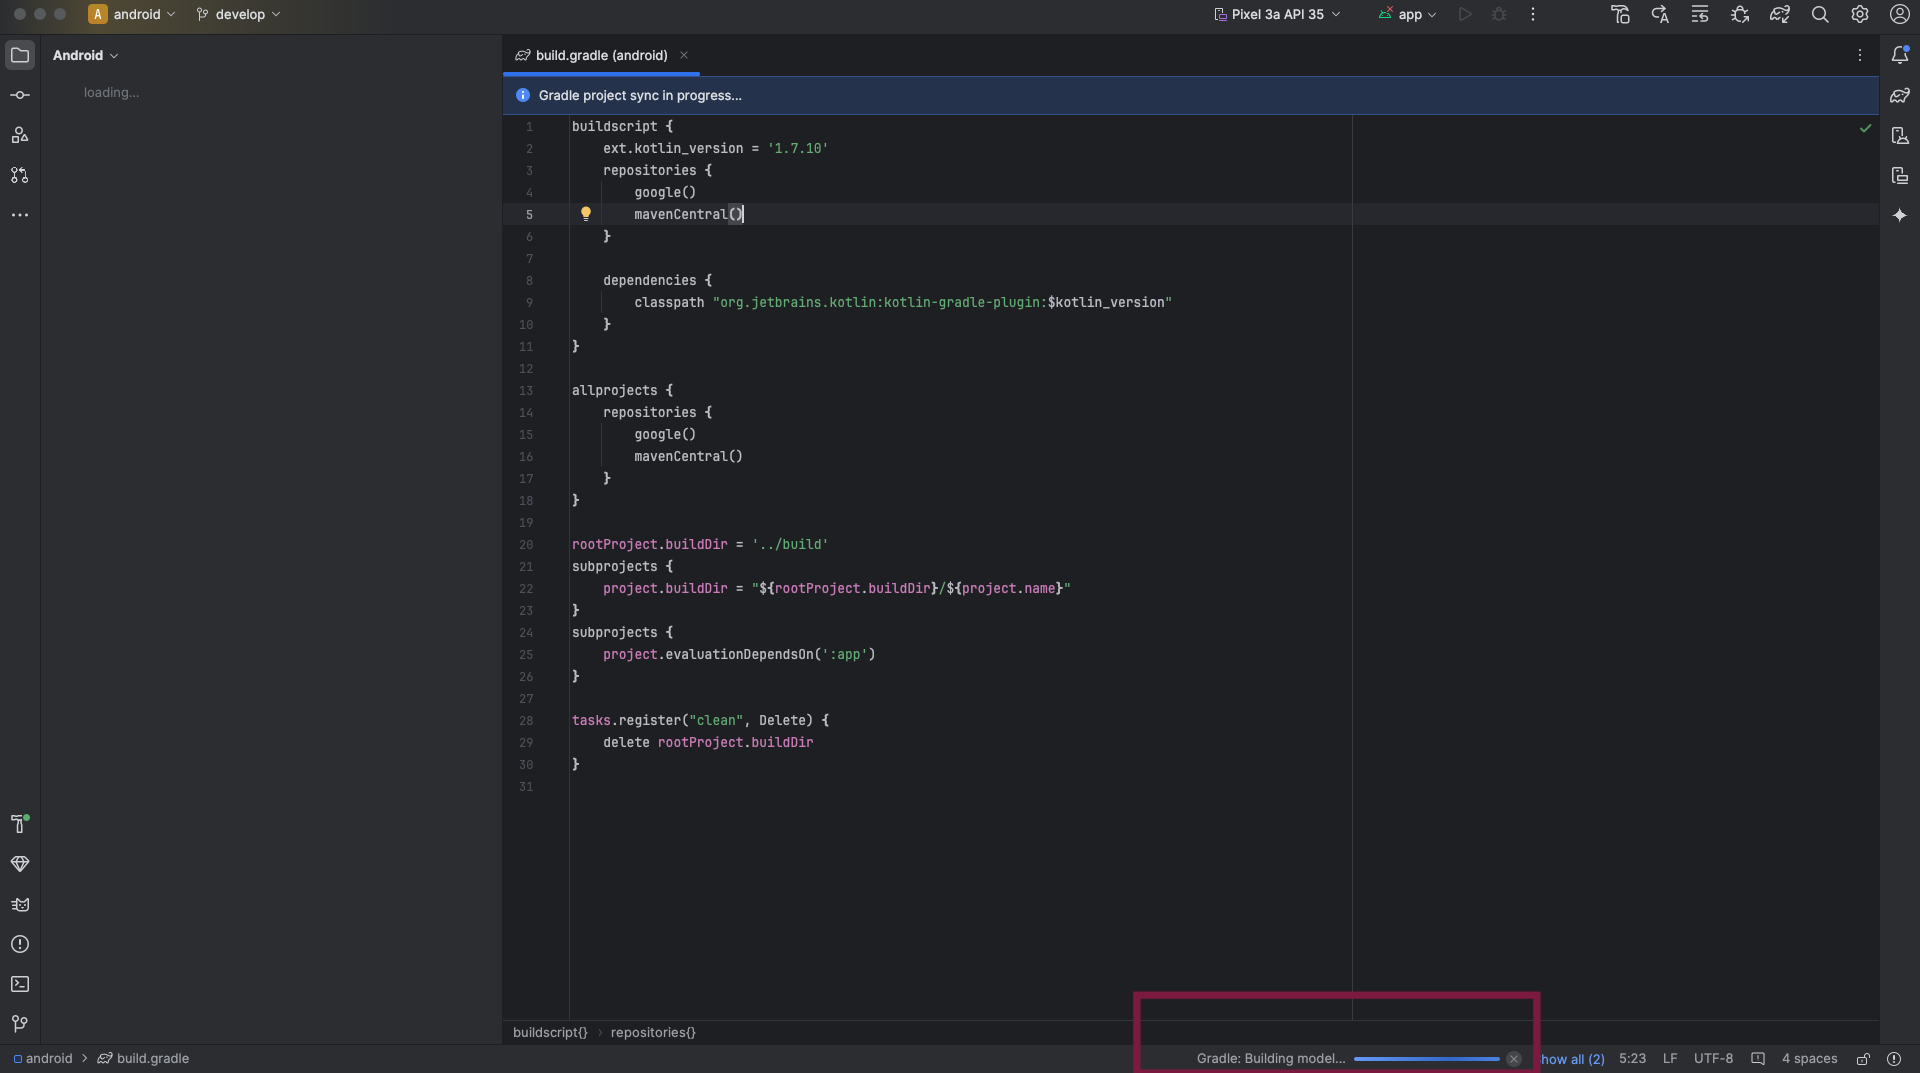
after syncing completed
 Then you have to set the generated file my-release-key.keystore
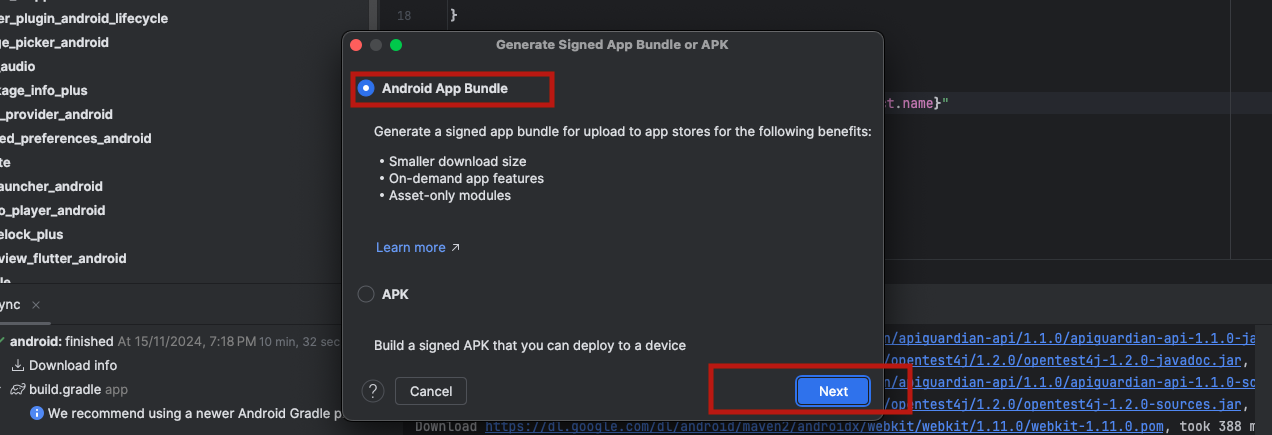
Click on Gnerate Signed App Bundle / APK...

by default bundle selected click next
Write name of keystore then click on new
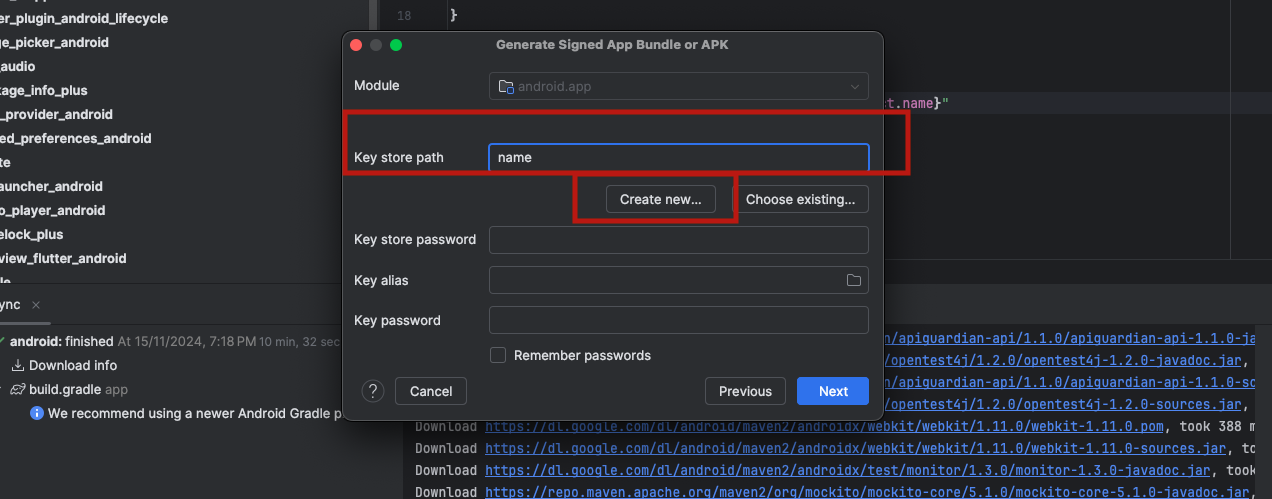
Fill Fields as per your requirement and select path where to save keystore then click next
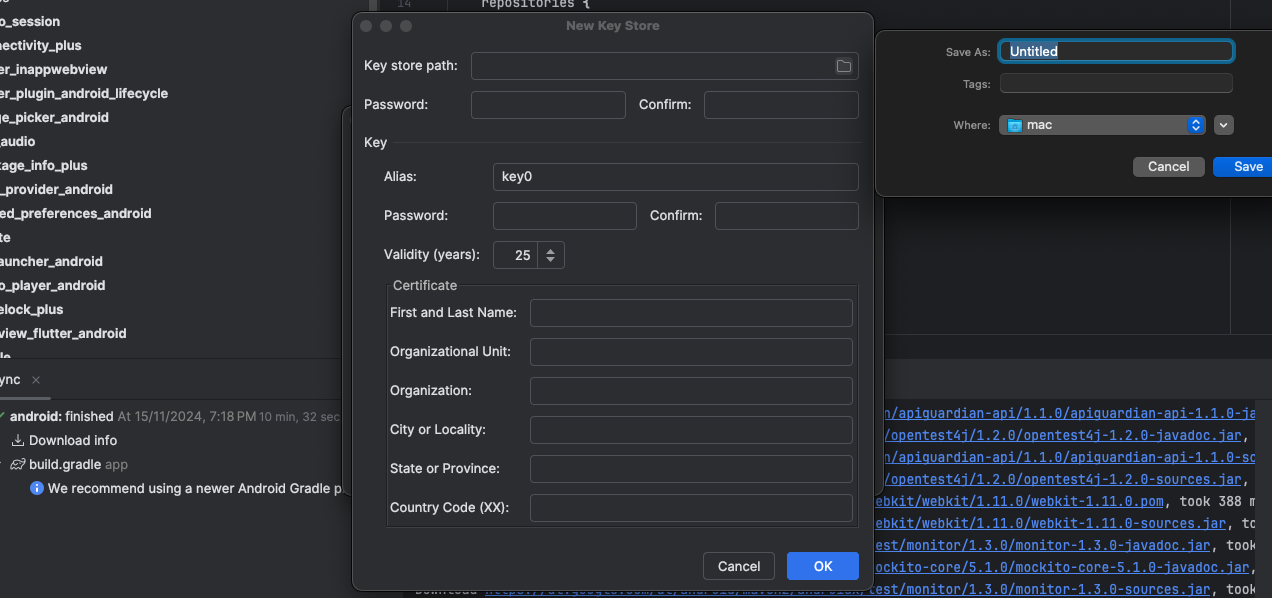
then click nect again to create bundle and make sure keystore path should be filled

tap on next to create release aab file to upload on your console account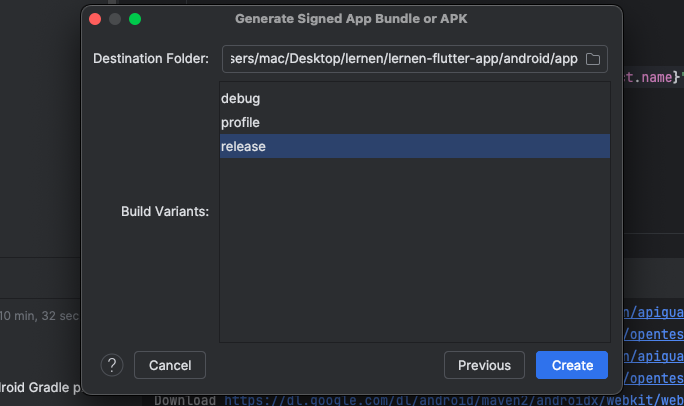
Congratulations! you successfully created .aab file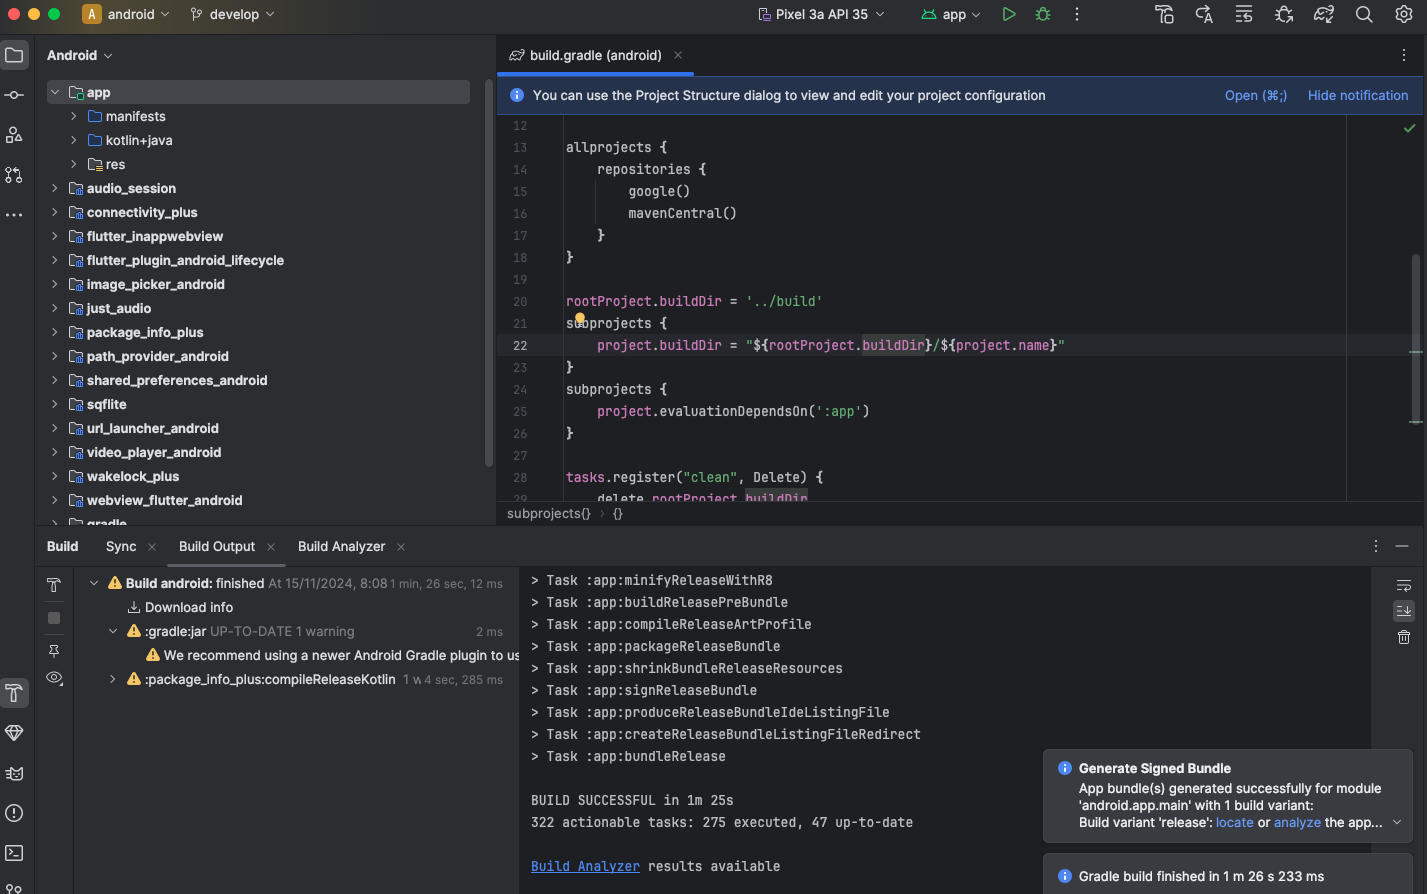
Clean Project
First open Flutter project in Android Studio
On Top toolbar Android Studio there is a Tools Tab.
Click on Tools and it shows multiple options. Then Click on Flutter.

Now Flutter show multiple options then click on Flutter Clean

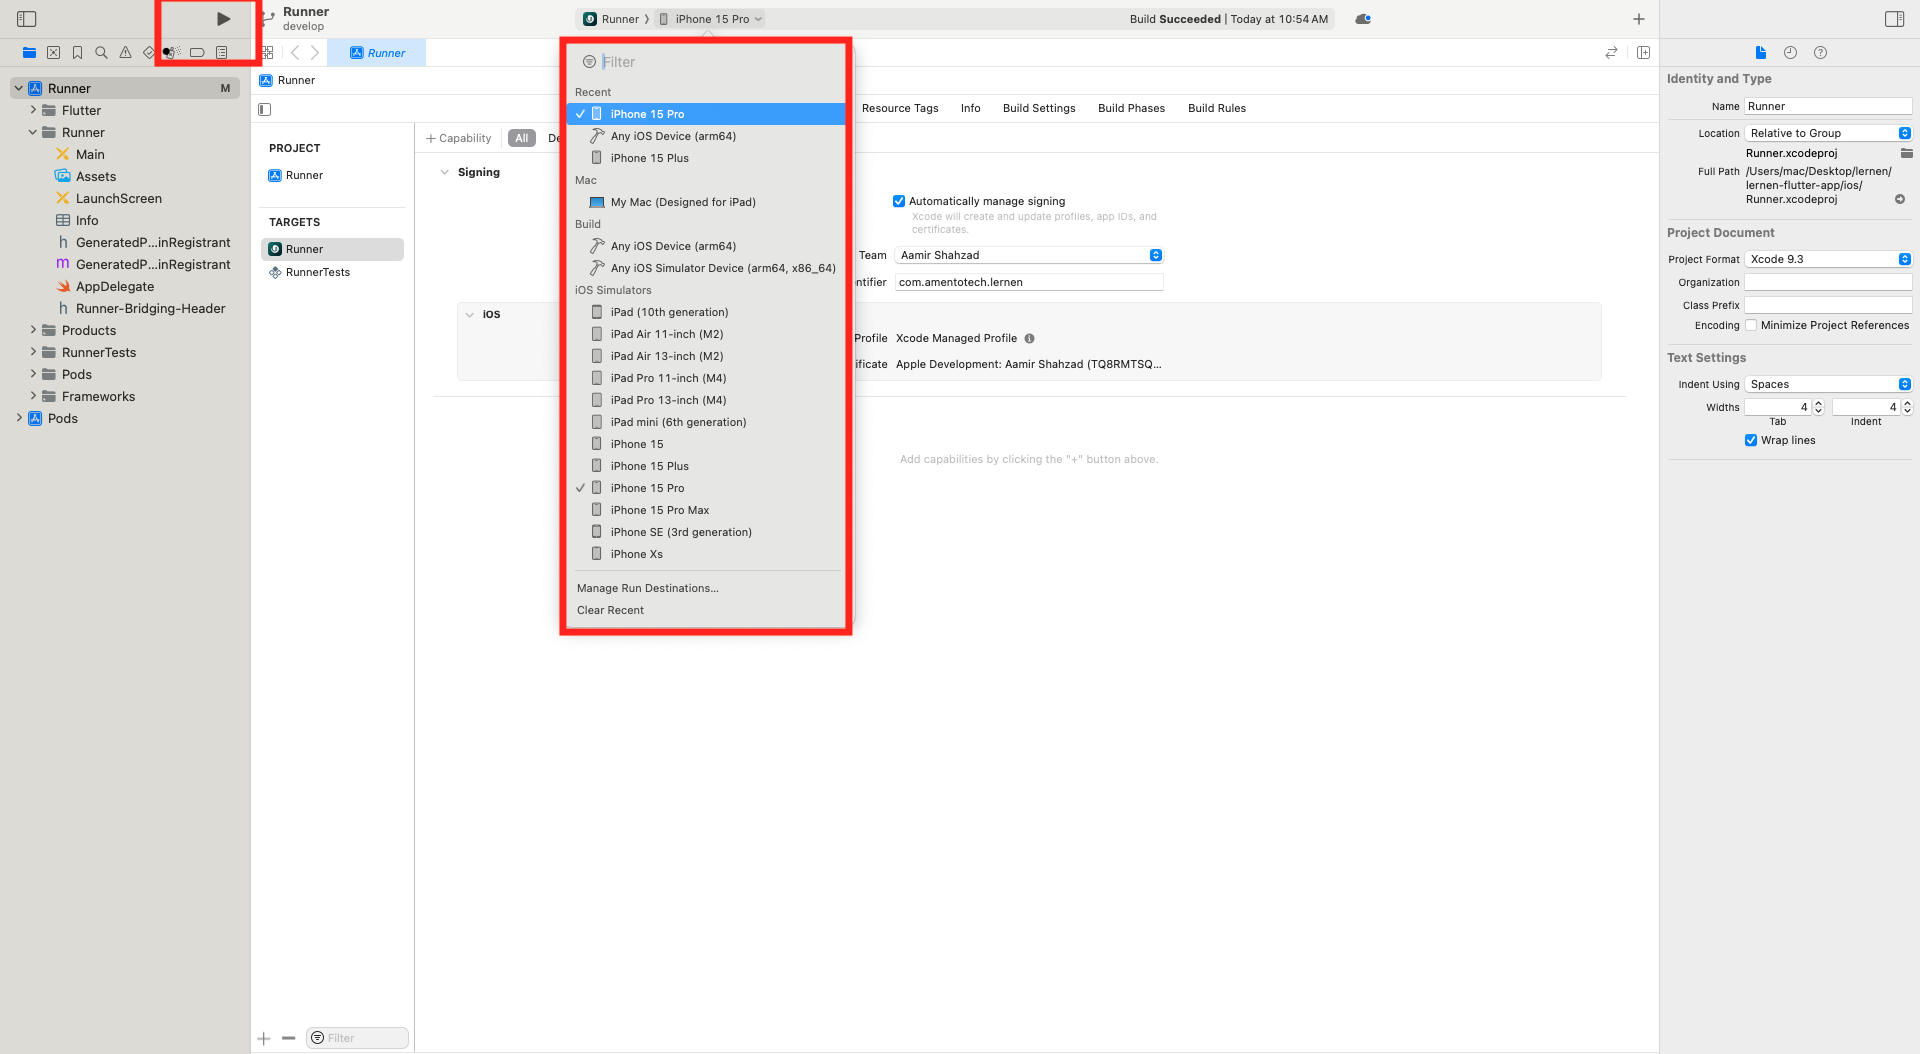
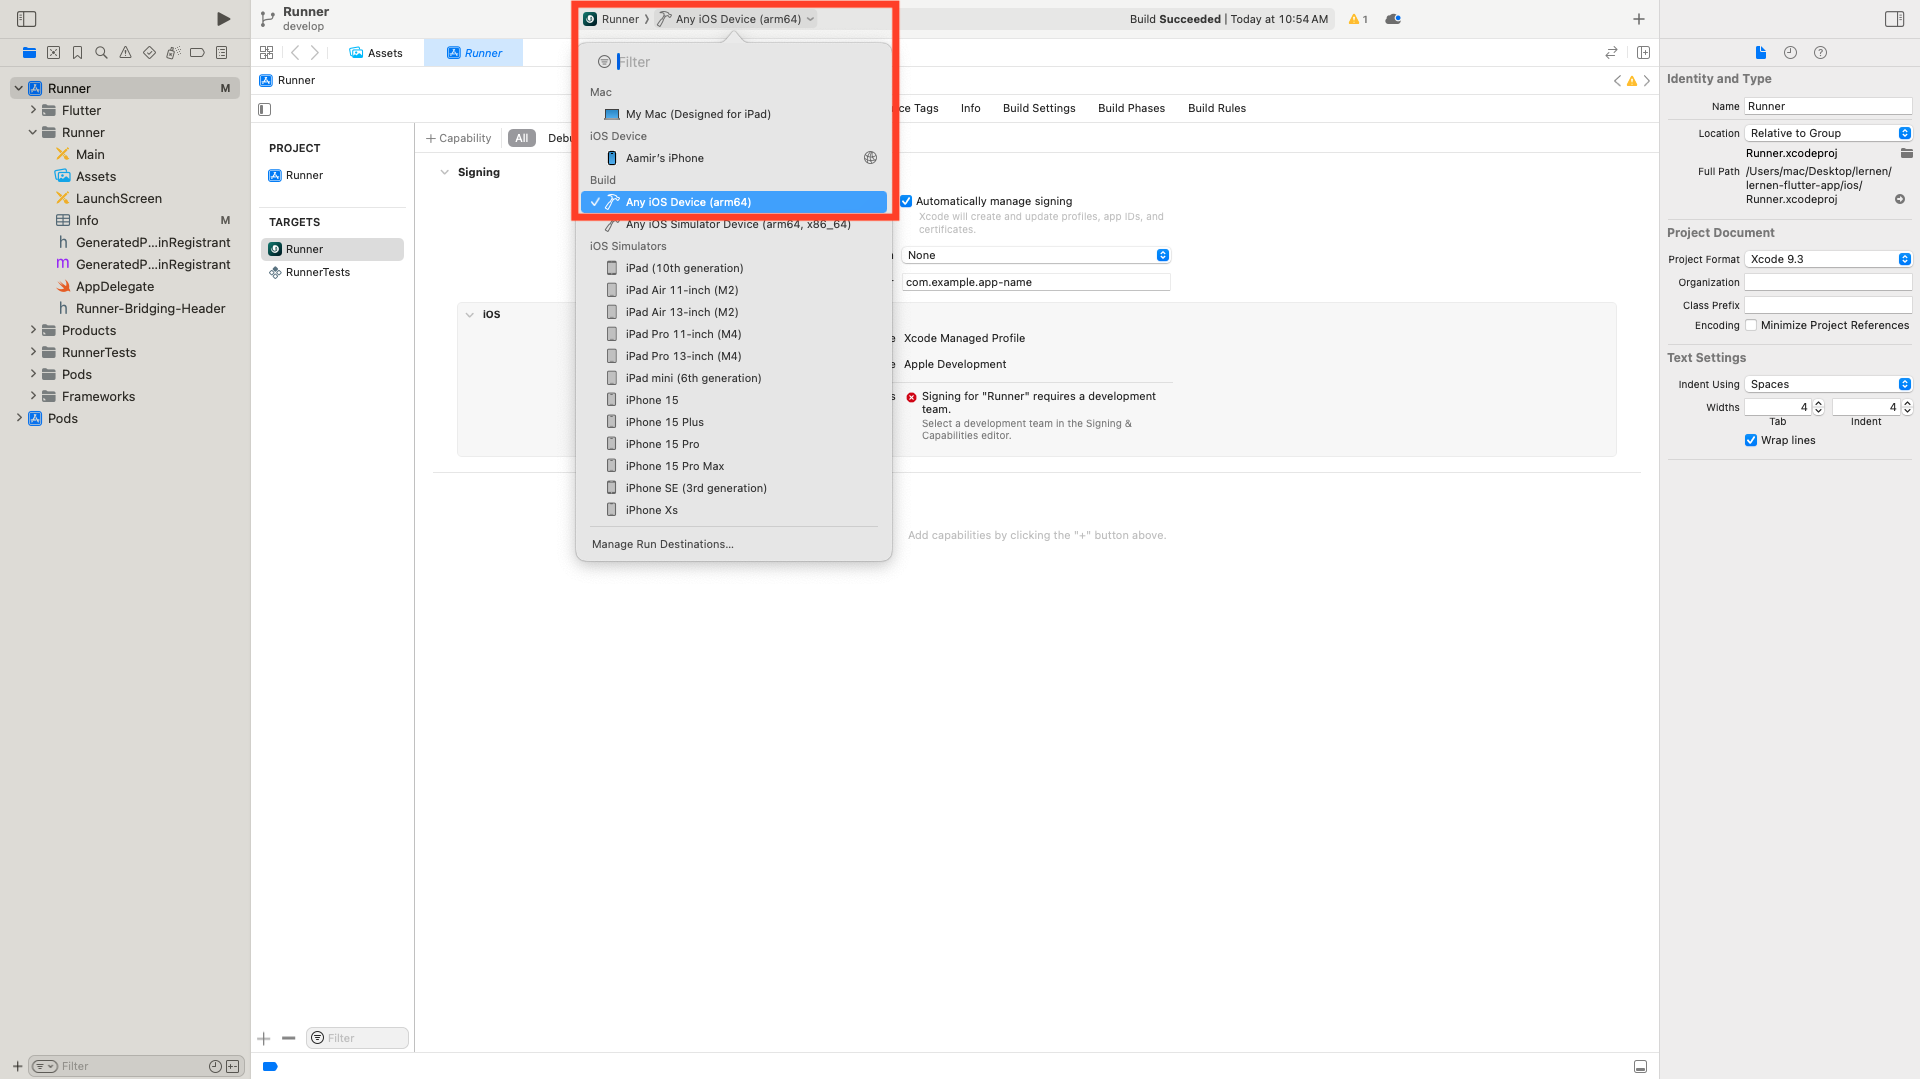
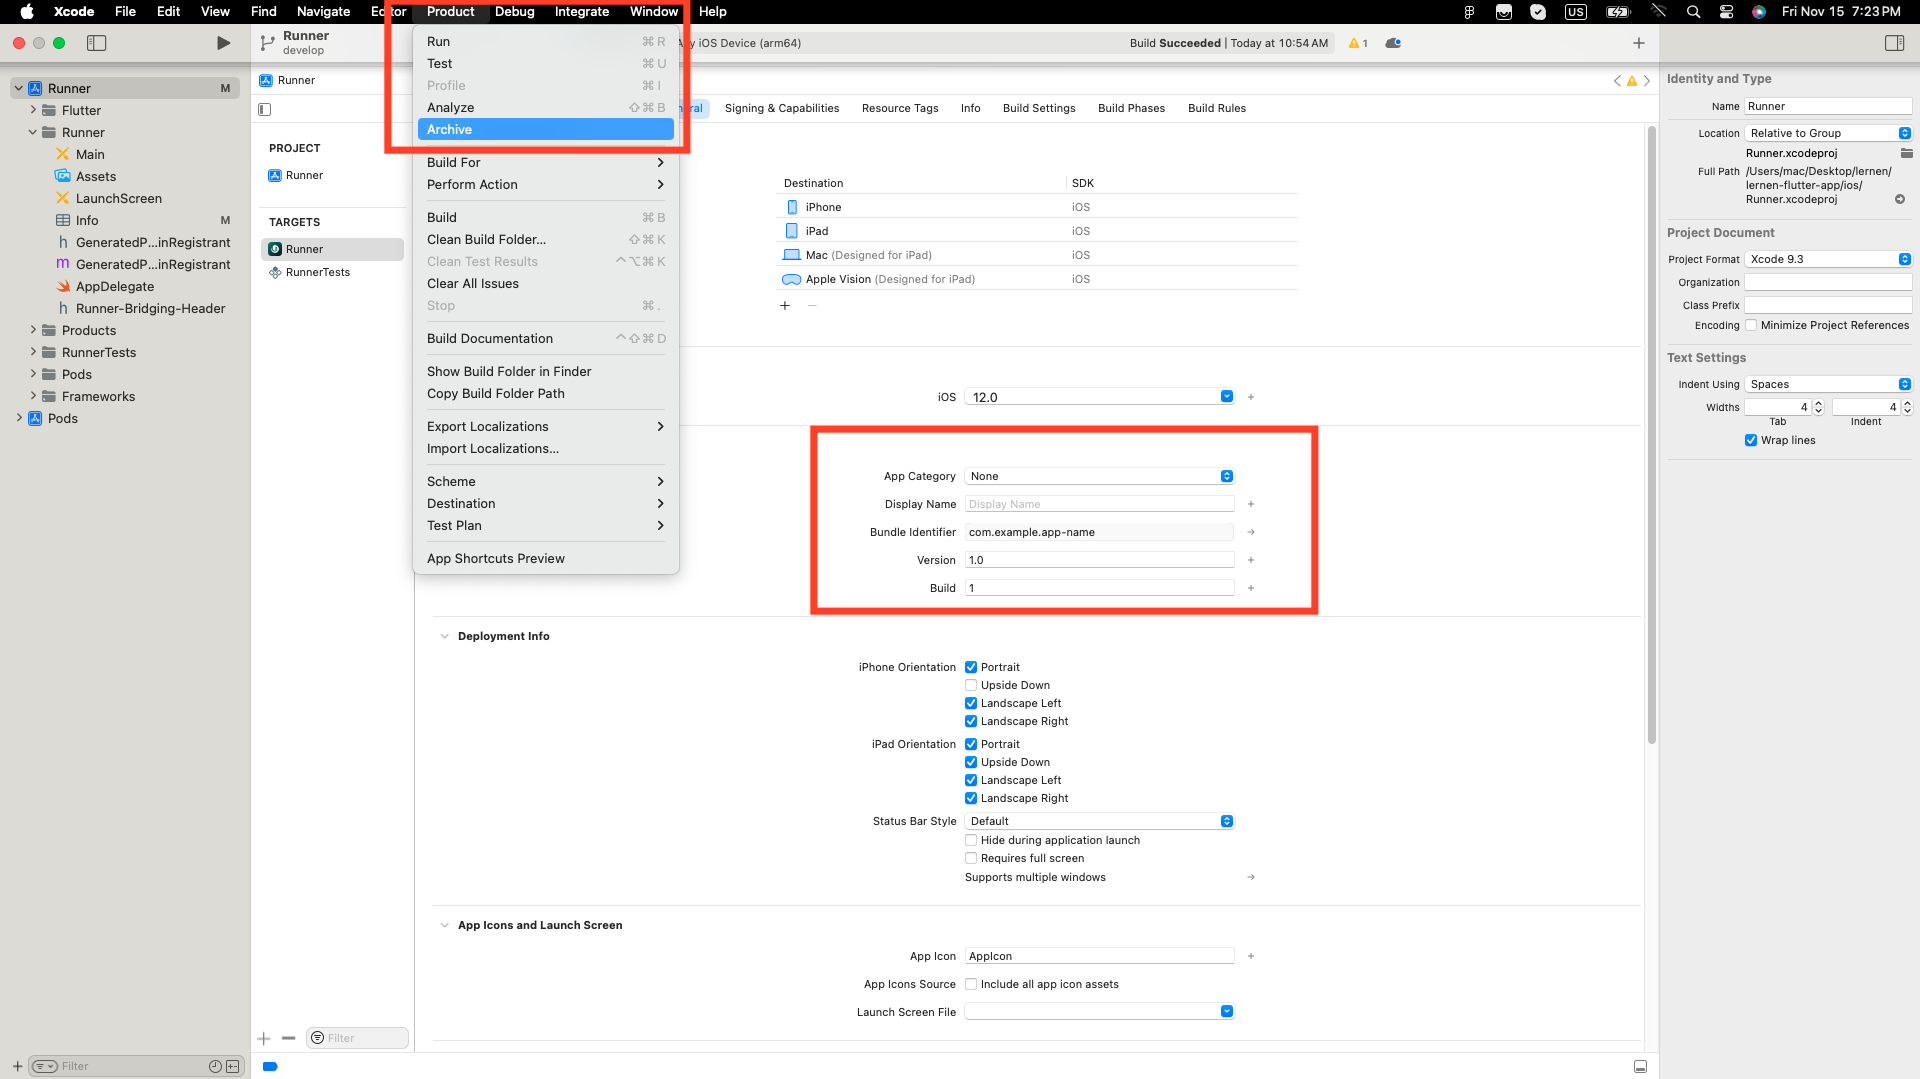
For IOS: You have to make some changes in Xcode. First you need to do purchase Apple Developer Account then after it go to your Xcode, select the Build device as Any iOS Device(arm64) and then open the tab of product/Archive after change version and build number for release.
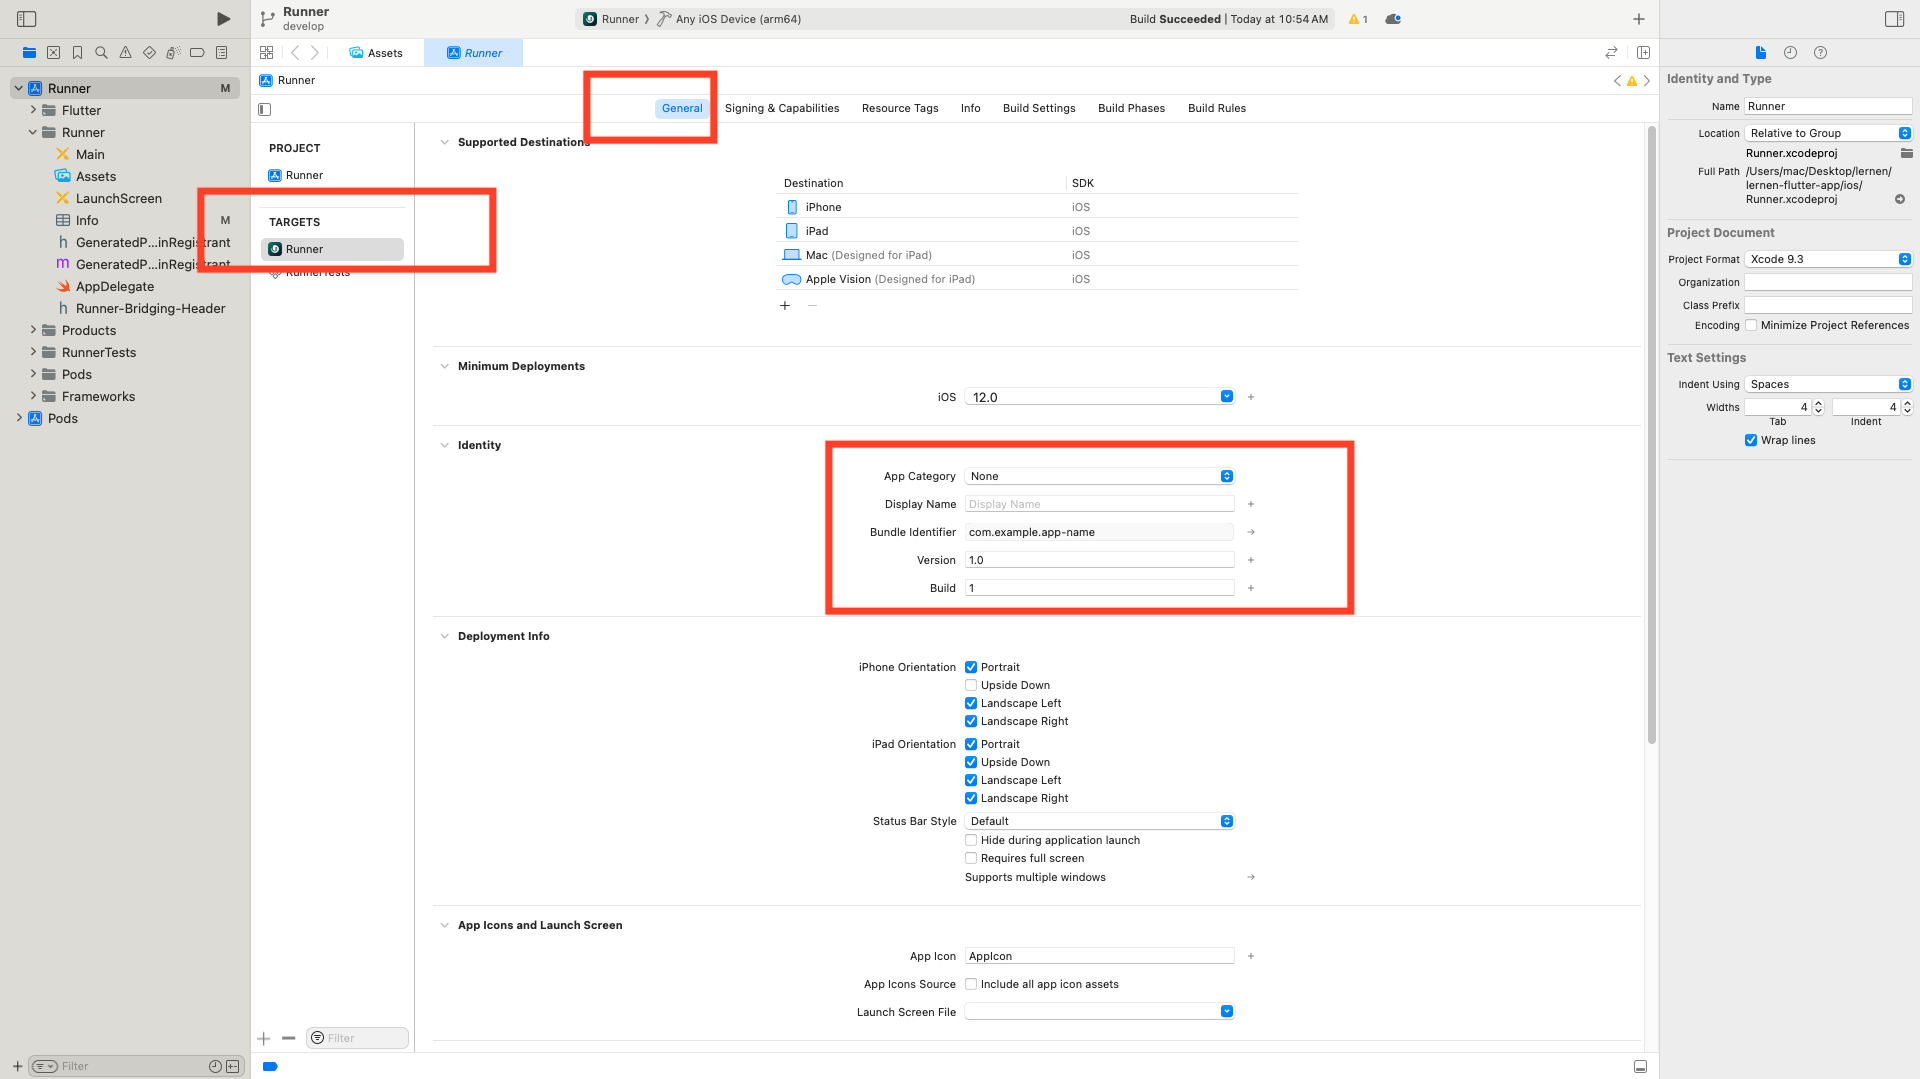
 For IOS: Check General settings
For IOS: When Account purcahse just make sure team should not be empty
IOS App Deployment: Open the tab of product/Archive after change version and build number for release.
For Google Social Login Android: Need client id for this.
How to get Client ID: Must ADD SHA1 key in your Google Cloud Console.
How to generate SHA1 key ?: Use this below command in your Editor terminal for debug mode Command for debug mode: keytool -list -v -alias androiddebugkey -keystore ~/.android/debug.keystore -storepass android -keypass android For relase mode: Make sure your generated jks file in your project android folder
Command for release mode: keytool -list -v -keystore android/YOUR_JKS_NAME.jks -alias YOUR_KEY_ALIAS_NAME -storepass YOUR_JKS_PASSWORD
When app deployed to playstore with aab file: Follow these instructions:
1. Open your Play Console.
2. Go to Test and Release.
3. Select App Integrity.
4. Find the App Signing Key Certificate and take a screenshot of the "SHA-1 certificate fingerprint".
For relase mode: Make sure your generated jks file in your project android folder
Command for release mode: keytool -list -v -keystore android/YOUR_JKS_NAME.jks -alias YOUR_KEY_ALIAS_NAME -storepass YOUR_JKS_PASSWORD
When app deployed to playstore with aab file: Follow these instructions:
1. Open your Play Console.
2. Go to Test and Release.
3. Select App Integrity.
4. Find the App Signing Key Certificate and take a screenshot of the "SHA-1 certificate fingerprint".
Follow this tutorial video for the step-by-step guide: Watch the tutorial here
Just a quick note: Ignore the Firebase part in the video, as it's not relevant to your setup.
How to add SHA1 key in your Google Cloud Console: These are steps to add SHA1:
1. Go to your Google Cloud Console Project. 2. Navigate to APIs & Services > Credentials. 3. Select Android as the application type. 4. Find your OAuth 2.0 Client ID for Android. 5. Add the SHA-1 fingerprint under the package name.For Google Social Login IOS: Need client id for this.
How to get Client ID: Follow these below steps
1. Go to your Google Cloud Console Project. 2. Navigate to Credentials in your project. 3. Click Create Credentials → OAuth Client ID. 4. Select iOS as the application type. 5. Enter your iOS app’s Bundle Identifier (you can find this in your Xcode project under Target > General > Bundle Identifier). 6. Click Create to generate an OAuth Client ID for iOS. 7. Note down the Client ID. After these steps now download .plist file. Now copy REVERSED_CLIENT_ID and CLIENT_ID from your .plist file. Add some below permission in your info.plist: Navigate to ios folder > Runner folder > Info.plist
        <key>CFBundleURLTypes</key>
        <array>
            <dict>
                <key>CFBundleURLSchemes</key>
                <array>
                    <string>YOUR_REVERSE_CLIENT_ID</string>
                </array>
            </dict>
        </array>
        <key>CLIENT_ID</key>
        <string>YOUR_CLIENT_ID</string>
Enable iOS Capabilities: Follow these below steps
1. In Xcode, open your project. 2. Go to Signing & Capabilities under your target. 3. Enable the following: Keychain Sharing (required for Google Sign-In). Click on + Capability Then search "Keychain Sharing" keyword and click on it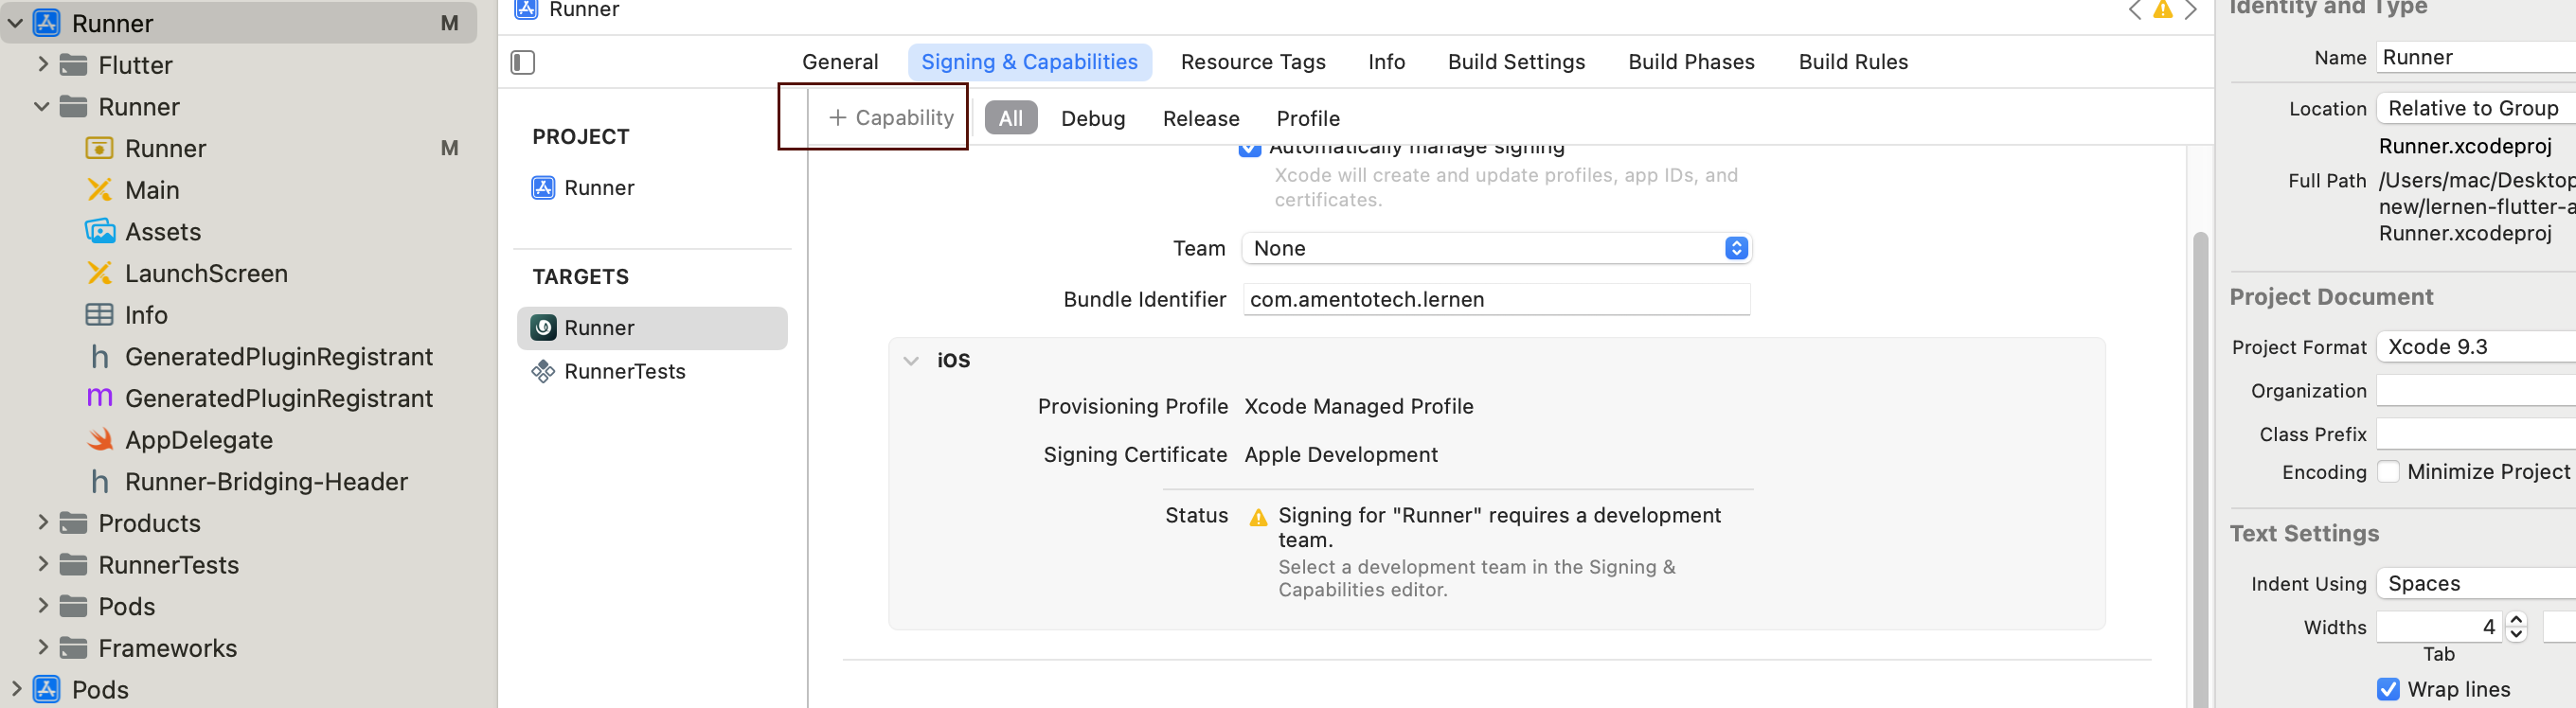
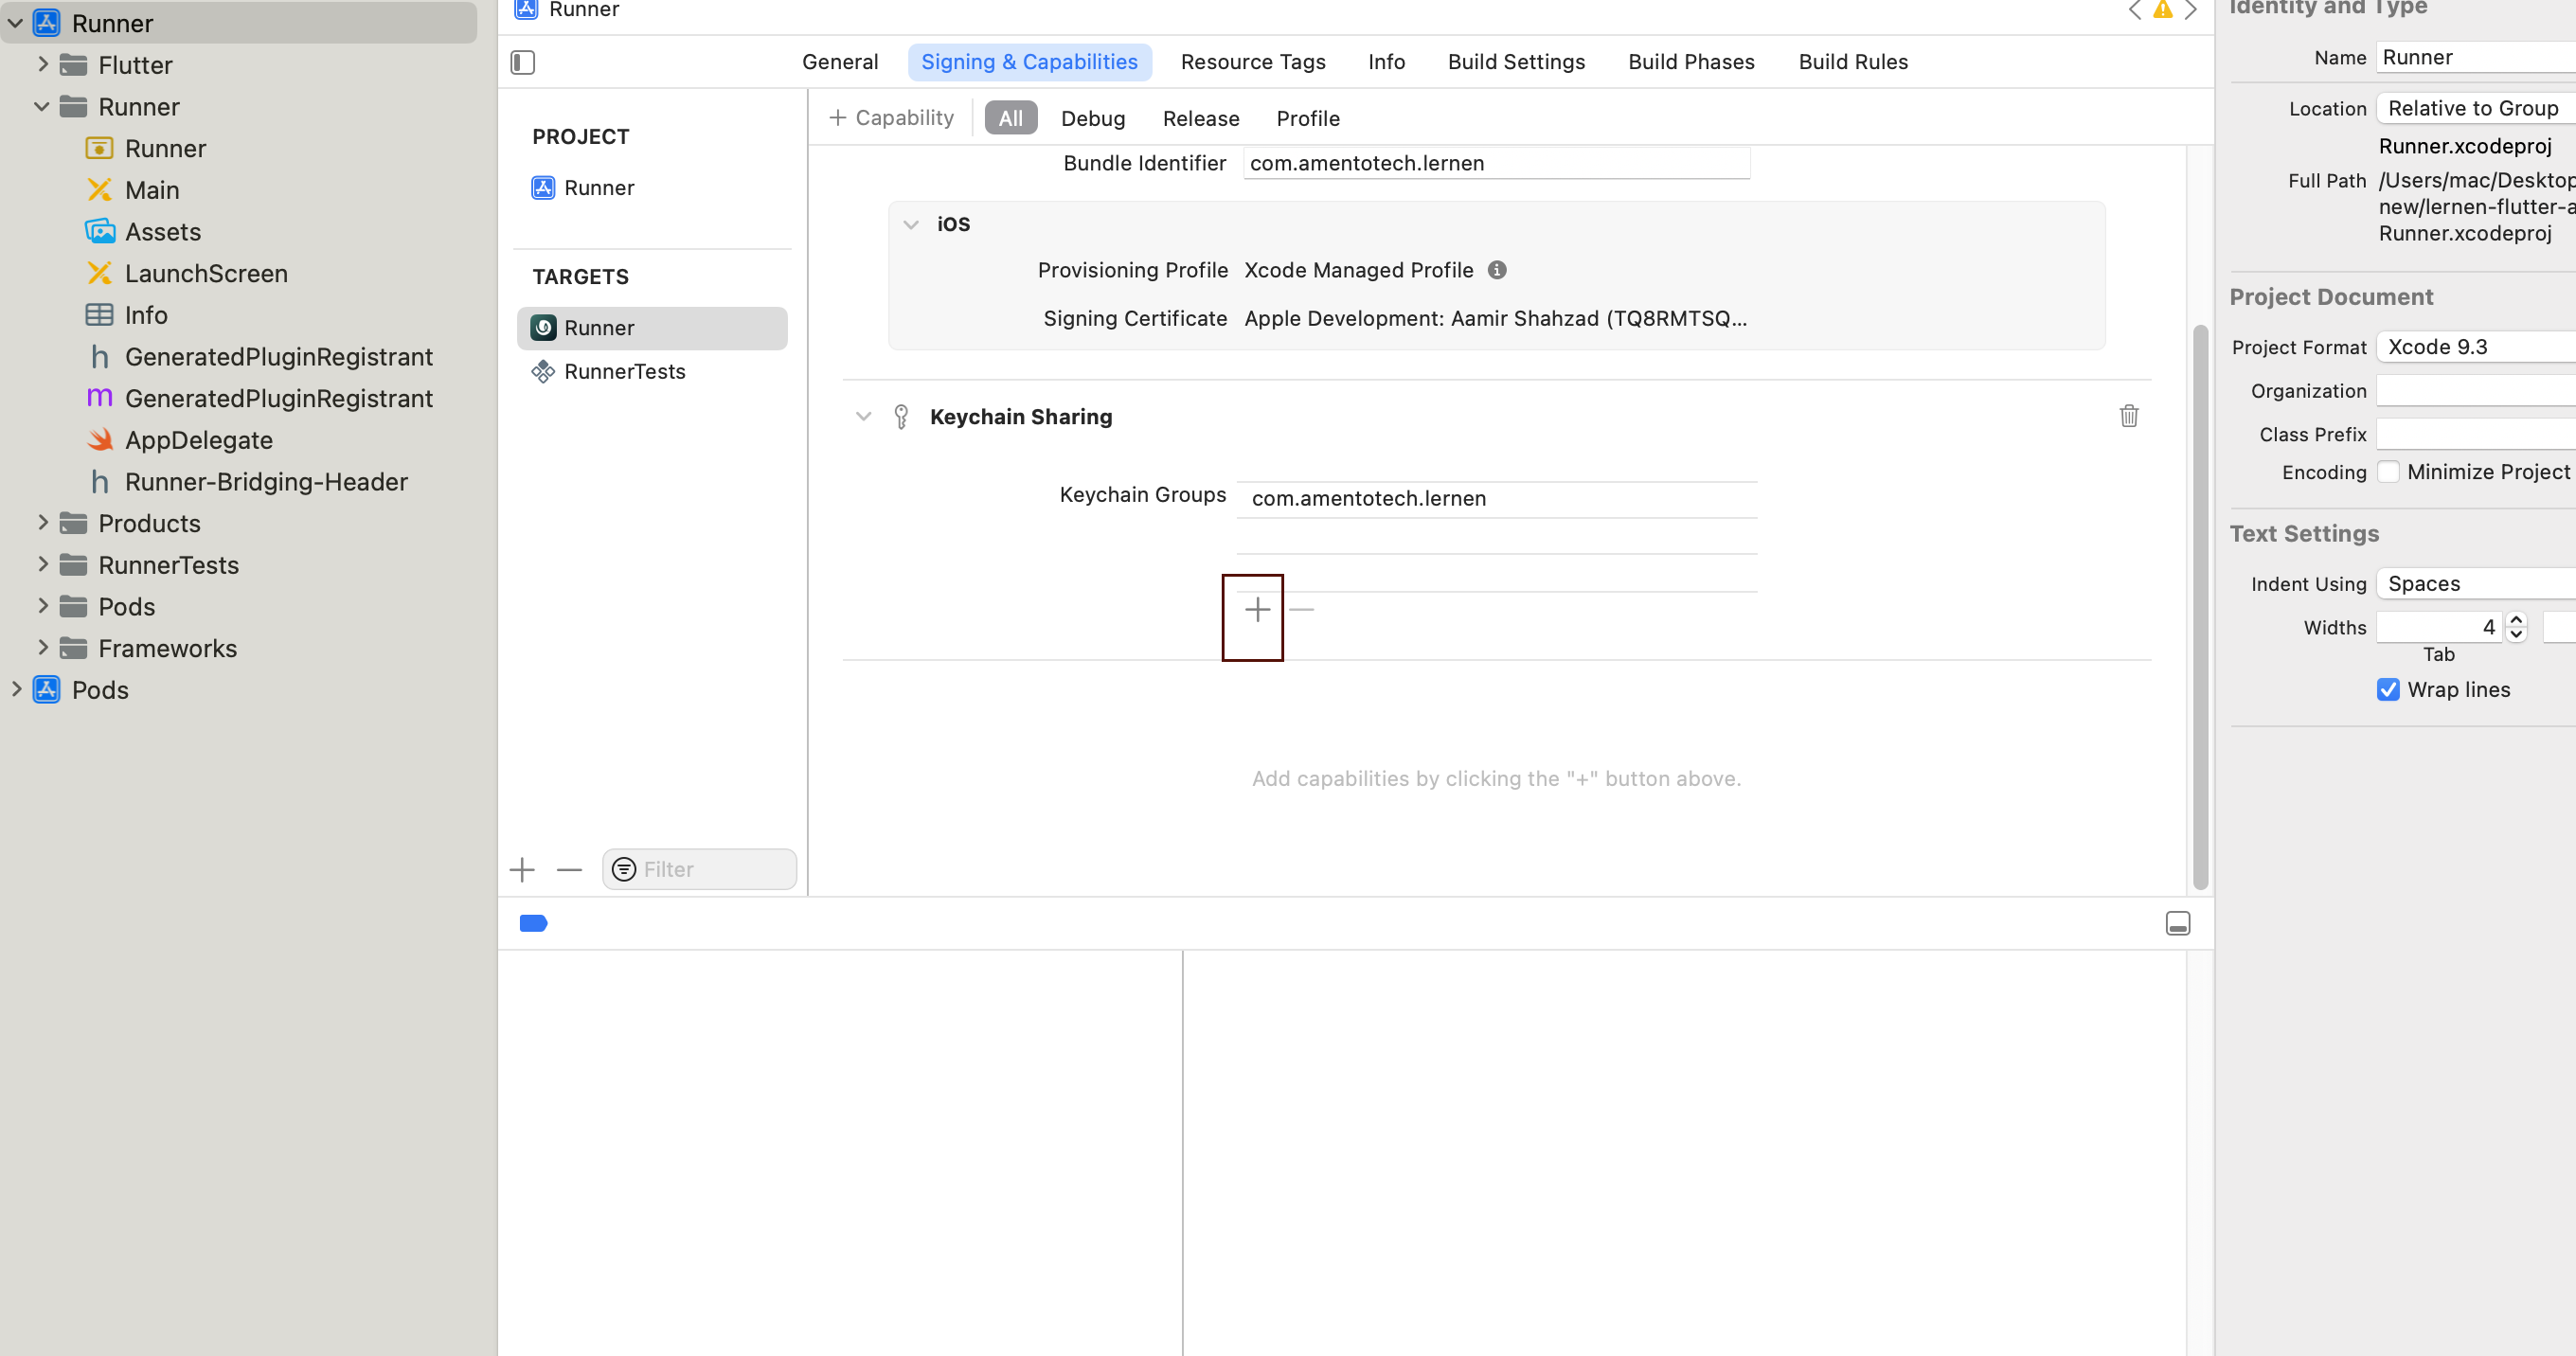
 Click on + icon: Then your Bundle Identifier will be added
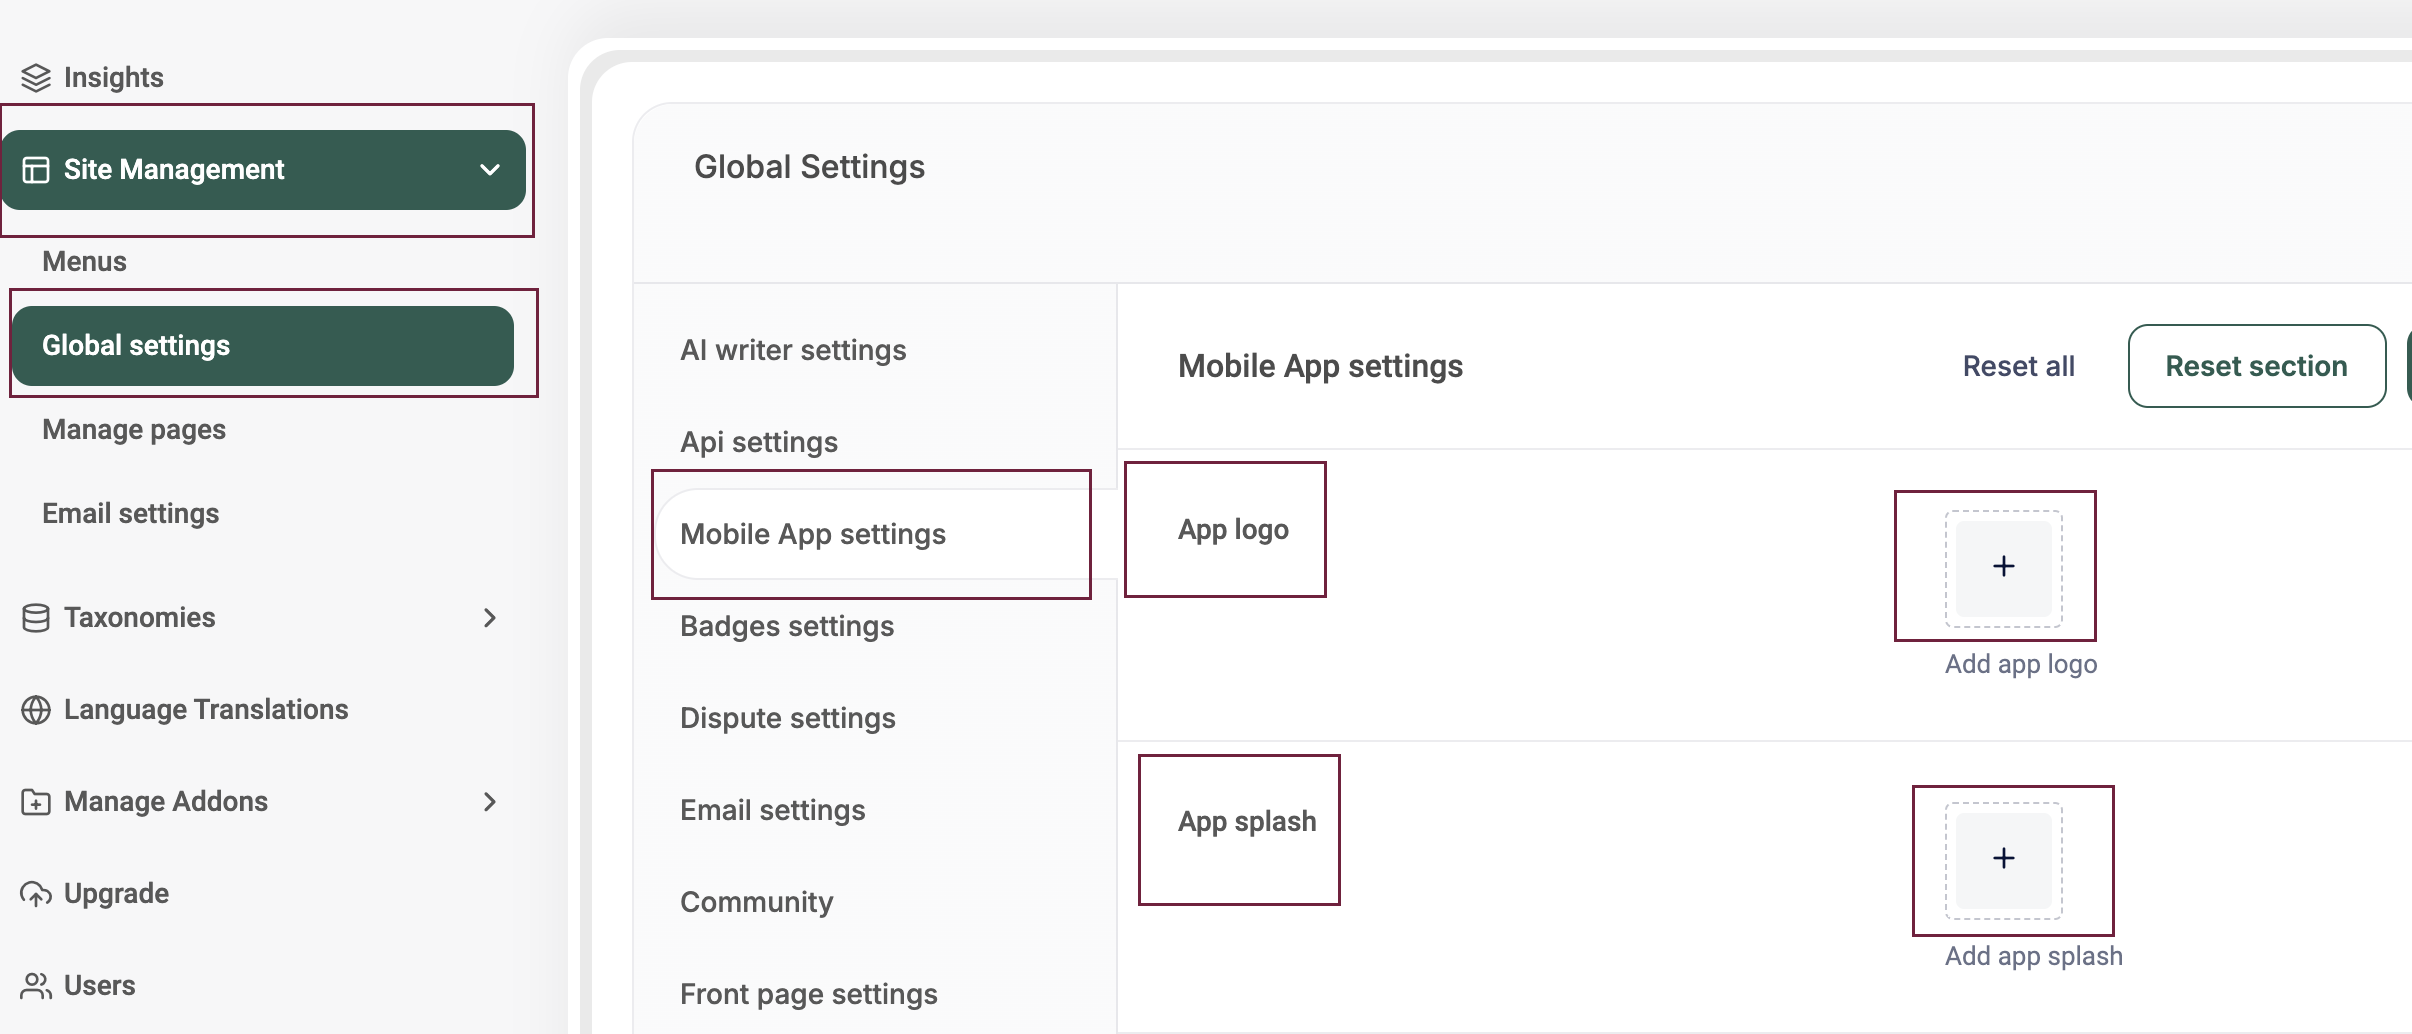
Dynamic Settings: Upload splash and logo image from admin side. Then click on Save changes. As it is in screenshot.
 Chnage Colors: You can also change colors from admin. Then click on Save changes. As it is in screenshot.
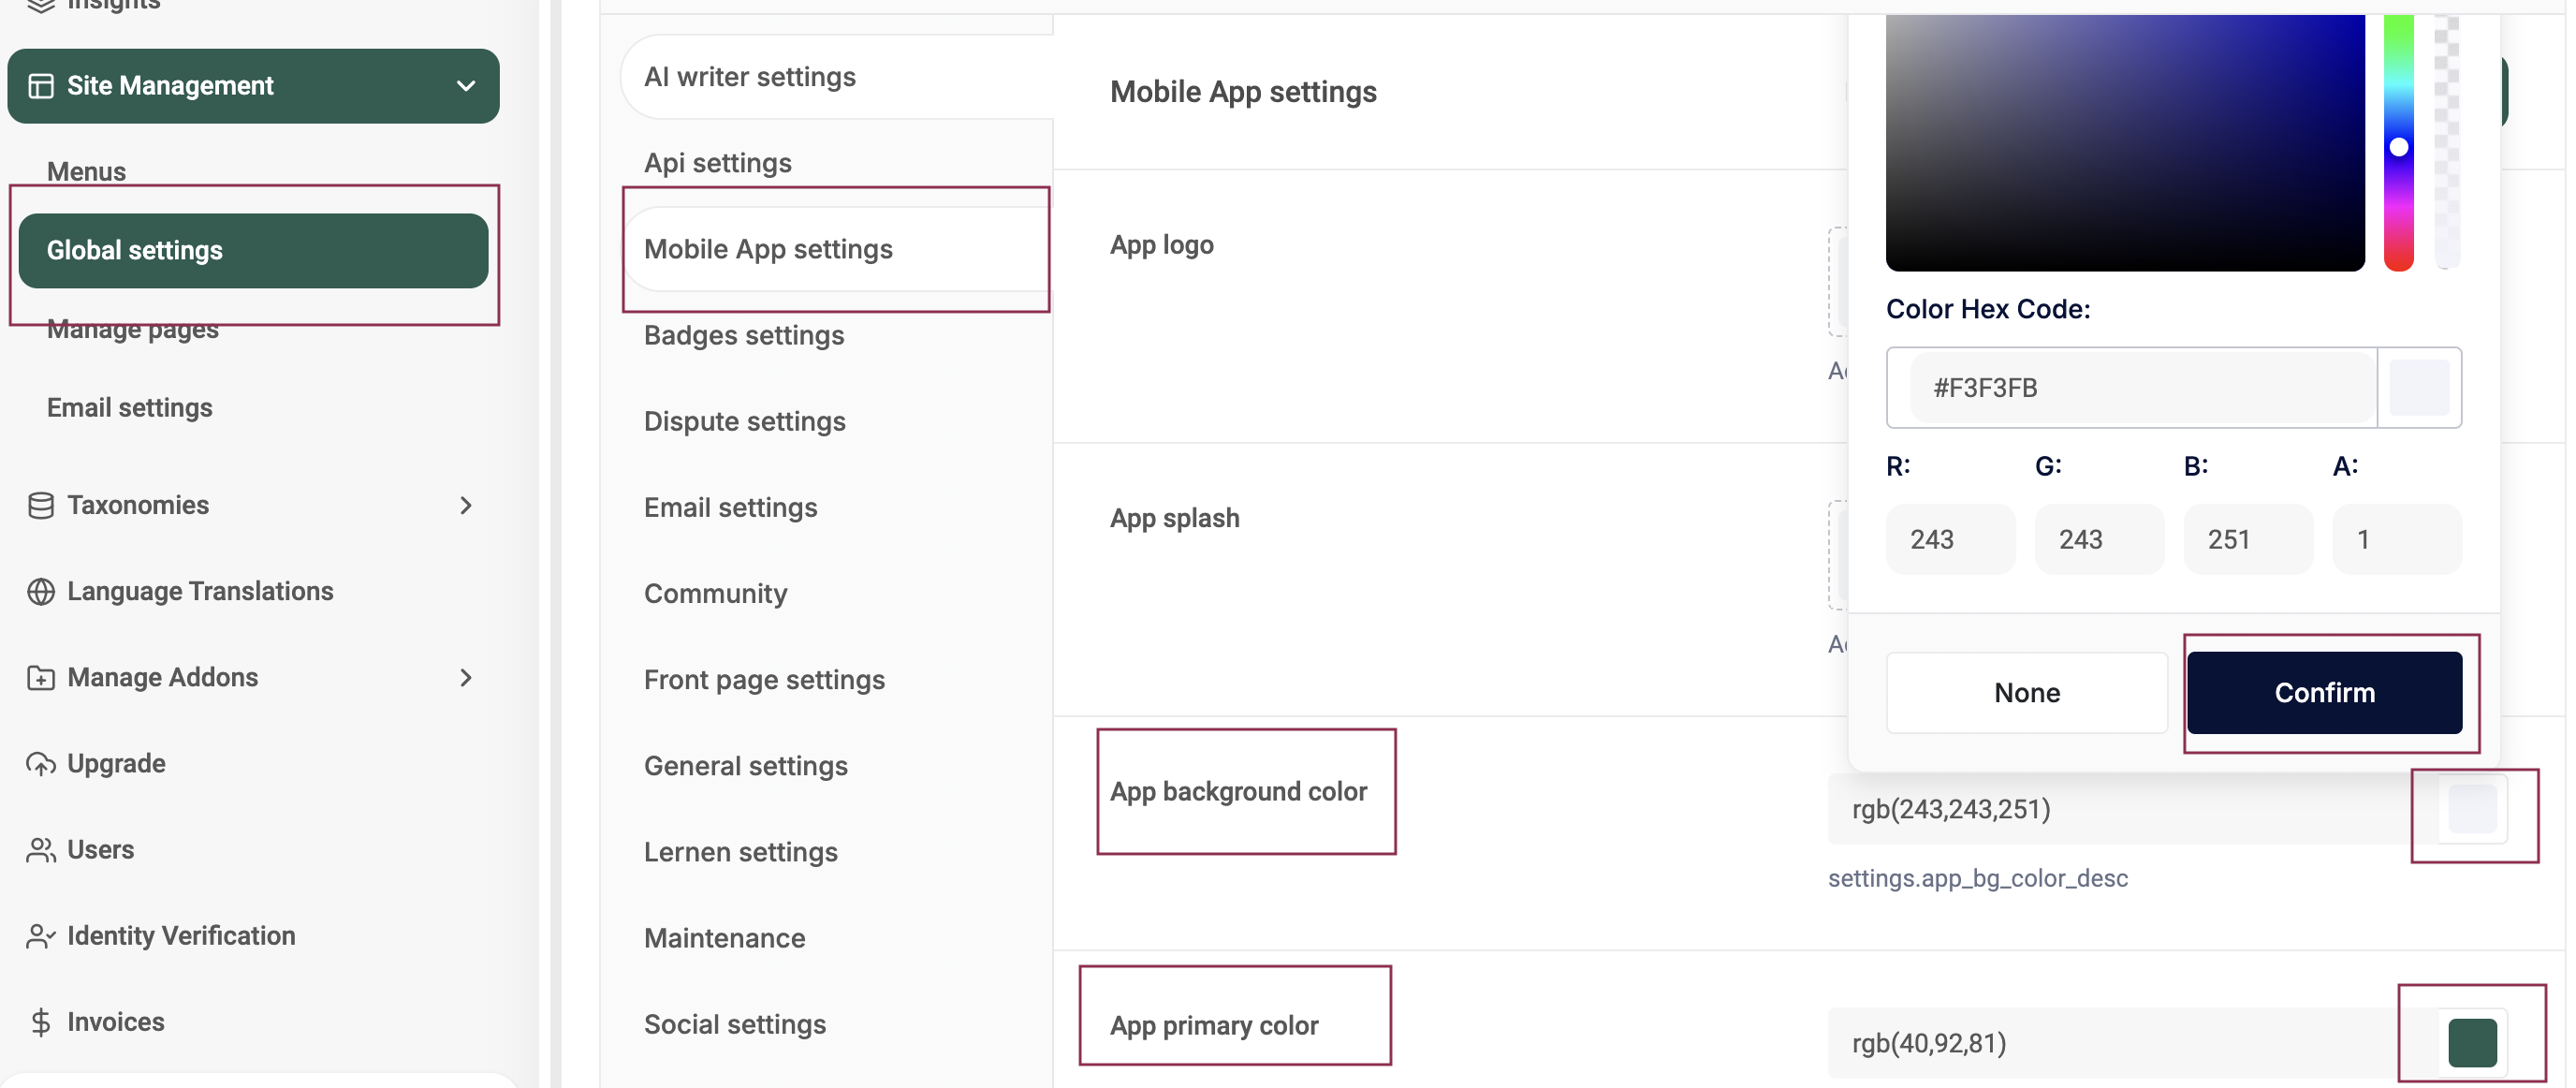 Chnage Secondary Color: You can also change Secondary Color from admin. Then click on Save changes. As it is in screenshot.
