Documentation
Taskup - A Seller Marketplace Application
Thank you so much for purchasing our item from the CodeCanyon.
- Version: 2.7
- Author: AmentoTech
- Created: 26 October, 2022
- Update: 09 September, 2025
If you have any questions that are beyond the scope of this help file, Pleasefeel free to email via Item Support Page.
Things You Must Have:
These are prerequisites for Taskup.
- PHP: 8.2.x
- MySQL: 8.x
- Laravel: 10.x
- Composer: 2.2.x
Downloading
Follow the steps below to set up your Taskup project:
When downloading the zip package file from CodeCanyon, you'll have all the files you need inside. The zip package contains the following files:
- taskup.zip contains the Laravel project
- documentation.zip folder (It contains documentation for the project)
When you are ready to install the project, you must first upload the project files to the server project directory. For this purpose, unzip the file that you have downloaded from CodeCanyon and upload the project files to the project server directory.
Installations
Setup & Installation
Taskup offers two convenient installation methods to suit your preferences and technical expertise. Choose the method that best fits your needs and technical comfort level. Both options will result in a fully functional Taskup installation.
1. Web Installer
For those who prefer a graphical interface or are less familiar with command-line operations, Taskup provides a user-friendly web installer.
Setup Database Credentials
Open your .env file, which is placed in your project root directory, and add the information of the database:
                ...
                DB_CONNECTION=****
                DB_HOST=****
                DB_PORT=****
                DB_DATABASE=****
                DB_USERNAME=****
                DB_PASSWORD=****
                ...
Navigate to Installer URL
-
To access the web installer, visit the
/installroute of your application (e.g.,https://yourdomain.com/install). This will launch the installer interface, guiding you through the setup process step-by-step. The web installer provides a user-friendly way to configure your database, set up your permissions and complete the installation smoothly without needing to use the command line. - Note: To setup on local server please run
php artisan serve, visit the/installroute of your application (e.g.,http://127.0.0.1:8000/install).
Installation Guide
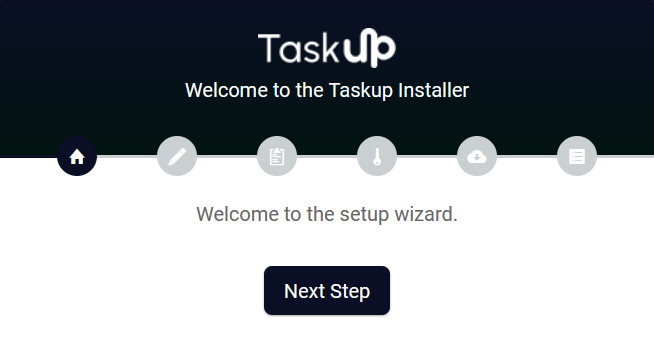
Step 1: Welcome to the Taskup Installer
- Introduction: This is the initial step of the installation wizard where you are welcomed to the setup process.
- Action Required: Click on the Next Step button to proceed.
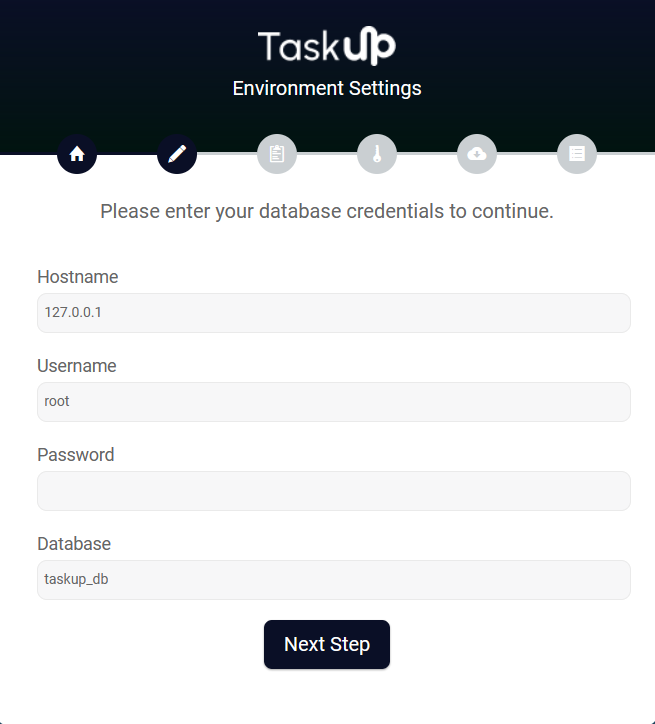
Step 2: Environment Settings
- Hostname: Enter the hostname for your database server. Typically, this is
127.0.0.1for a local setup. - Username: Provide the database username, usually
rootfor local environments. - Password: Enter the password associated with the database username.
- Database: Specify the database name you want to use for the Taskup application.
- Action Required: Click on the Next Step button to save the environment settings and proceed.
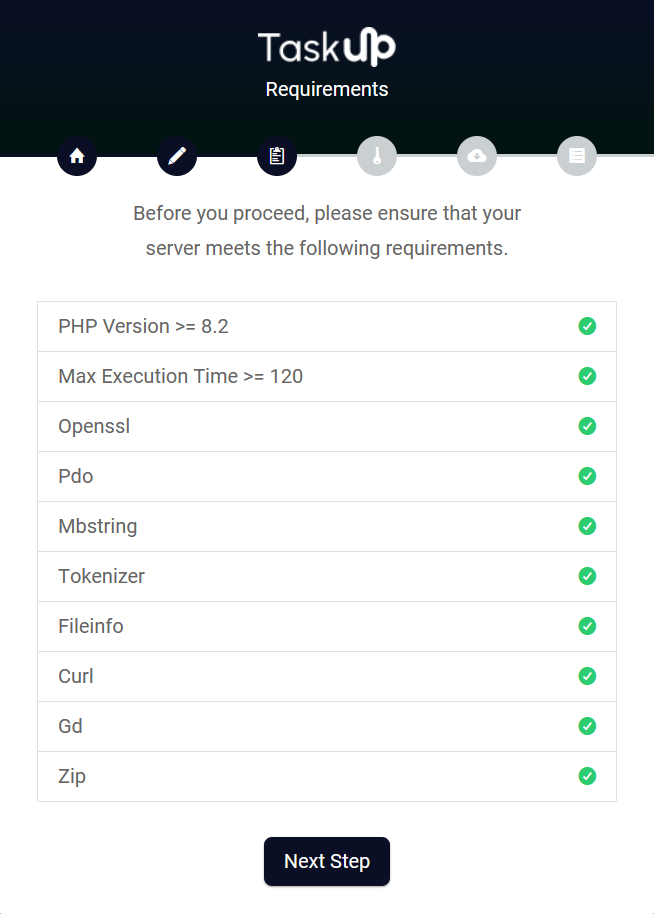
Step 3: Requirements
- PHP Version: The minimum required PHP version is
>= 8.2. - Max Execution Time: Set to
>= 120to ensure smooth execution of scripts. - Extensions: The following PHP extensions must be enabled:
- Openssl: Provides encryption and decryption functionality for secure data transfer.
- Pdo: A database access layer providing a uniform method of access to multiple databases.
- Mbstring: Handles multibyte string operations for encoding and character set support.
- Tokenizer: Provides token parsing for PHP code, used by various parsers and libraries.
- Fileinfo: Detects the MIME type and file type, helping to validate and handle file uploads.
- Curl: Allows PHP to send HTTP requests and interact with APIs or external servers.
- Ctype: Provides character classification functions for string manipulation and validation.
- Gd: Used for image processing and generation, including creating thumbnails and manipulating images.
- Zip: Facilitates the reading and writing of compressed ZIP archives for file handling.
- Action Required: Ensure all requirements are met (indicated by green checkmarks). Click on the Next Step button to proceed.
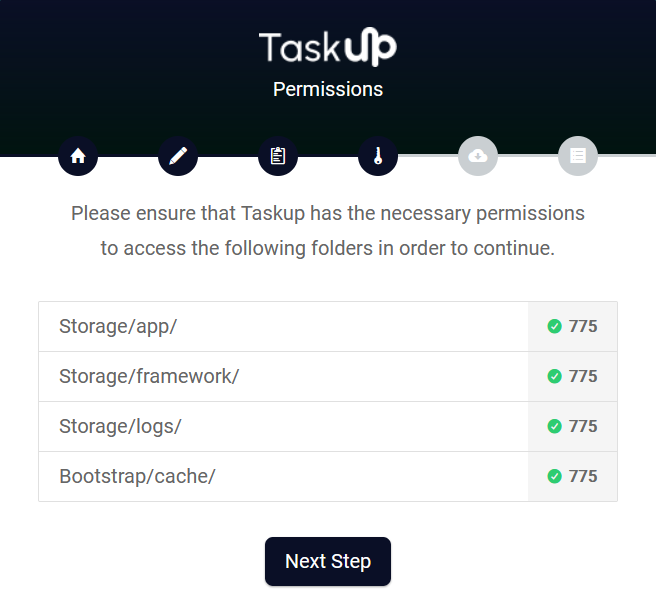
Step 4: Permissions
- Directories: The following directories must have write permissions set to
775:- Storage/app/
- Storage/framework/
- Storage/logs/
- Bootstrap/cache/
- Action Required: Verify that all listed directories have the correct permissions (indicated by green checkmarks). Click on the Next Step button to proceed.
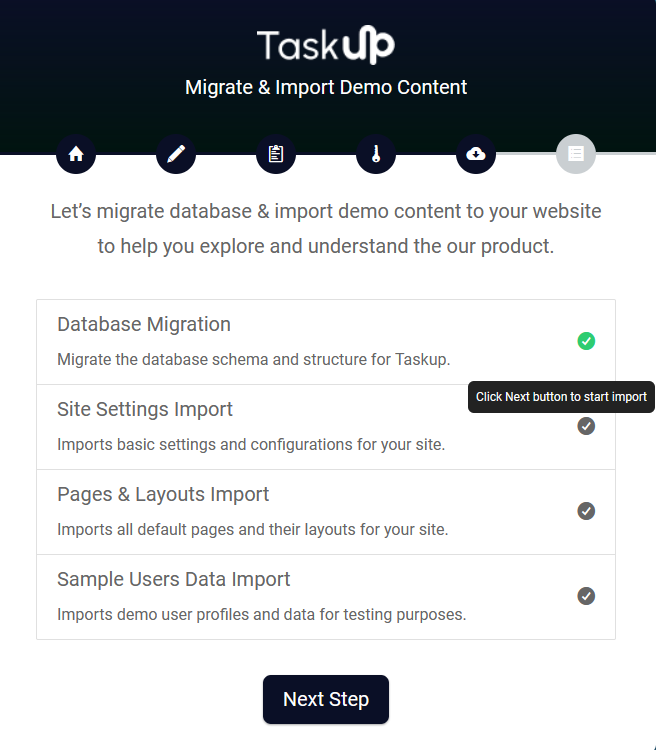
Step 5: Import Demo Content
- Import demo content to help you explore and understand the features of the Taskup platform. The following data will be imported:
- Site Settings Import: Imports basic settings and configurations for your site.
- Pages & Layouts Import: Imports all default pages and their layouts for your site.
- Sample Users Data Import: Imports demo user profiles and data for testing purposes.
- Action Required: Click on the Next Step button to start the import process.
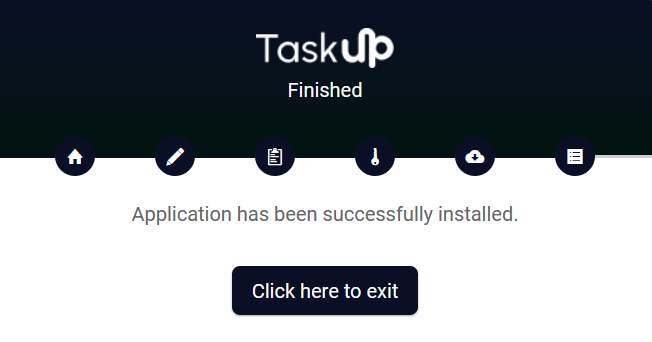
Step 6: Finished
- Completion: You will see a confirmation screen indicating the successful installation of Taskup.
- Action Required: Click on the Click here to exit button to finish the installation process.
Troubleshooting
- Database Connection Error: Double-check your database credentials and ensure the database server is running.
- Permission Issues: If any directories are not writable, update the permissions using the following command:
chmod -R 775 storage bootstrap/cache - PHP Extension Missing: Install missing PHP extensions via your package manager (e.g.,
apt-get install php-zipfor Ubuntu).
By following these steps, you should be able to successfully install and configure the Taskup application.
2. Composer Installation
For developers comfortable with command-line interfaces, the Composer installation method is recommended. This approach gives you more control over the installation process and is ideal for customized setups. Follow the steps outlined in the "Composer Install" section below to use this method.
After setting up the project files, you need to install Composer to download the Laravel packages. Please go to the root directory of the project using CLI and execute the following command. If you don't have CLI support, then contact your server manager.
To install Composer packages, execute this command: composer install --optimize-autoloader --no-dev
Setup Database Credentials
Open your .env file, which is placed in your project root directory, and add the information of the database:
                ...
                DB_CONNECTION=****
                DB_HOST=****
                DB_PORT=****
                DB_DATABASE=****
                DB_USERNAME=****
                DB_PASSWORD=****
                ...
Ensure that your database credentials are correct to avoid connectivity issues. After that please run following commands:
- To create database tables, execute:
php artisan migrate - To install demo content, execute:
php artisan db:seed
Laravel Project Post Setup Commands
Execute the following commands via CLI for further processing:
- To link the storage folder, execute:
php artisan storage:link - To clear cache, execute:
php artisan optimize:clear
After this, you can use your Taskup project.
SMTP Setting
To set up SMTP, please update your .env file as follows:
                    ...
                    MAIL_DRIVER=****
                    MAIL_HOST=****
                    MAIL_PORT=****
                    MAIL_USERNAME=****
                    MAIL_PASSWORD=****
                    MAIL_ENCRYPTION=****
                    ...
Push Notification Setup
To enable real-time notifications, please update your .env file as follows:
Option 1: Pusher
This is the recommended method, as it involves no integration and is the most straightforward way to enable push notifications. It leverages the Pusher service, which is a popular and reliable choice for real-time communication.
To enable Pusher, update your app .env file with the following settings:
                BROADCAST_DRIVER=pusher
                ...
                PUSHER_APP_ID=****
                PUSHER_APP_KEY=****
                PUSHER_APP_SECRET=****
                PUSHER_APP_CLUSTER=****
Option 2: Laravel Reverb
To install broadcasting driver please run following command: php artisan install:broadcasting
Setting up Laravel Reverb can be challenging as it requires server-side configuration. For this, you may need a dedicated server. After setting up the server, follow the Laravel documentation to install and set up Reverb. Once set up, update the respective keys in your .env file as follows:
                ...
                REVERB_APP_ID=****
                REVERB_APP_KEY=****
                REVERB_APP_SECRET=****
                REVERB_APP_CLUSTER=****
                ...
For detailed instructions on setting up Reverb, refer to the Laravel documentation.
New Upgrade Taskup
Note: Before updating, do backup your project files and database. & Don't replace storage folder as it will remove your uploaded images
After downloading and replacing your project files, you need to run the following commands mentioned below.
Run composer update command via: CLI composer update --optimize-autoloader --no-dev
To update new migrations execute this – php artisan migrate
Seller Settings
Seller Demo Account
To access the Seller dashboard, use the following credentials:
- Email address: baker@amentotech.com
- Password: google
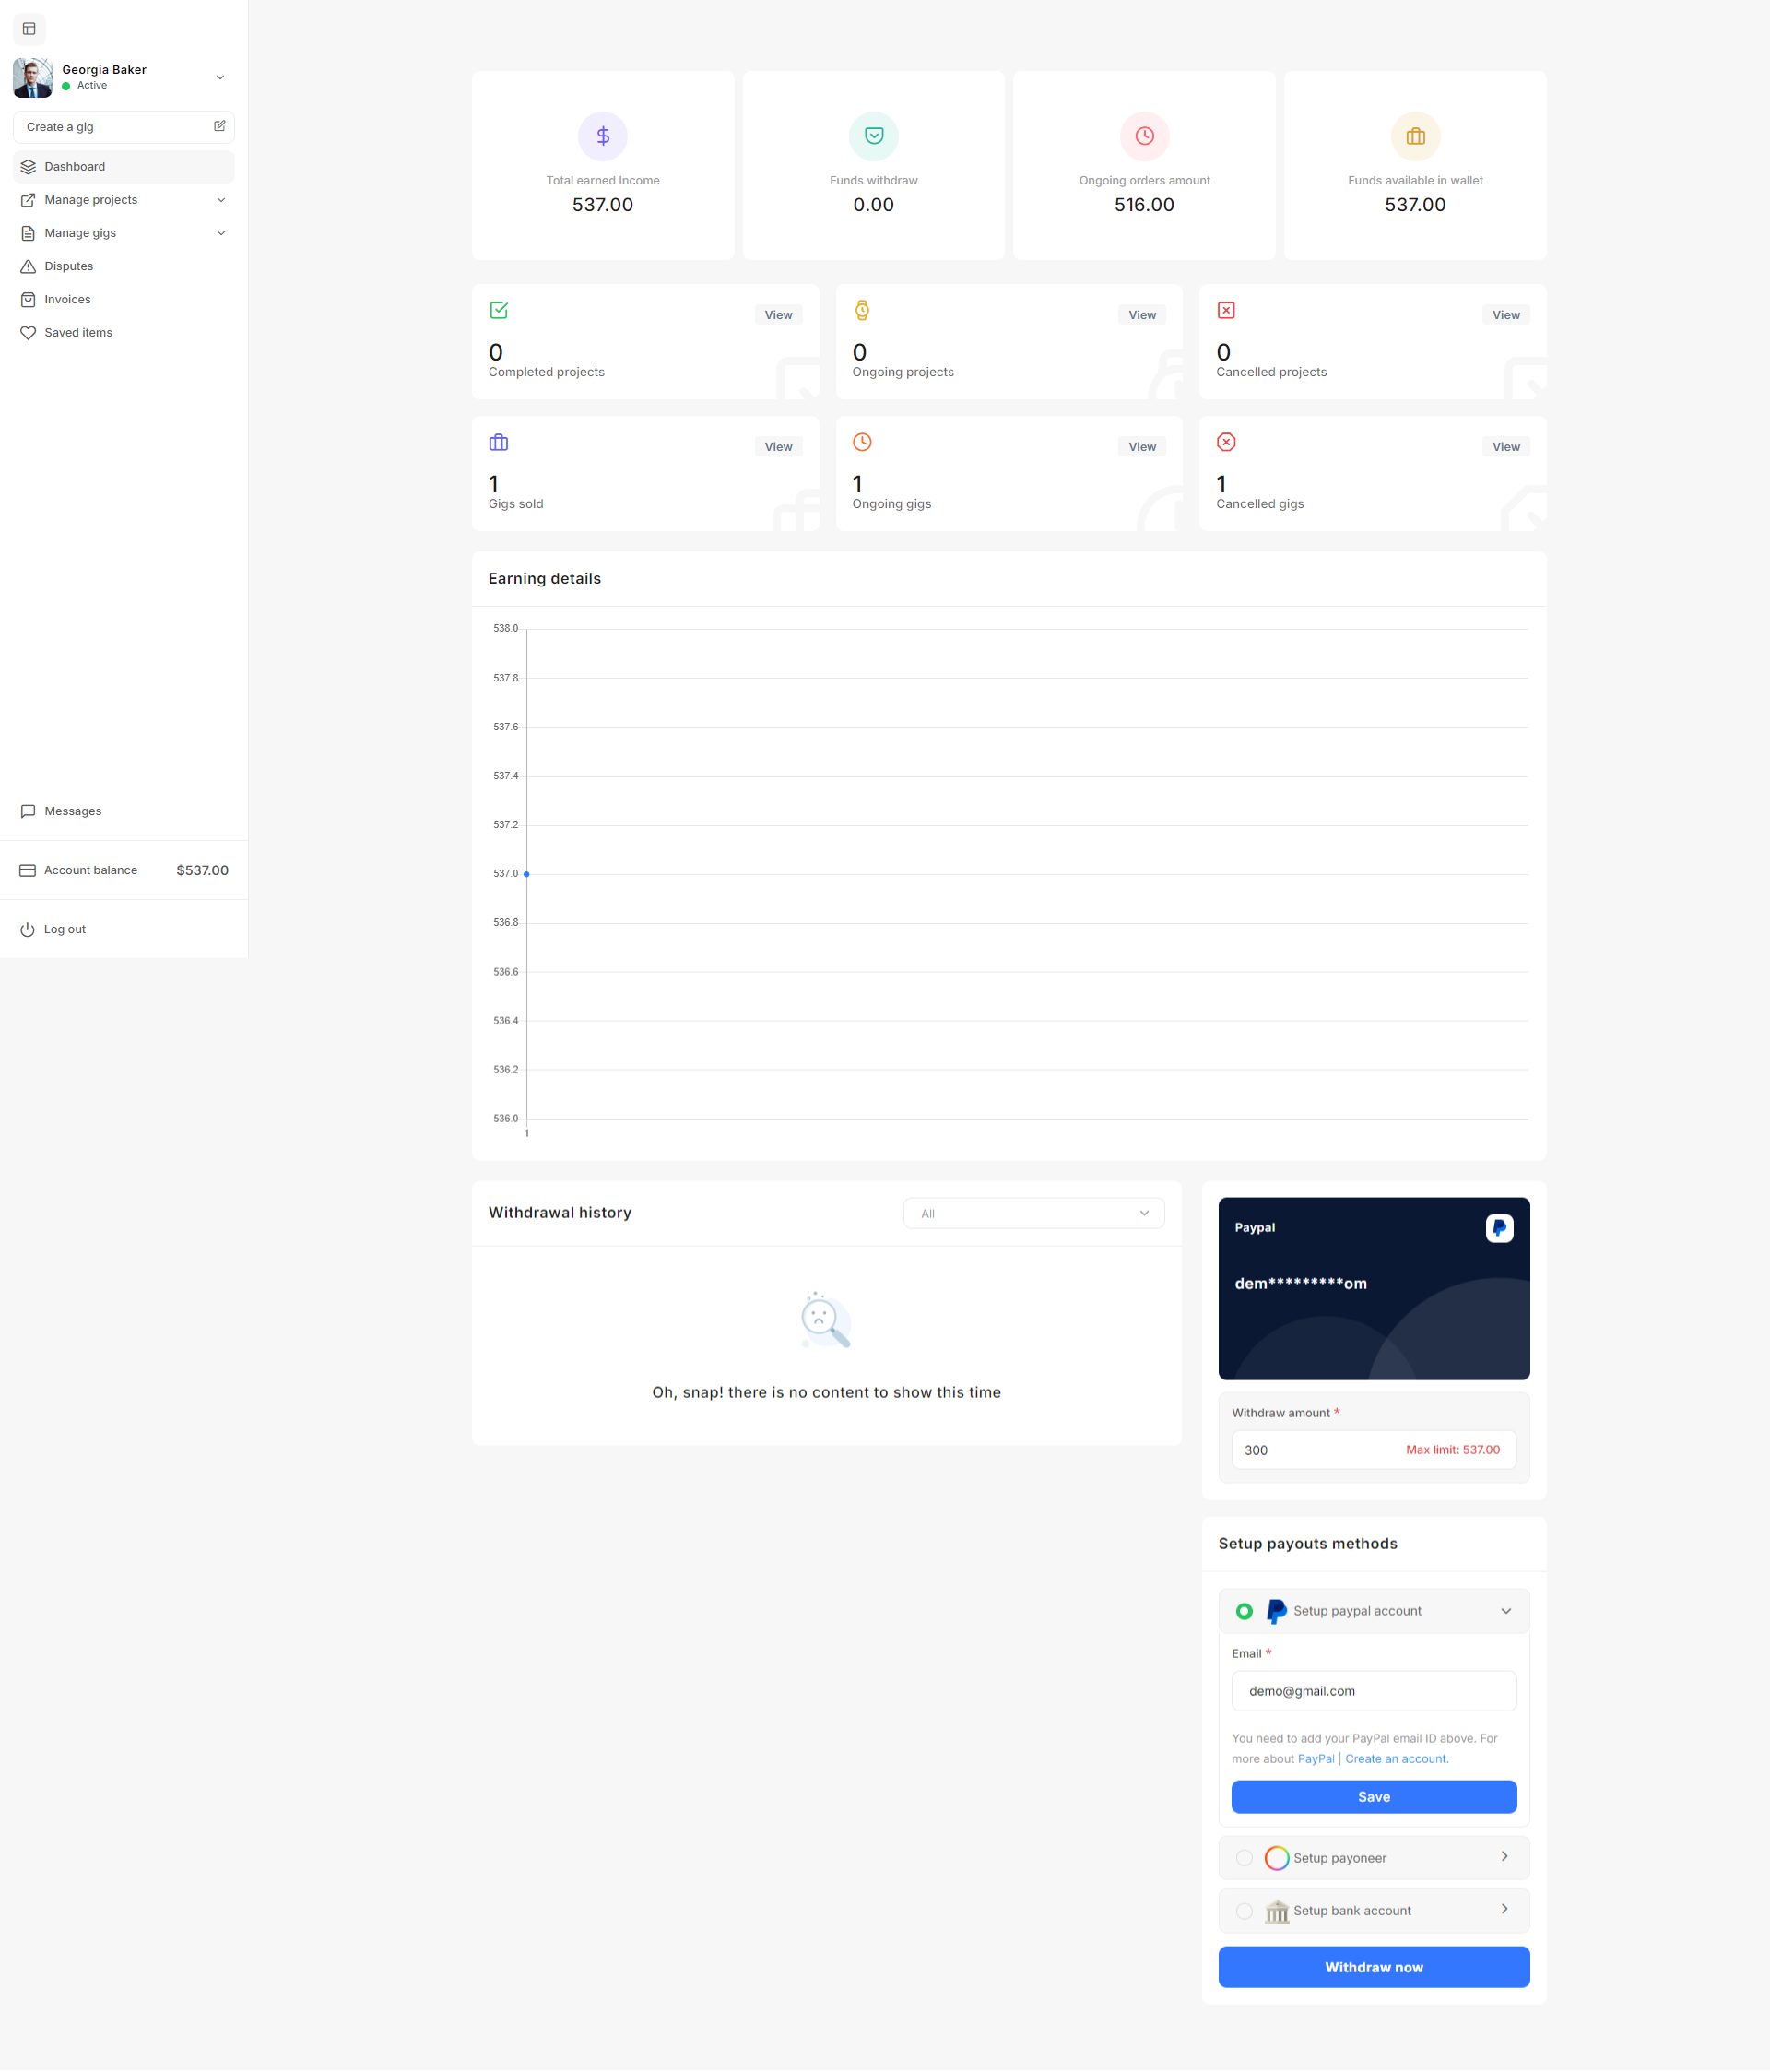
Dashboard
The seller dashboard provides an overview of your activity, income, projects, and gigs. It also offers direct access to important features like gig creation, project management, and payment setup.
Main Sections of the Dashboard
- Total Earned Income: Displays the total income you have earned from completed projects and gigs on Taskup.
- Funds Withdrawn: Shows the total amount of funds you have successfully withdrawn to your external payment accounts (PayPal, payoneer, bank).
- Ongoing Orders Amount: Displays the amount of money tied to ongoing or in-progress orders.
- Funds Available in Wallet: Shows the total funds currently available in your Taskup wallet, ready for withdrawal.
Each of these sections helps you keep track of your finances in real-time, with a quick overview of where your money is at any given moment.
Project and Gig Management
- Completed Projects: Shows the number of projects you've successfully completed. Click on “View” to get more details or access project history.
- Ongoing Projects: Displays the current number of ongoing projects and gives you quick access to manage them.
- Cancelled Projects: Shows any projects that were cancelled by clients or by you. This section helps in maintaining transparency and tracking your work history.
- Gigs Sold: Displays the total number of gigs you have sold to clients. You can view details to assess the performance of your gigs.
- Ongoing Gigs: Displays gigs that are currently in progress.
- Cancelled Gigs: Shows gigs that were cancelled, either by you or the buyer.
Earning Details
The Earning Details section provides a graph representing your earnings over time. You can track how your income has grown or fluctuated daily, weekly, or monthly. This visual tool helps in understanding your financial performance on the platform.
Withdrawal History
This section gives you an overview of your withdrawal activities. It tracks all transactions related to withdrawing funds from your Taskup wallet to your external accounts. If no withdrawals have been made, it shows a message like "Oh snap! there is no content to show this time."
Withdrawing Funds
- Withdraw Amount: In the withdrawal section, you will see a field labeled Withdraw amount. Here, you can enter the amount you wish to withdraw.
- The maximum amount you can withdraw is displayed (in this example, the max limit is $537.00).
- Enter the amount you would like to withdraw (e.g., $300).
- After entering the desired amount, review the total to ensure it matches your withdrawal request.
Setting Up Payout Methods
Taskup offers multiple payout methods, and you need to set up at least one in order to withdraw your earnings.
- PayPal:
- To use PayPal as your payout method, click on Setup PayPal account.
- Enter your PayPal email address in the Email field.
- Click Save to link your PayPal account. Make sure the email you provide is associated with an active PayPal account. If you don’t have a PayPal account, click Create an account to set one up.
- Payoneer:
- Alternatively, you can choose Setup Payoneer as a payout method if you prefer using Payoneer.
- You will be prompted to provide your Payoneer details. Follow the instructions to link your Payoneer account.
- Bank Account:
- You can also set up a bank account for direct transfers.
- Selecting this option will prompt you to provide your bank details, such as your account number and routing number.
Once the method is set up, you can withdraw the funds by entering the amount in the Withdraw Amount field and clicking Withdraw Now. This section shows your withdrawal limit based on the available balance.
General Settings
The General Settings section allows you to manage basic personal details to keep your profile up-to-date.
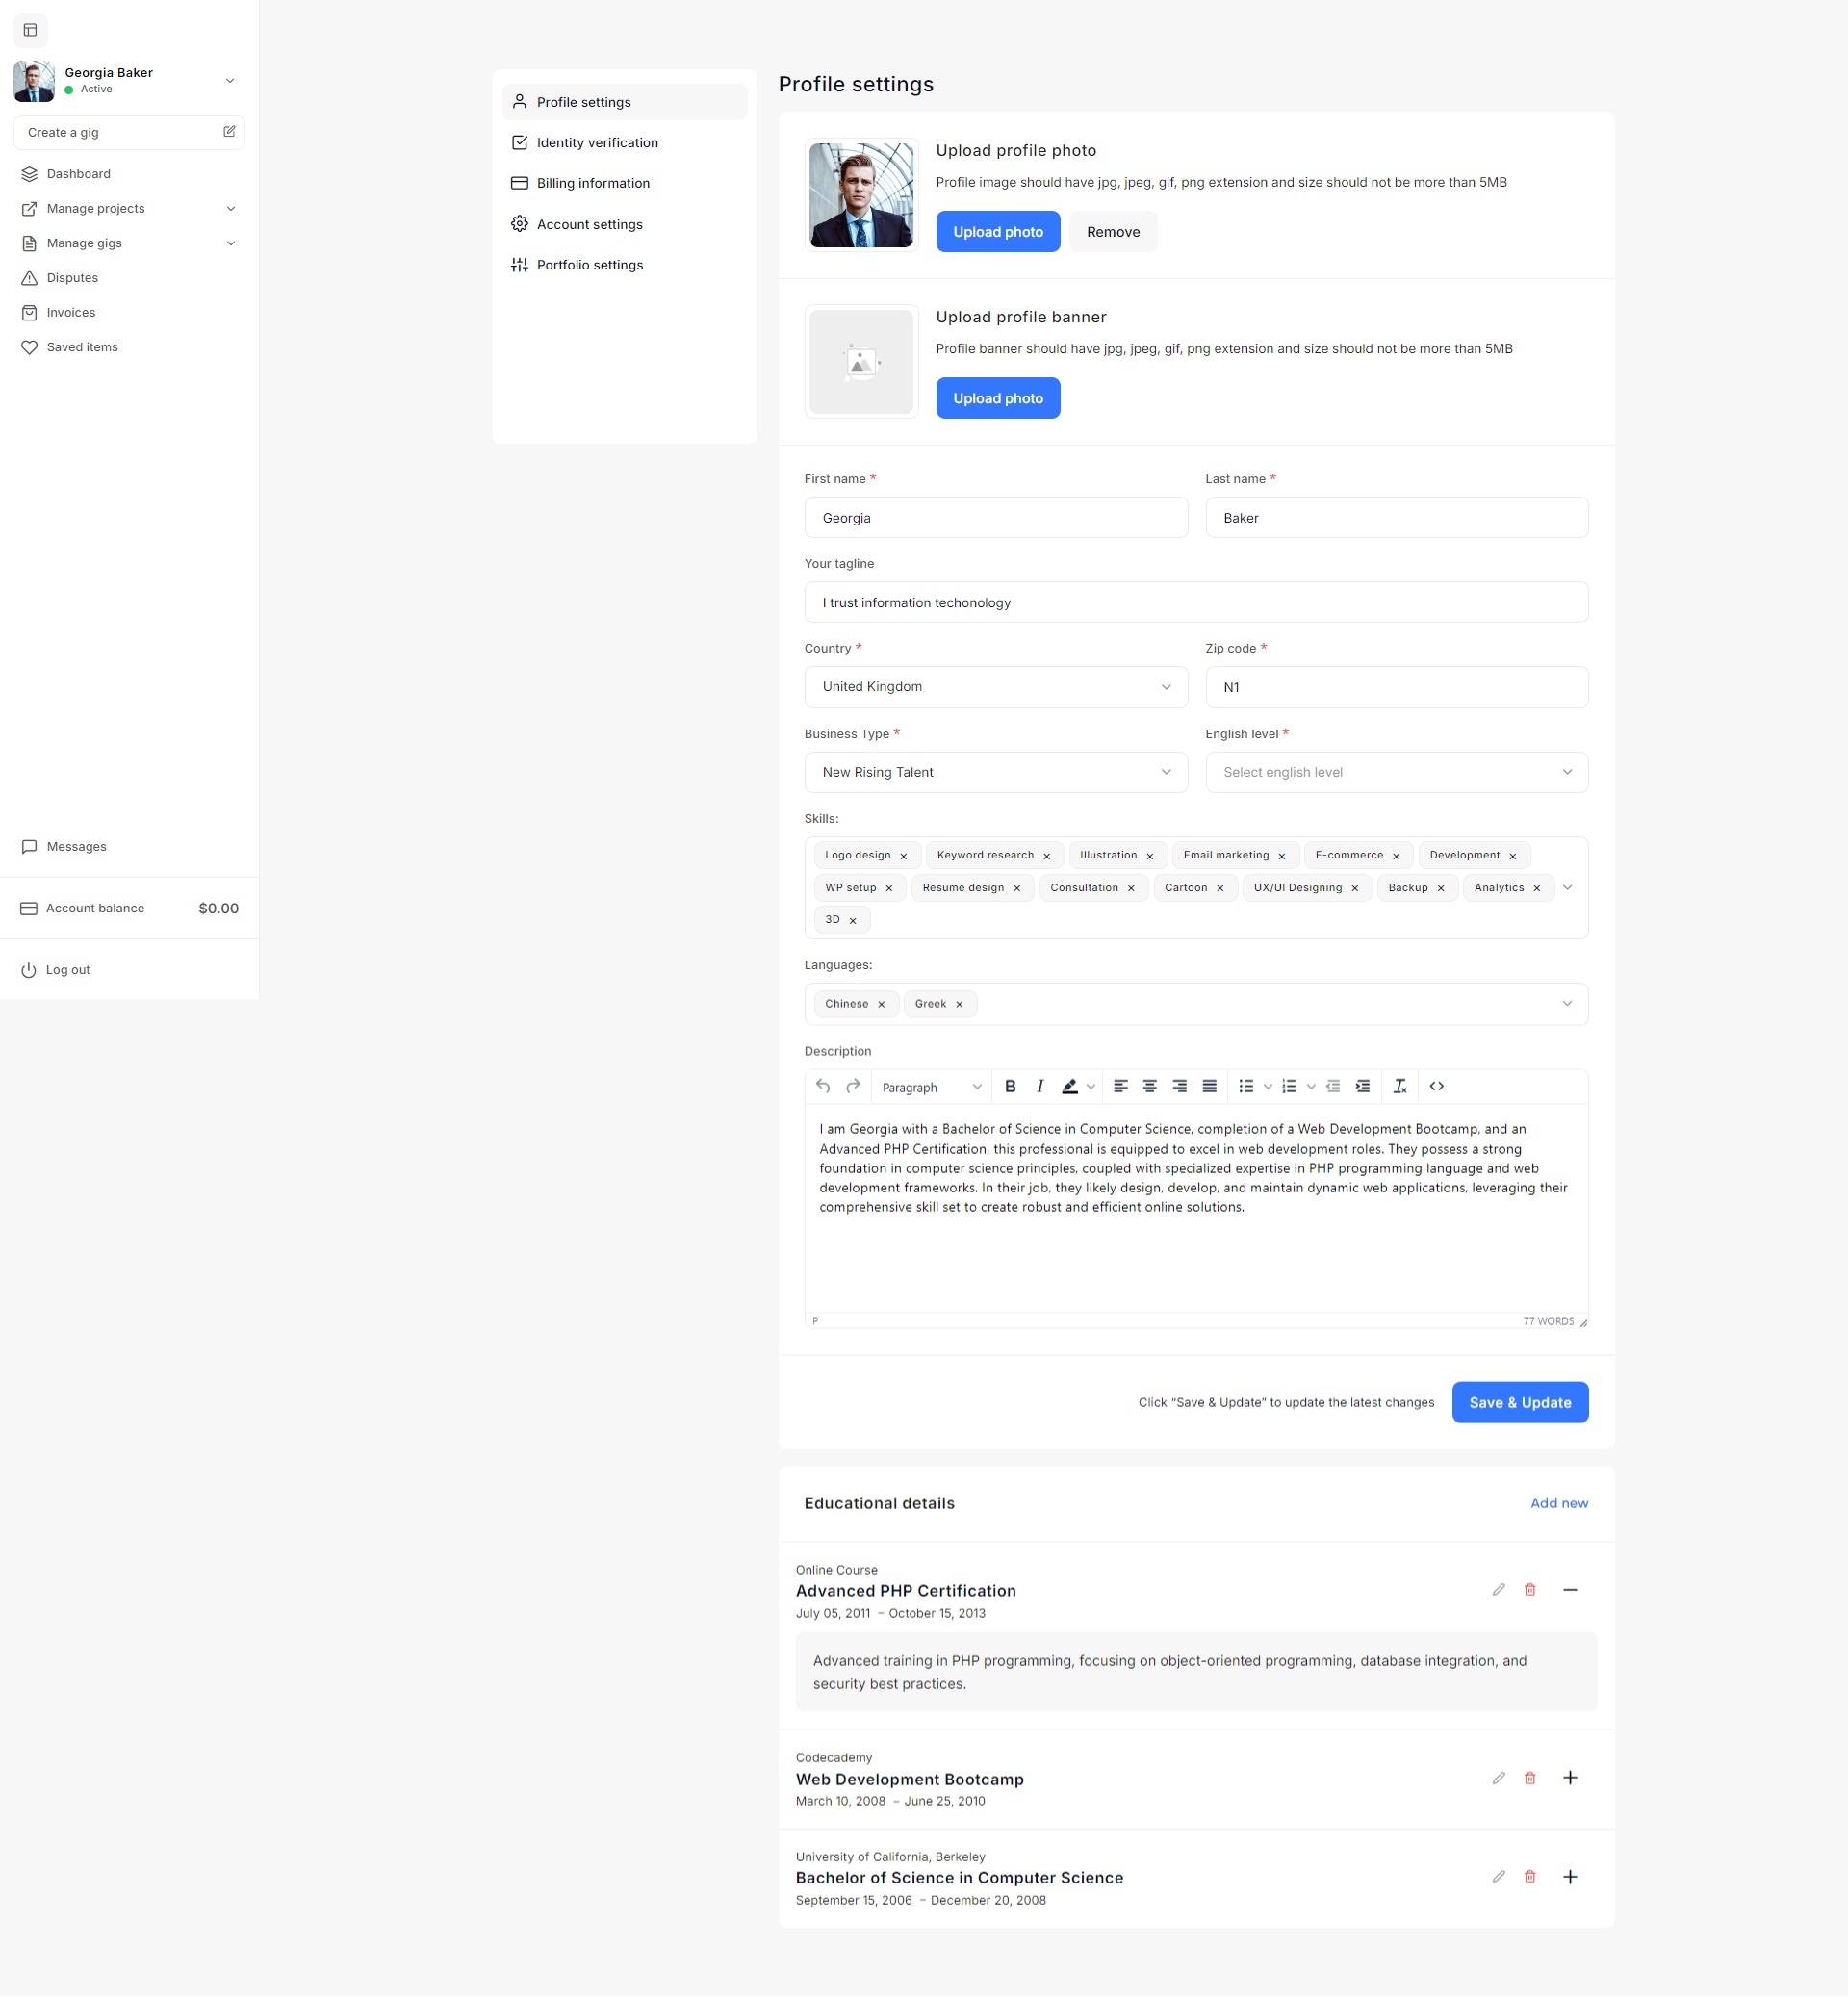
Profile Settings
The Profile Settings section on Taskup allows you to personalize and update your profile details, ensuring that potential clients get the most accurate and up-to-date information about you and your services. Below is a guide on how to manage your profile settings effectively.
Uploading Profile Photo and Banner
- Profile Photo:
- Click Upload photo to upload a professional image of yourself. Supported formats are JPG, JPEG, GIF, and PNG. The size should not exceed 5MB.
- A professional-looking photo helps build trust with clients.
- If you wish to change your photo, you can click Remove and upload a new one.
- Profile Banner:
- The profile banner allows for additional personalization of your profile.
- Click Upload photo to add a banner image in JPG, JPEG, GIF, or PNG format (maximum size 5MB).
- This banner can give your profile a more unique look and showcase something relevant to your services or brand.
Personal Information
- First and Last Name: Ensure that your full name is entered correctly. This is how clients will see you on the platform.
- Tagline: Add a short, descriptive tagline that summarizes your expertise or what you offer (e.g., “I trust information technology”).
- Country: Select your current country of residence from the dropdown list. This helps clients understand where you're based, which can be important for time zone and regional availability.
- Zip Code: Enter your postal code to further specify your location.
- Business Type: Choose your business type from the available options (e.g., New Rising Talent).
- English Level: Specify your proficiency in English by selecting an appropriate level (e.g., Basic, Intermediate, Fluent).
Skills
- Add all relevant skills that reflect the services you offer. These skills help potential clients find you through search filters and understand your expertise.
- You can add multiple skills, and these will appear as tags on your profile (e.g., Logo Design, Email Marketing, E-commerce, Development).
- To add more skills, simply type them into the field and hit enter.
Languages
- Specify the languages you speak fluently. This helps clients from different countries understand if they can communicate with you easily.
- You can add multiple languages by selecting from the dropdown list (e.g., Chinese, Greek).
Description
- The Description field is where you can provide a detailed overview of your professional background, skills, and experience.
- Use this section to introduce yourself, explain your qualifications, and describe the types of services you offer. A well-written description helps clients understand your capabilities and why they should hire you.
- Make use of formatting options (bold, italics, bullet points) to improve readability and presentation.
Educational Details
- Adding Education: This section allows you to add your educational background to demonstrate your qualifications.
- Click Add new to enter details about your education, such as degree or certification, institution, and dates attended.
- Existing Education: You can edit or remove existing educational entries by clicking the respective icons.
- Example: "Bachelor of Science in Computer Science" from the University of California, or "Advanced PHP Certification" from an online course.
- Keeping this section updated is vital for building trust and credibility with clients, especially when your education is directly related to your services.
Saving Changes
- After updating your profile information, click Save & Update to ensure your changes are reflected on your public profile.
- Always double-check that all information is accurate before saving.
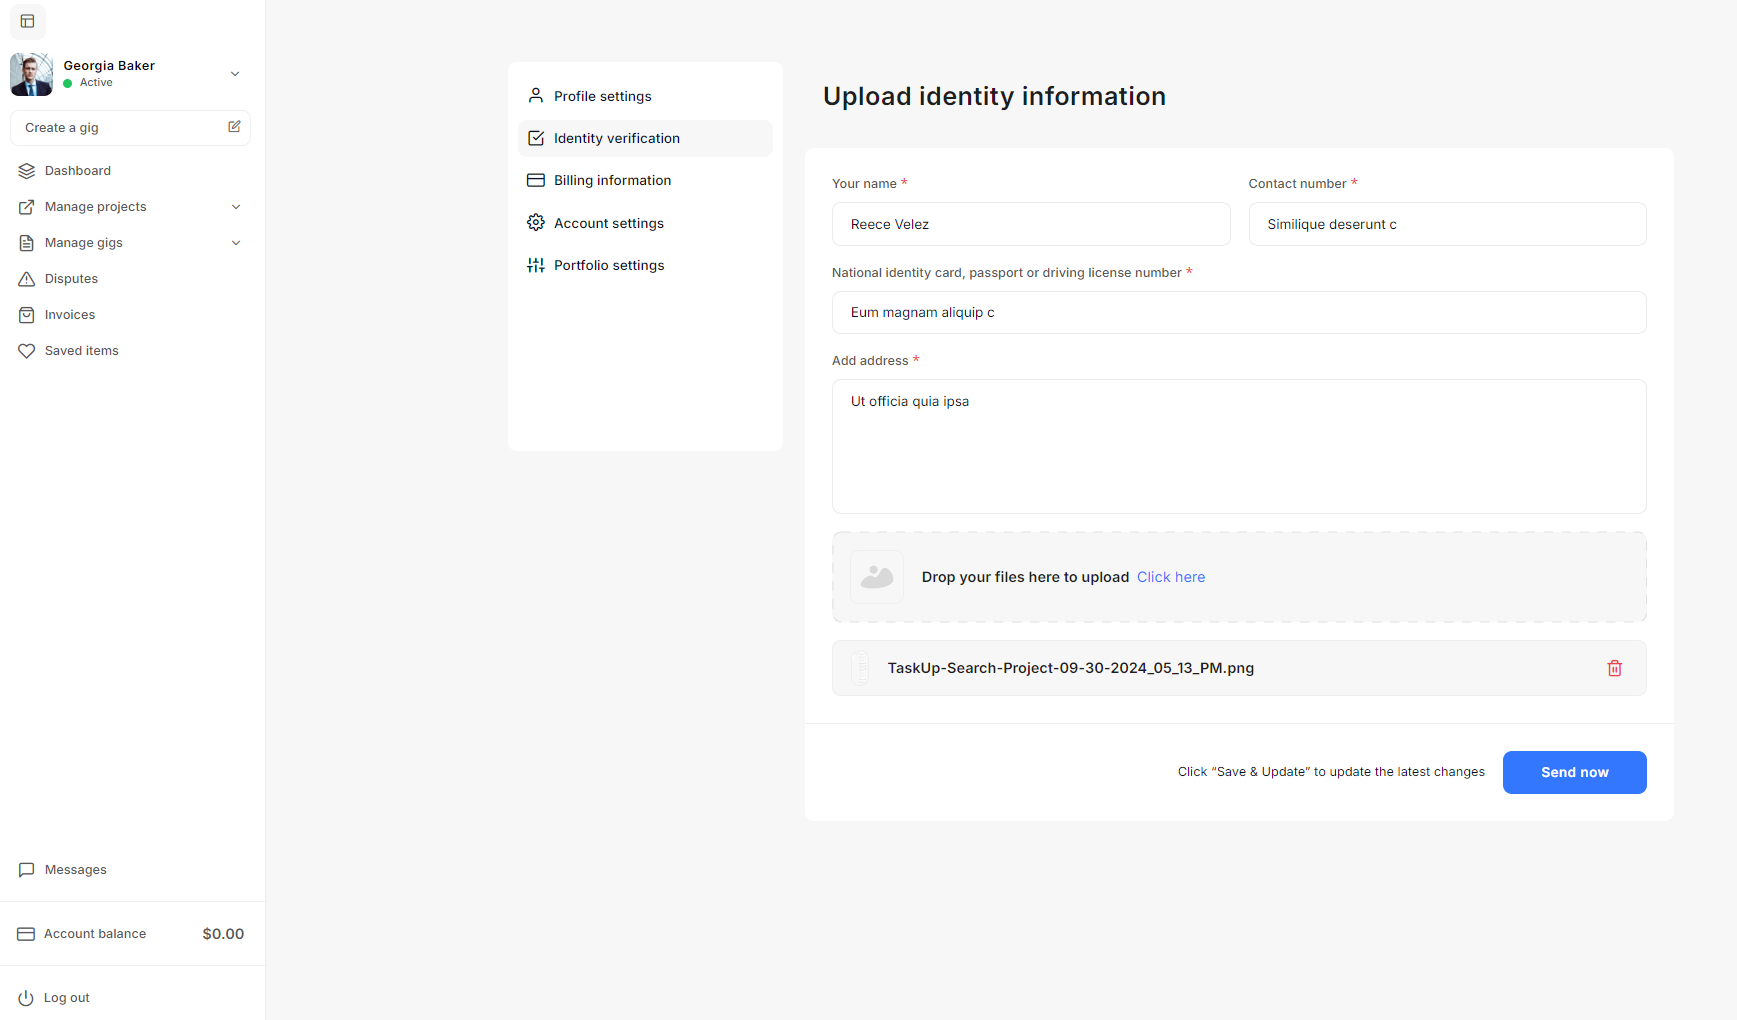
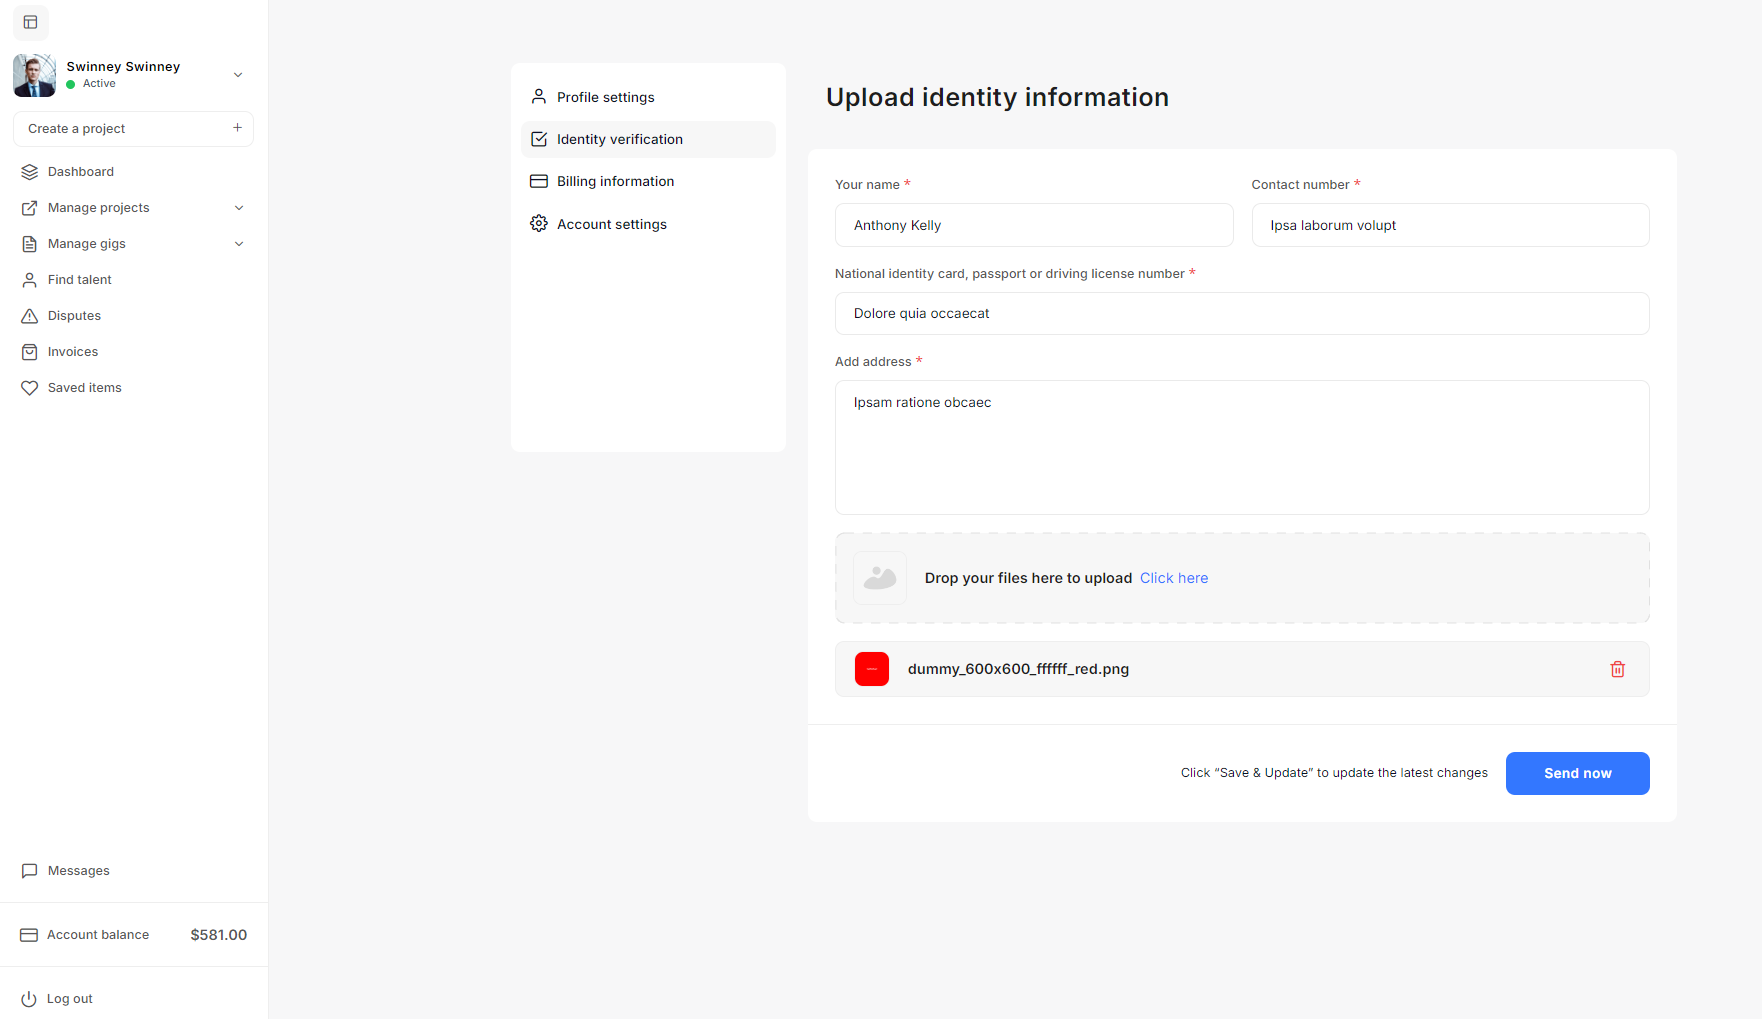
Identity Verification
The Identity Verification process on Taskup helps ensure the authenticity of sellers and provides a safer environment for clients and service providers. Completing this step can build trust with potential clients, improve your profile’s credibility, and enable you to access more features on the platform. Below is a guide on how to complete the identity verification process.
Accessing Identity Verification
- From the left sidebar, click on Settings.
- In the Settings menu, select Identity verification to begin the process of verifying your identity.
Filling in Identity Information
- Your Name: Enter your full name as it appears on your official documents.
- Contact Number: Provide a valid contact number that you can be reached on.
- National Identity Card, Passport, or Driving License Number: Enter your identification number from any valid government-issued ID (e.g., passport, national ID, or driver's license).
- Ensure that the information is accurate and matches the document you will upload.
- Add Address: Input your current address as it appears on official documents. This is important to ensure consistency with your identity documents.
Uploading Supporting Documents
- To complete your identity verification, you will need to upload a scanned copy or a clear photo of your government-issued ID.
- Uploading a Document:
- Click on "Click here" or drag and drop your files into the designated area to upload a copy of your national ID, passport, or driver’s license.
- Make sure the document is clear and legible, and the file format is supported (e.g., JPG, PNG, PDF).
- Once uploaded, the document will appear in the list below the upload section.
- If you need to remove a document, click the Trash icon next to the file.
Submitting Your Information
- After filling in all the required fields and uploading your documents, review the information to ensure accuracy.
- Once you’re confident that all details are correct, click the "Send now" button to submit your identity verification request.
- Taskup's verification team will review your submission, and you will be notified once the process is complete.
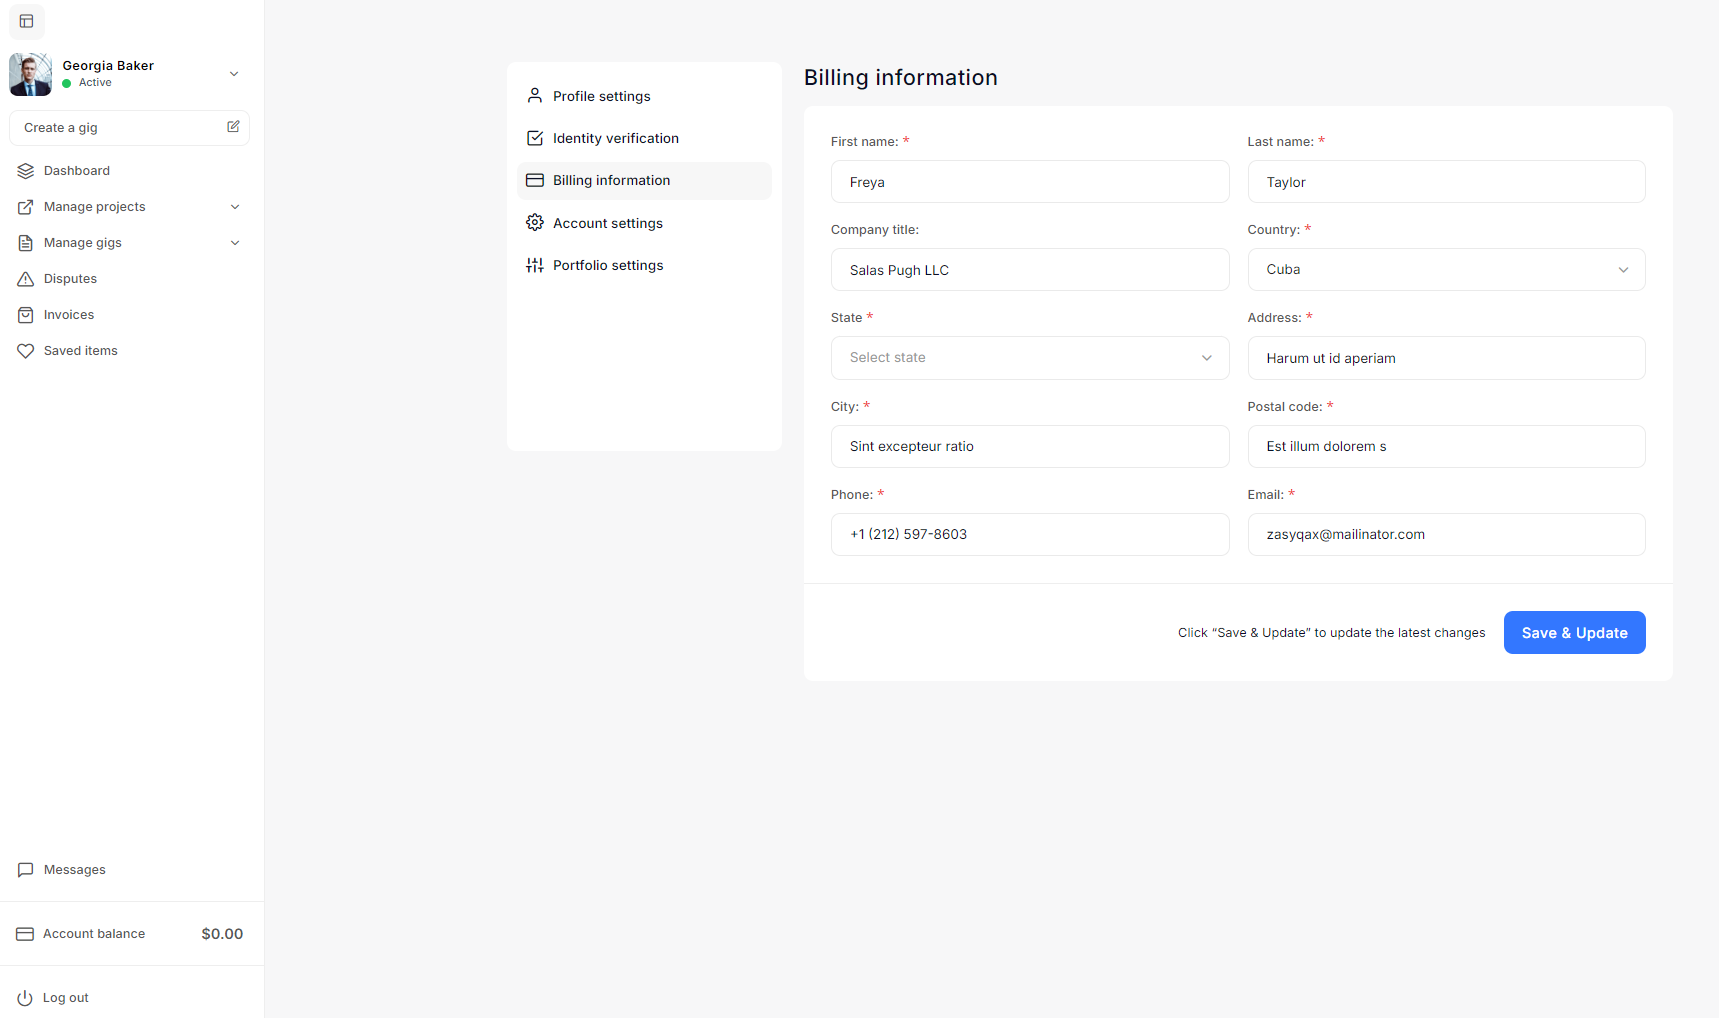
Billing Information
The Billing Information section allows you to enter and update the necessary details related to your financial transactions on Taskup. This information is crucial for generating invoices and ensuring smooth payment processing. Below is a guide on how to fill in and manage your billing information effectively.
Accessing Billing Information
- From the sidebar, click on Settings.
- In the settings menu, select Billing information to access the billing information form.
Filling in Billing Details
- First Name and Last Name: Enter your legal first and last name. This should match the name associated with your bank account or payment method.
- Company Title (Optional): If you operate as a business, you can enter the name of your company (e.g., "Salas Pugh LLC"). If you are a seller working independently, you can leave this field blank.
- Country: Select your country of residence from the dropdown menu. This helps Taskup generate accurate invoices based on regional regulations.
- State/Province: Depending on your country, select the relevant state or province where you reside. Some countries may not require this field.
- City: Enter the city where your business or residence is located.
- Address: Provide the full address, including street number and name, to ensure accurate billing and invoicing.
- Postal Code: Enter the postal or ZIP code for your location. This is important for ensuring accurate invoices and legal documents.
- Phone Number: Add a valid phone number where you can be reached. This is important for any potential billing-related inquiries.
- Email: Ensure that your email is correct, as this is where Taskup will send invoices, payment notifications, and other financial communications.
Saving Your Information
- After entering all the necessary details, review the information to ensure it is accurate and up-to-date.
- Once you are satisfied with the information provided, click Save & Update to store your changes.
- Taskup will use this information to generate your invoices and for any official billing correspondence.
Updating Your Billing Information
- If any of your billing details change (e.g., you move to a new address or change your phone number), you can easily update your information by returning to the Billing information section.
- Be sure to keep your details current to avoid any issues with payment processing or invoice generation.
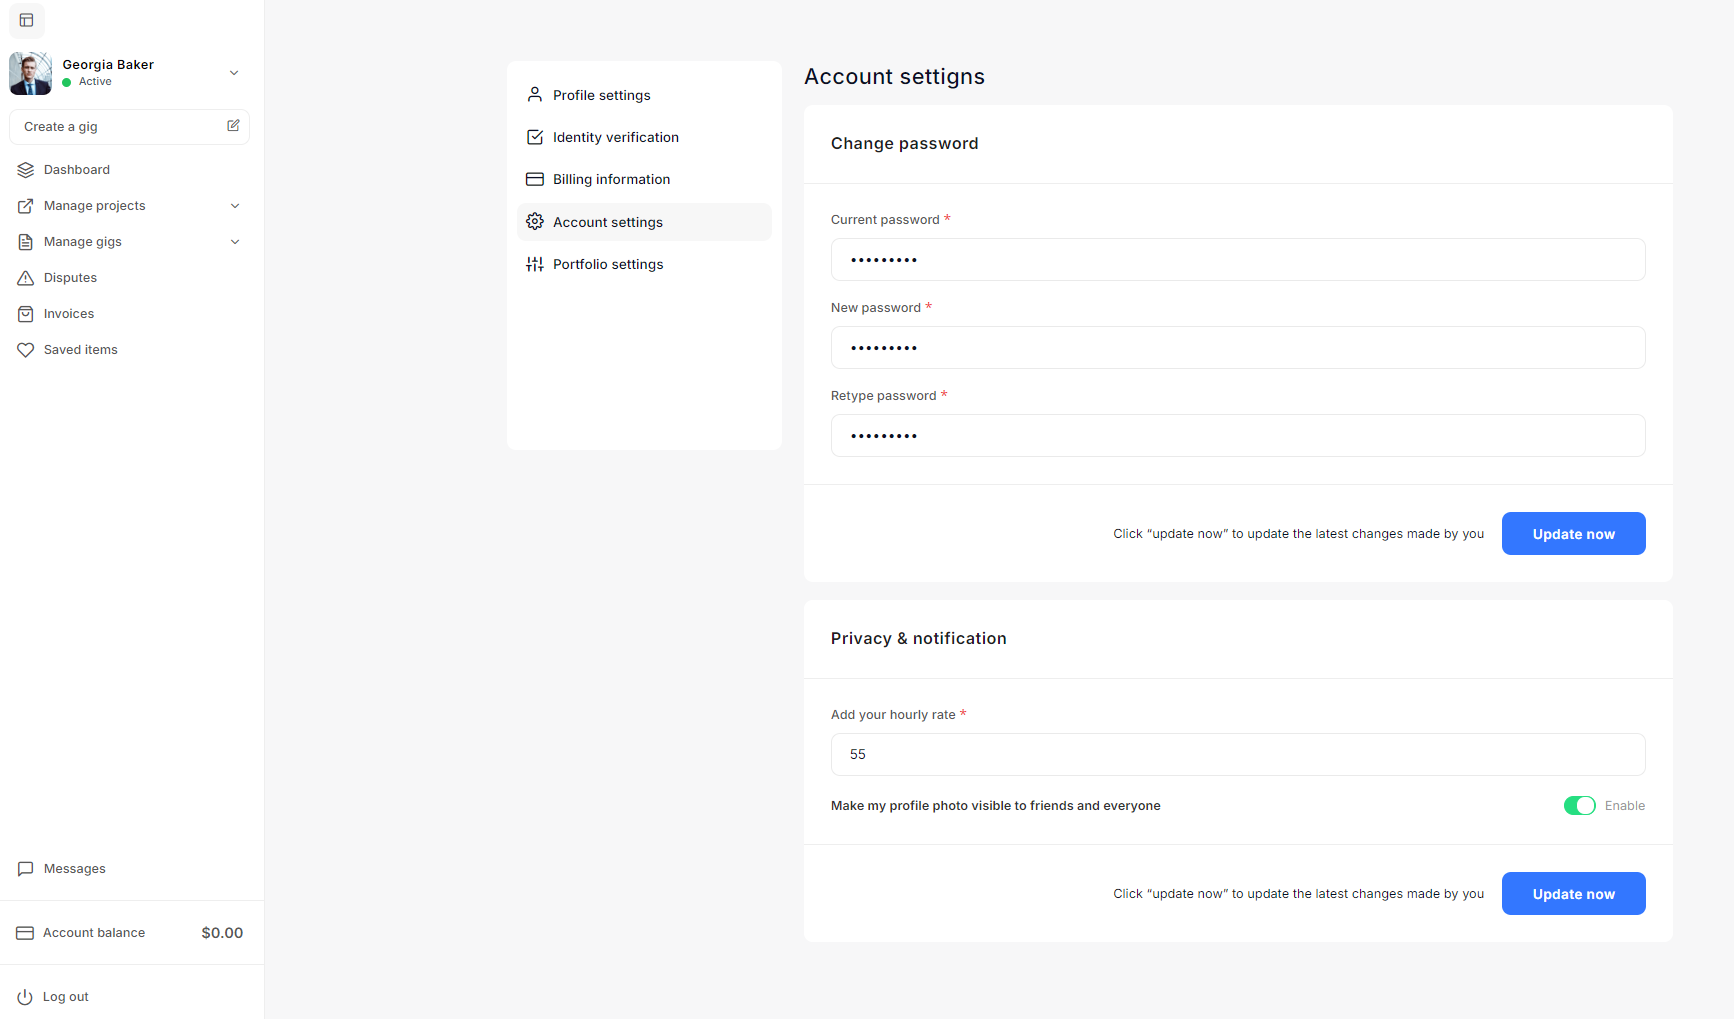
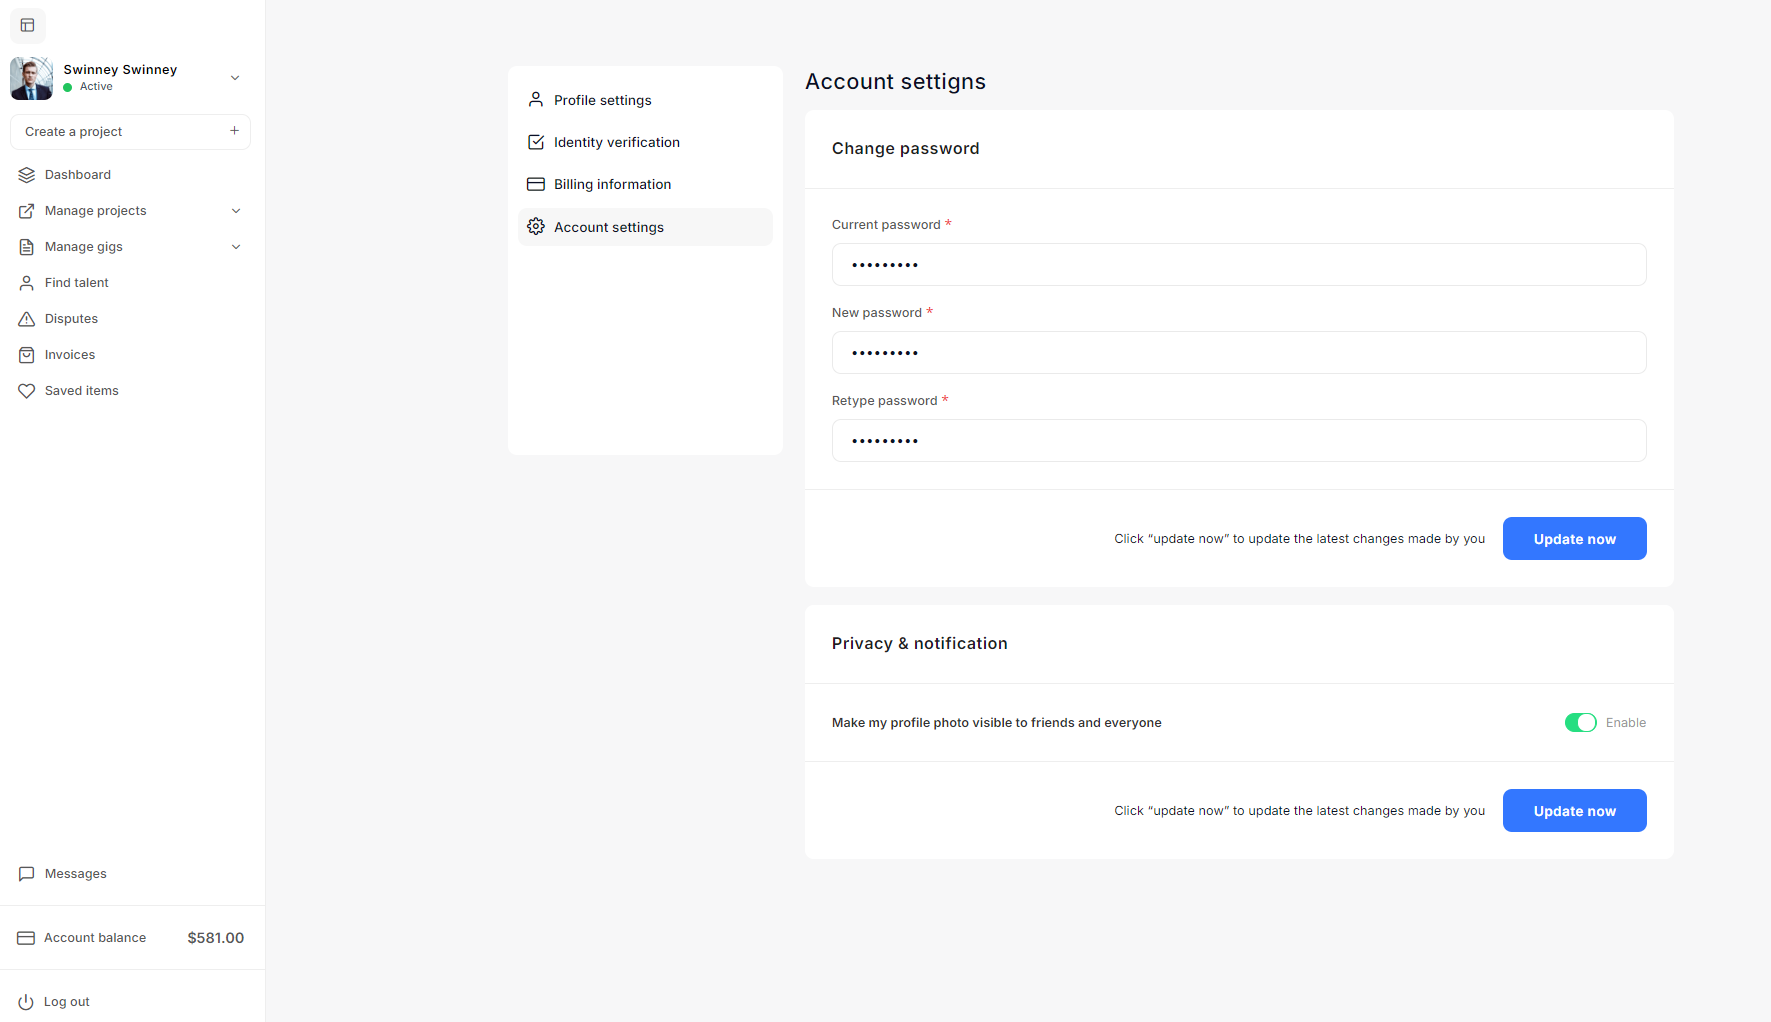
Account Settings
The Account Settings section allows you to manage your password, privacy settings, and hourly rate. Keeping your account secure and ensuring the right privacy settings are in place is crucial for managing your Taskup profile effectively. Below is a guide to the available settings and how to manage them.
Change Password
- To change your password, follow these steps:
- Current Password: Enter your existing password to confirm your identity.
- New Password: Enter a new password that is secure and easy to remember.
- Retype Password: Enter the new password again to confirm it matches.
- Click Update now to save your new password.
- Make sure your password is strong, using a combination of letters, numbers, and special characters to enhance security.
Privacy & Notification Settings
- Add Your Hourly Rate: In this section, you can set your default hourly rate. This is the rate clients will see when they view your profile and gigs.
- Enter the hourly rate that matches your skills and expertise (e.g., $55).
- Profile Photo Visibility:
- There is a toggle switch to control the visibility of your profile photo.
- If enabled, your profile photo will be visible to everyone on Taskup, including friends and potential clients. Disabling it will hide your photo from public view.
- After updating your rate or profile visibility, click Update now to save your changes.
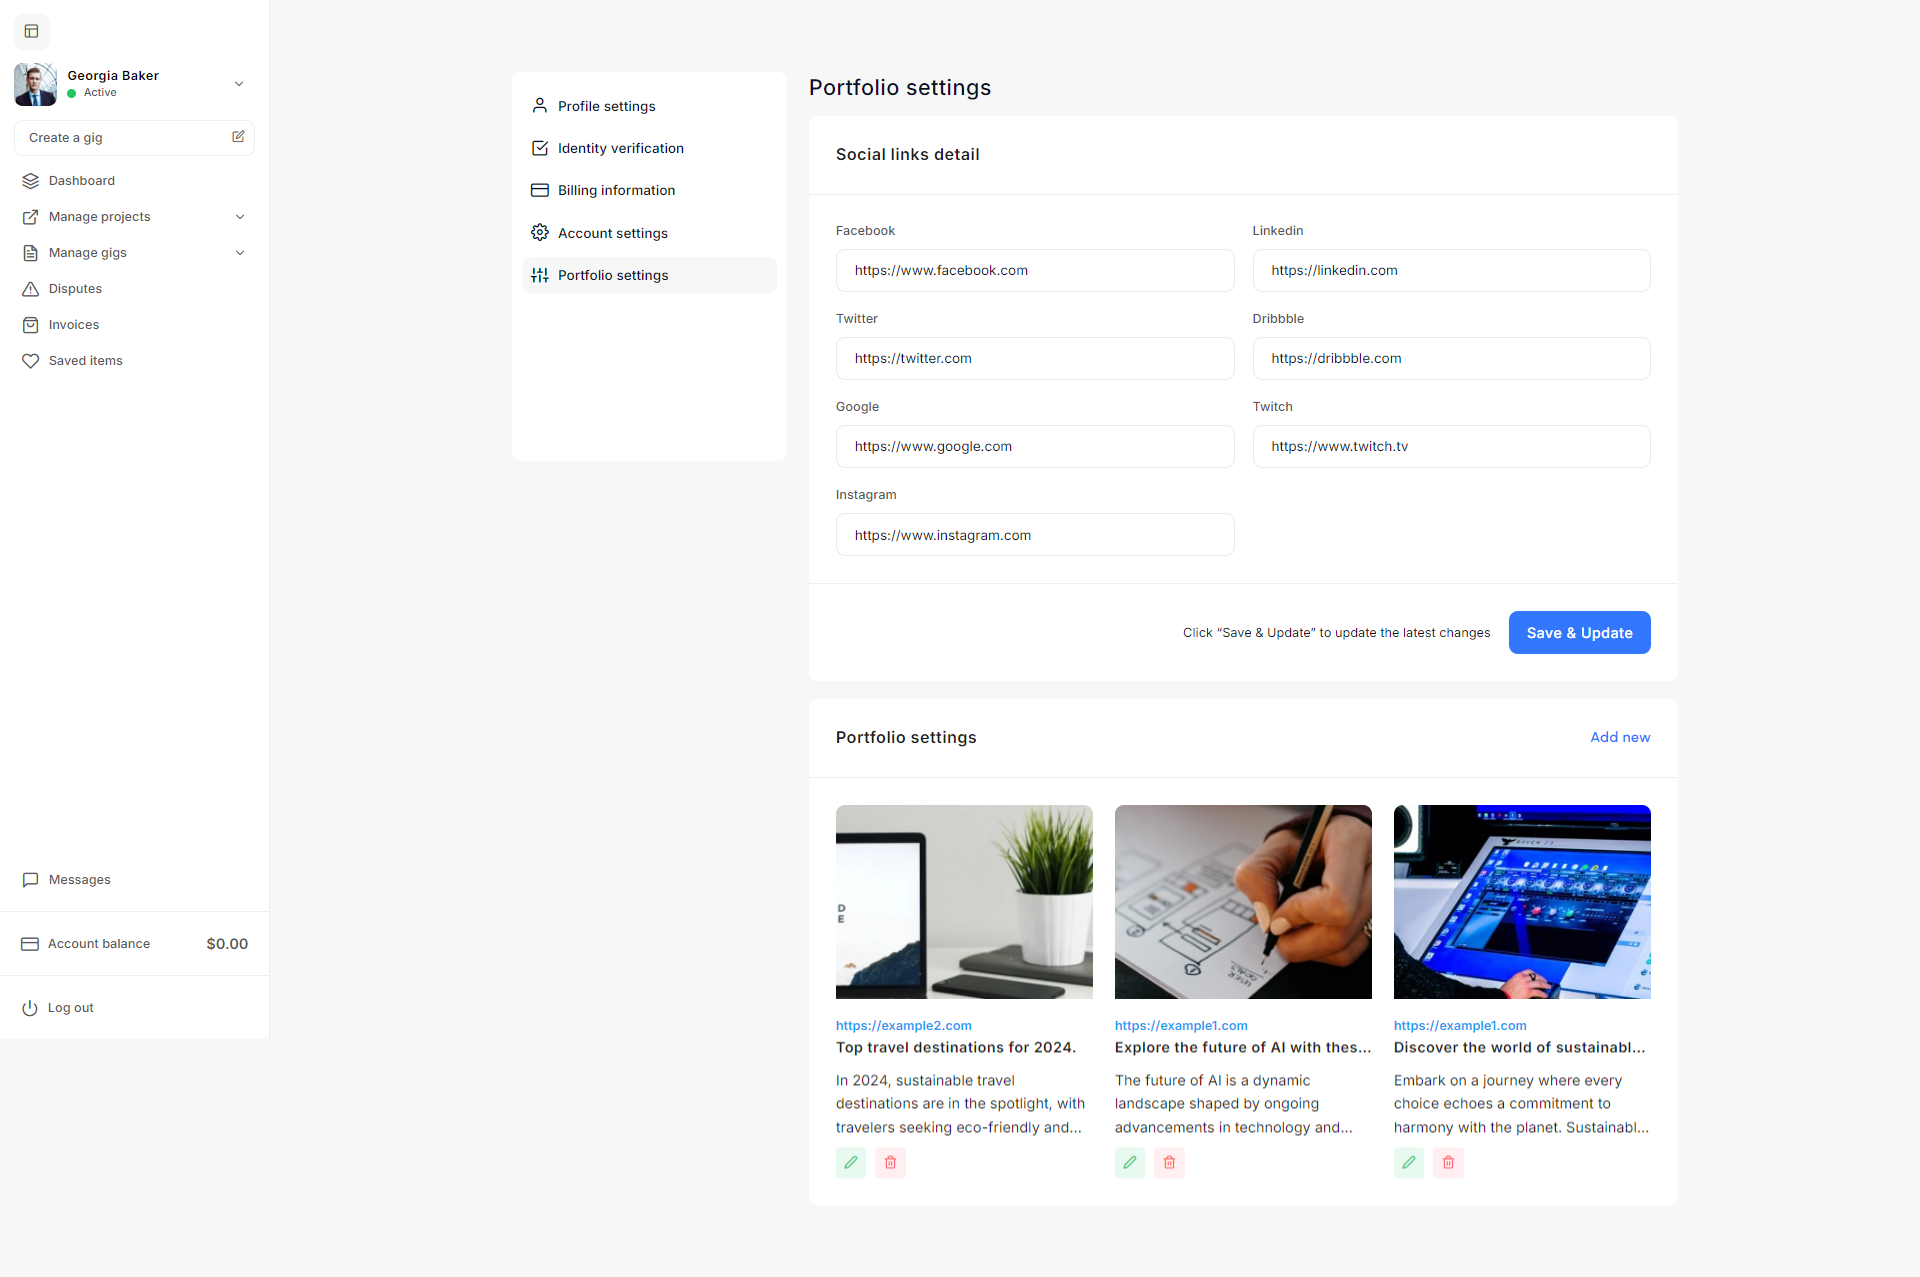
Portfolio Settings
The Portfolio Settings section allows you to manage both your social media links and the projects in your portfolio. This helps you showcase your work and provide potential clients with links to your professional online profiles. Below is a detailed guide on how to configure your portfolio and manage your social links.
Social Links Detail
This section allows you to add links to your social media profiles, enabling clients to discover more about your professional presence online. You can include links to:
- Facebook: Add your Facebook profile or page URL.
- LinkedIn: Provide your LinkedIn profile URL.
- Twitter: Enter your Twitter handle.
- Dribbble: Add your Dribbble profile link, especially if you have design work to showcase.
- Google: Provide a link to your Google profile or any relevant Google page.
- Twitch: If you use Twitch, enter your profile URL.
- Instagram: Add your Instagram profile link if you use it for business or to showcase work.
Steps to add or update social links:
- Copy the URL of the respective social media platform.
- Paste it into the correct field (e.g., Facebook, LinkedIn).
- Once all the relevant fields are filled, click Save & Update to apply the changes.
Managing Portfolio Projects
The Portfolio Settings section below the social links allows you to showcase your past projects. This section is crucial for displaying examples of your work and demonstrating your capabilities to potential clients.
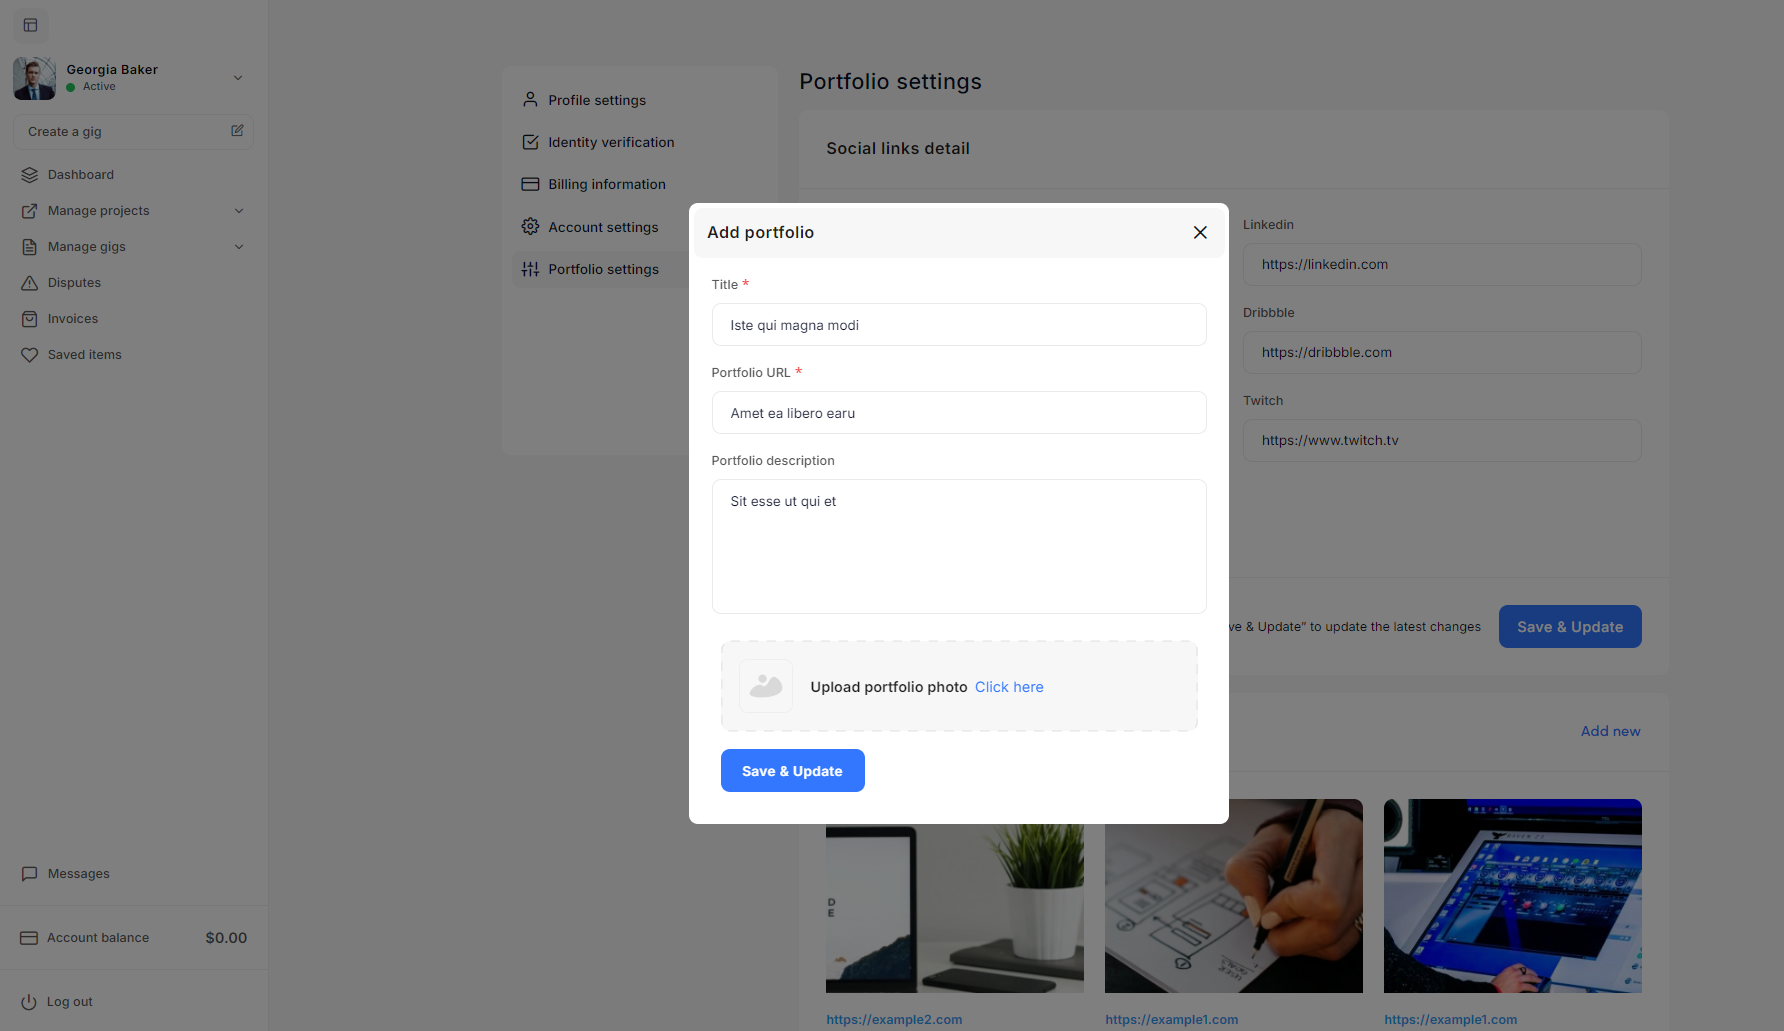
Steps to add a new portfolio project:
- Click Add new to open the portfolio project form.
- Title: Enter a descriptive title for the project (e.g., "Top Travel Destinations for 2024").
- Portfolio URL: Provide the link to the project, such as a live website, article, or gallery where your work is displayed.
- Portfolio Description: Write a brief description of the project, explaining your role and the outcome. Be clear about what value you brought to the project.
- Upload Portfolio Photo: Click on Click here to upload an image representing the project (e.g., a screenshot, cover image, or relevant graphic).
- Click Save & Update to finalize and add the project to your portfolio.
Managing existing portfolio projects:
- You will see each project displayed with its title, image, and URL.
- Edit: Click the pencil icon to edit the project, update its description, or change the image or URL.
- Delete: Click the trash icon to remove a project from your portfolio permanently.
Best Practices for Managing Your Portfolio
- Highlight Relevant Work: Focus on showcasing your best projects that are most relevant to the services you offer on Taskup.
- Update Regularly: Keep your portfolio up to date with recent work, ensuring potential clients see your most current skills and achievements.
- Use High-Quality Images: Make sure the images you upload are clear and professional, as these represent your work to potential clients.
- Keep Descriptions Concise: While providing important details about each project, ensure the descriptions remain easy to read and focused on the results you delivered.
Saving and Updating Changes
- After making any changes to your social links or adding/editing portfolio projects, always click Save & Update to confirm and apply your changes.
- Regularly review your portfolio to ensure it reflects your current skills and expertise.
Manage Projects
The Manage Projects section allows you to manage projects.
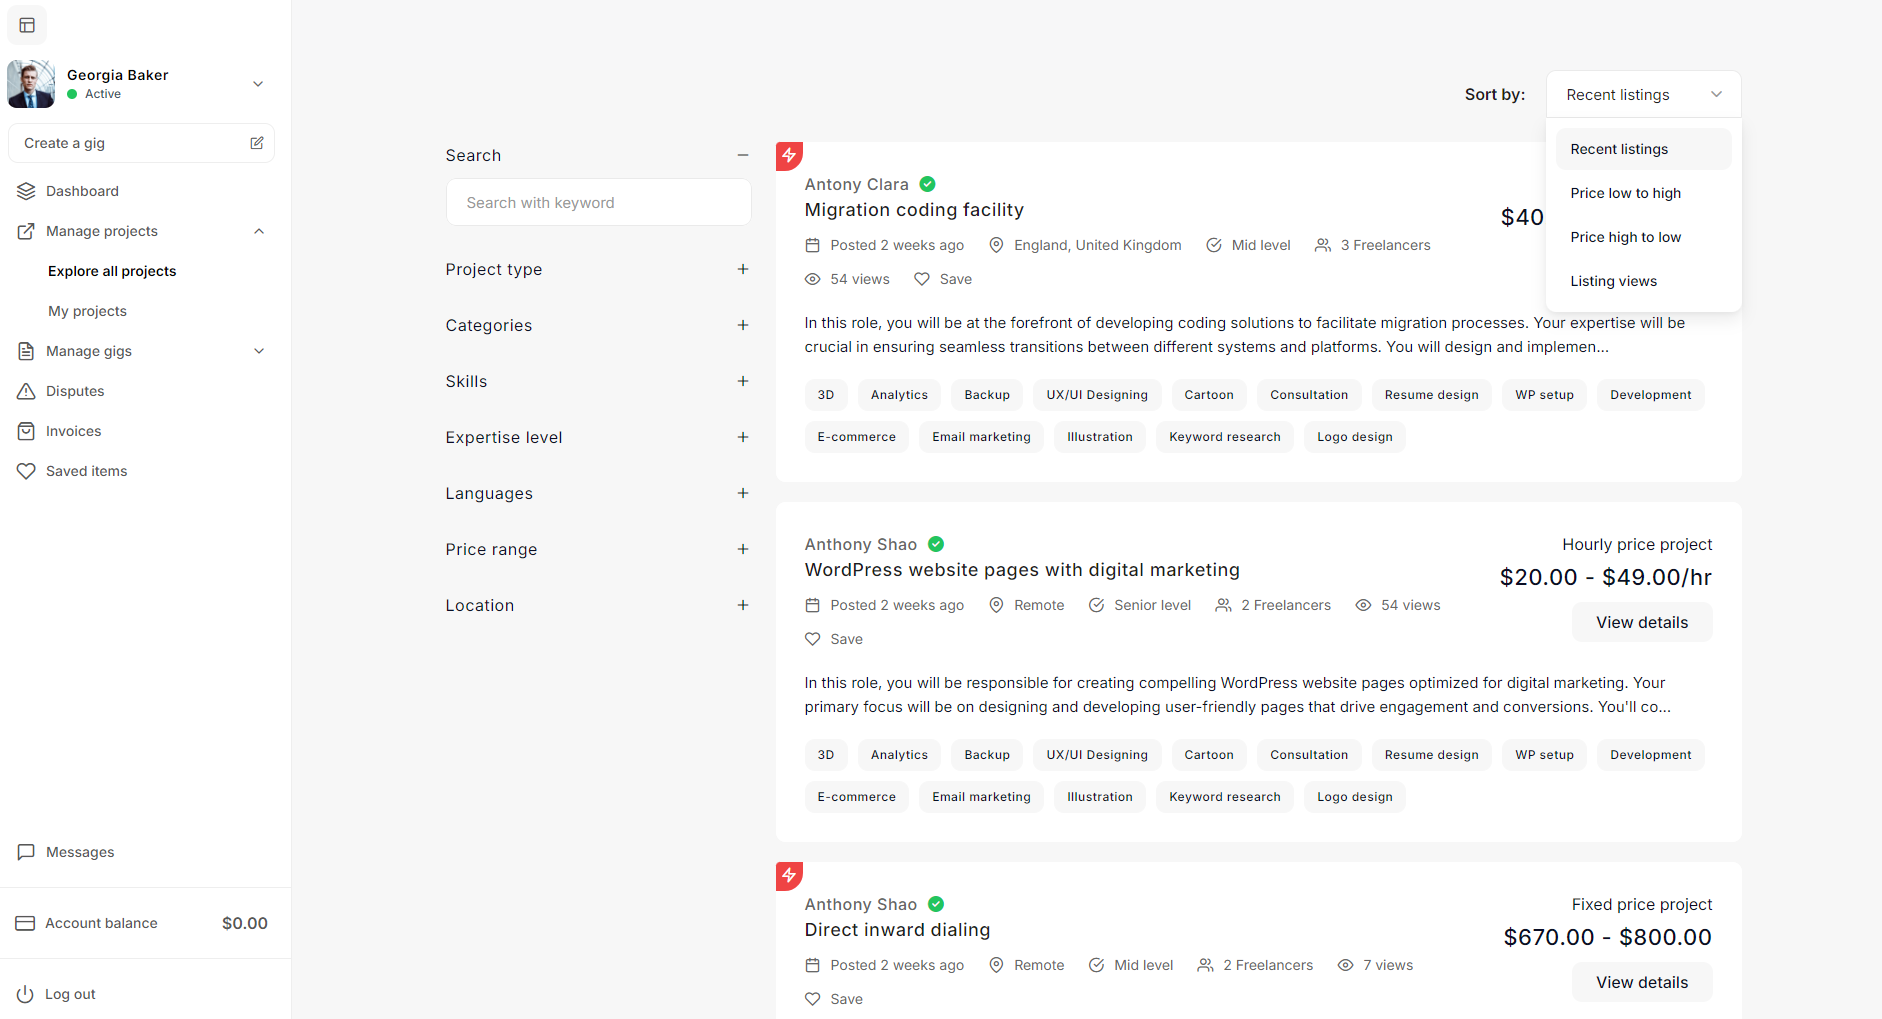
Explore All Projects
The Explore All Projects page allows sellers to search for and browse available projects posted by clients on Taskup. This page provides several filtering and sorting options, helping sellers find projects that match their skills and preferences.
Search Bar
At the top of the page, there is a Search Bar where you can enter keywords related to the type of project you are looking for. For example, you can search for "WordPress development" or "graphic design." This will filter the results to display only relevant project listings based on the keywords entered.
Filter Options
On the left side, there are several filter options to help you narrow down the project listings based on your preferences. The available filters include:
- Project Type: Allows you to filter by project type, such as hourly or fixed-price projects.
- Categories: Select specific categories such as web development, writing, design, etc. to find projects that match your skillset.
- Skills: Filter by skills required for the project, such as SEO, UX/UI design, or development.
- Expertise Level: Choose the experience level that the client is looking for, such as junior, mid-level, or expert.
- Languages: Filter projects based on the language required for communication or the project itself.
- Price Range: Set a minimum and maximum price range to filter projects that meet your financial expectations.
- Location: Select projects based on the client’s or your preferred location. This could include remote work or specific country-based projects.
These filter options allow you to quickly refine your search results to find the most relevant project listings.
Sorting Options
At the top-right corner of the project listings, there is a Sort By dropdown menu, which allows you to sort the project listings based on different criteria, such as:
- Recent Listings: Displays the newest project postings first.
- Price Low to High: Sorts projects from the lowest budget to the highest.
- Price High to Low: Sorts projects from the highest budget to the lowest.
- Using Views: Sorts projects based on how many views they’ve received, helping you gauge the popularity or competition of each project.
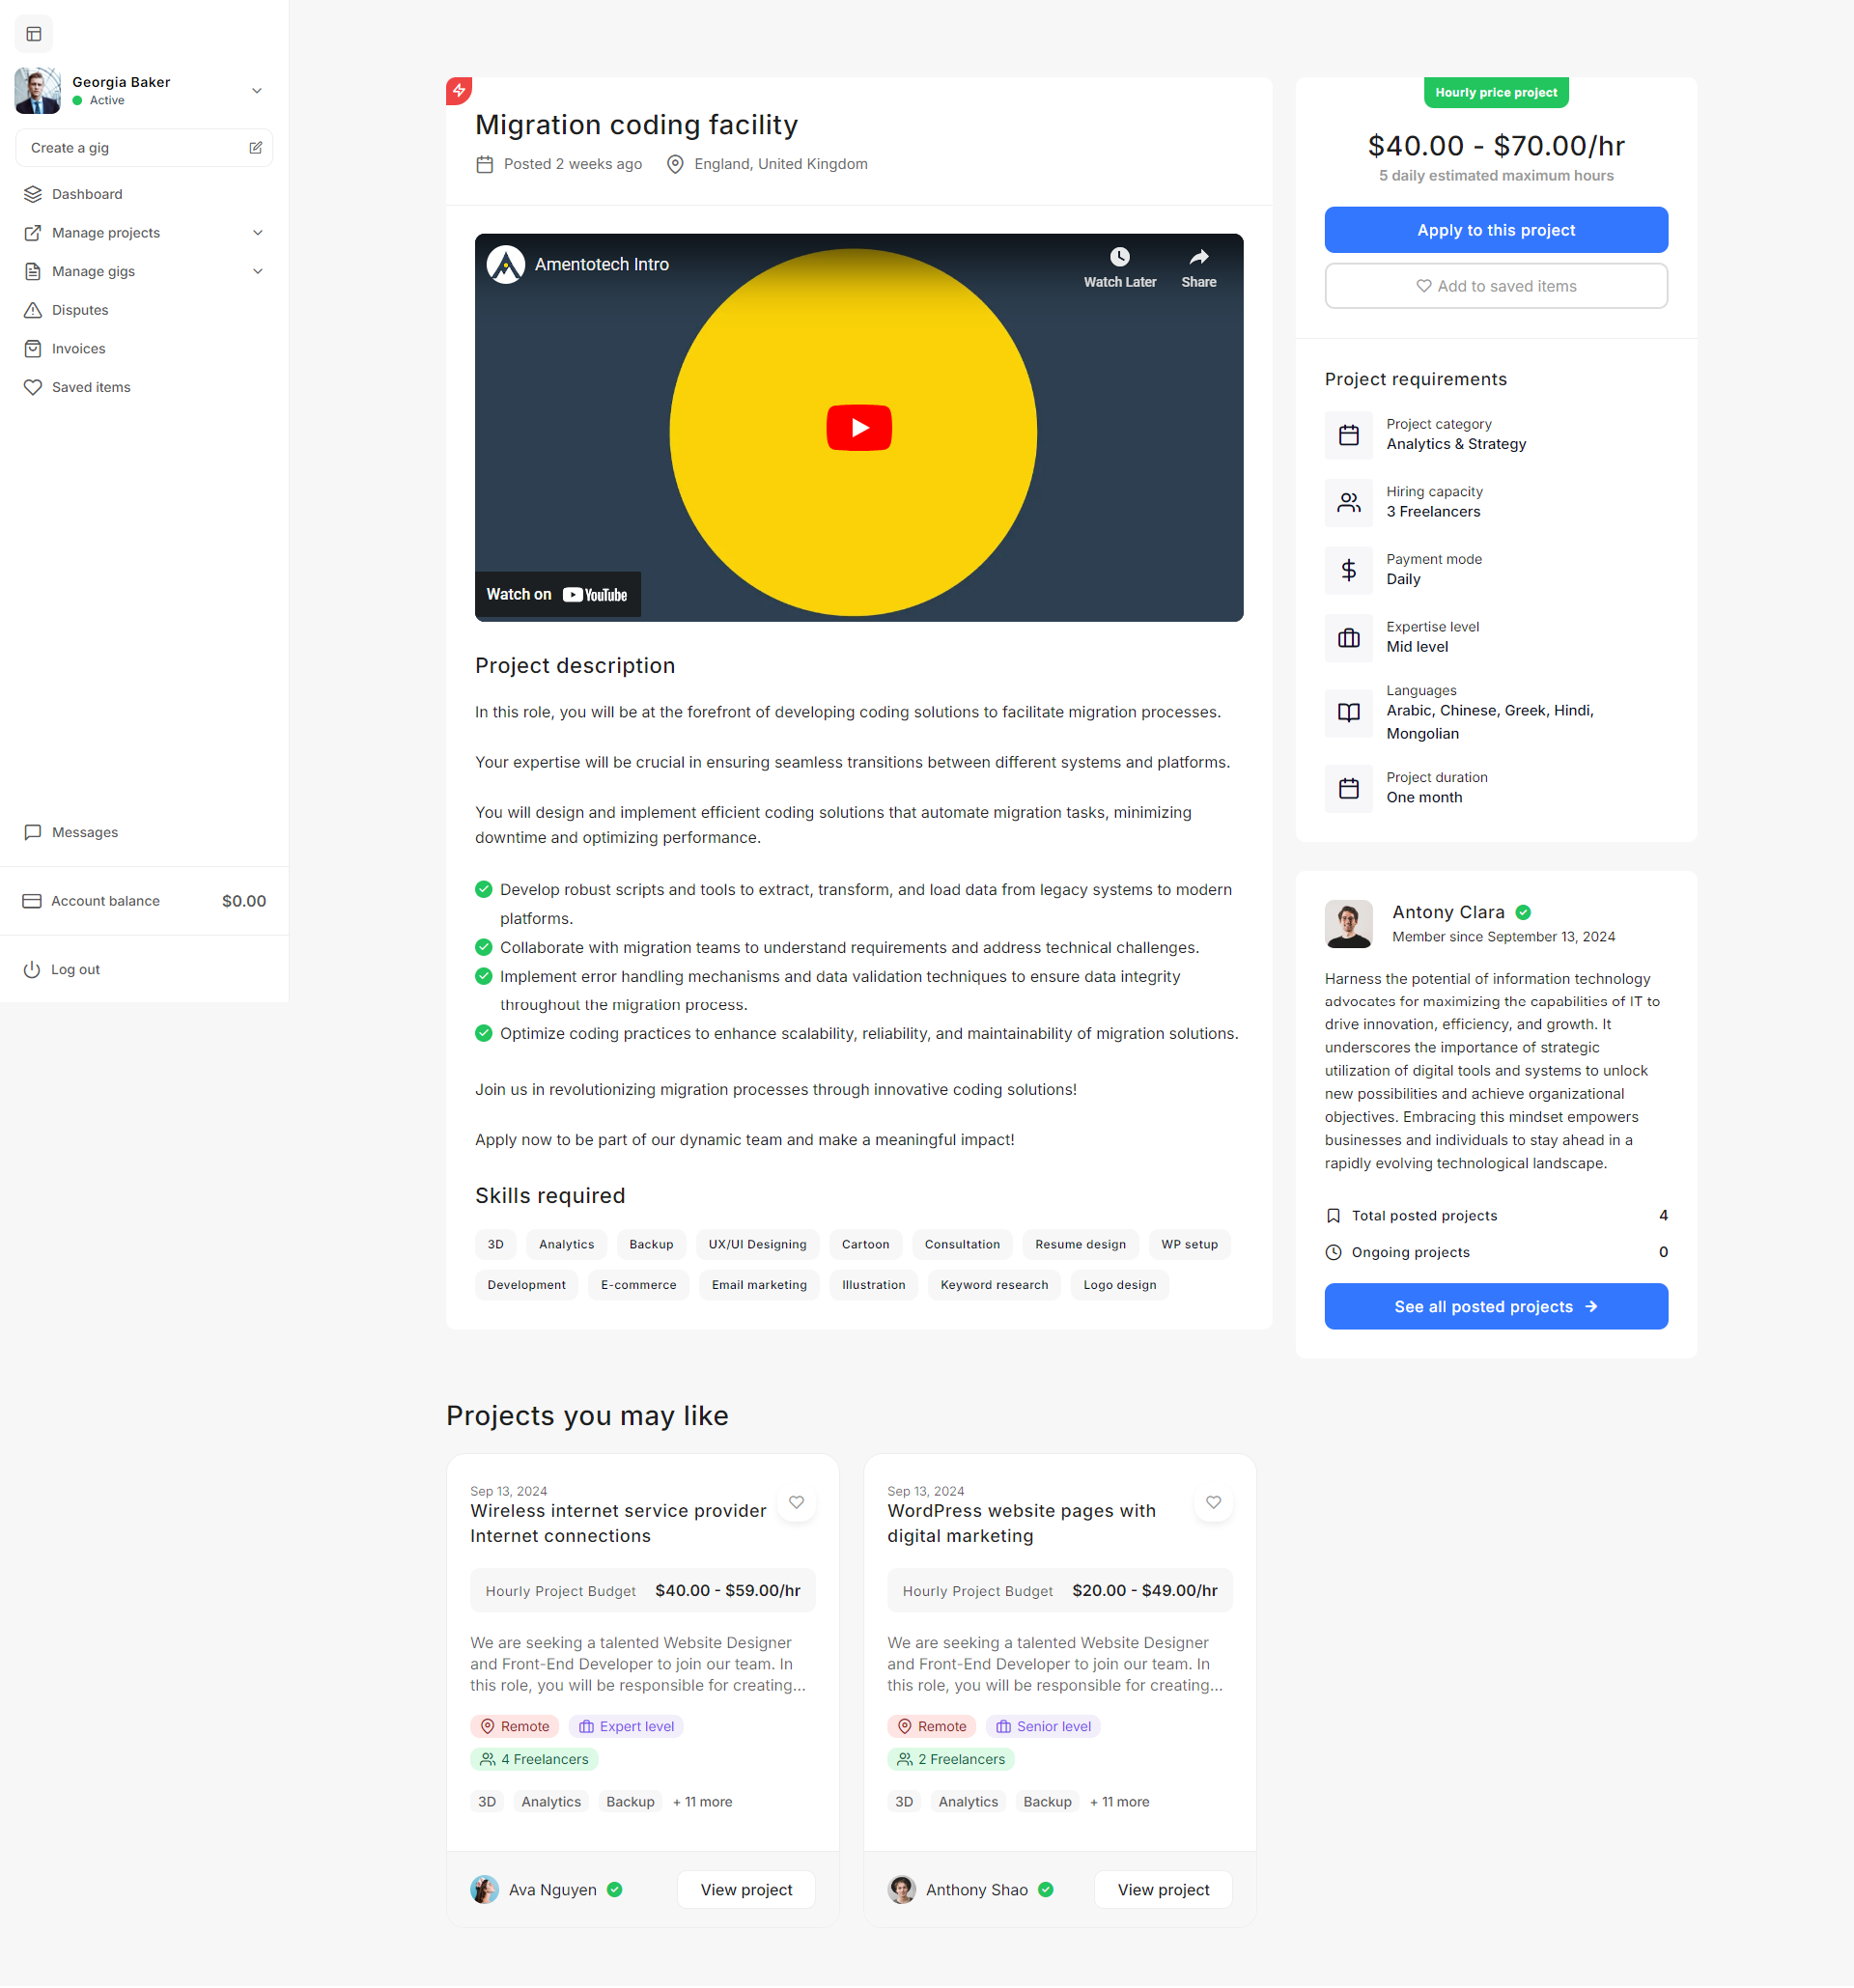
Project Details
The Project Details Page provides sellers with all the necessary information about a project posted by a client. This page allows sellers to review the project scope, budget, required skills, and other key details before deciding to apply.
Project Title and Overview
At the top of the page, the project title, in this case, "Migration coding facility," is displayed prominently. Below the title, the following important details are provided:
- Posted Date: Indicates how long ago the project was posted (e.g., "2 weeks ago").
- Client Location: Shows the location of the client (e.g., "England, United Kingdom").
- Hourly Rate: Displays the project budget as an hourly price (e.g., "$40.00 - $70.00/hr"). Additionally, it shows the estimated maximum hours required per day (e.g., "5 daily estimated maximum hours").
Project Video Introduction
In some cases, as with this project, the client may include an introductory video to provide more context about the project. The video can be played directly from this page, allowing sellers to learn more about the project visually.
Project Description
This section provides a detailed overview of the project scope and responsibilities. In this project, the seller will be involved in the development of coding solutions for migration processes. The description explains the main tasks involved, such as:
- Designing and implementing efficient coding solutions.
- Optimizing code practices for scalability and performance.
- Collaborating with migration teams to address technical challenges.
- Extracting and loading data from legacy systems to modern platforms.
The project description also highlights the impact the seller will have by working on this project, which helps the seller understand the importance of the work.
Skills Required
A set of skills tags is displayed to indicate the specific skills required to complete the project. These tags might include:
- Analytics
- Backup
- UX/UI Designing
- Cartoon
- Consultation
- Resume Design
- WP Setup
- Development
These skill tags provide a quick way for sellers to assess whether they are qualified for the project based on their expertise.
Action Buttons
- Apply to this Project: Clicking this button allows sellers to submit their application or proposal for the project.
- Add to Saved Items: Sellers can save this project for future reference by clicking this button. The project will be added to their "Saved Items" section for easy access later.
Project Requirements and Client Information
On the right-hand side, there's a panel that summarizes key project requirements:
- Project Category: Specifies the category of the project (e.g., "Analytics & Strategy").
- Hiring Capacity: Displays the number of sellers the client is looking to hire (e.g., "3 Sellers").
- Payment Mode: Indicates the payment method or frequency (e.g., "Daily").
- Expertise Level: Shows the experience level required for the project (e.g., "Mid Level").
- Languages: Lists the languages required for the project, such as "Arabic, Chinese, Greek, Hindi, Mongolian."
- Project Duration: Displays the expected duration of the project (e.g., "One month").
Below these details, there's a section with information about the Client:
- Client Name: The client’s name is shown, and their account is verified with a "Member since" date (e.g., "September 13, 2024").
- Client Overview: A brief client description helps sellers understand the client’s expertise, industry, and overall business goals.
- Total Posted Projects: Shows the total number of projects posted by the client.
- Ongoing Projects: Displays the number of projects currently in progress with this client.
Sellers can also click on "See all posted projects" to view all other projects posted by this client.
Related Projects (Projects You May Like)
At the bottom of the page, sellers are presented with a list of related projects that might interest them. This section suggests projects similar to the one currently viewed based on the seller’s profile or project browsing history.
For each suggested project, the following details are shown:
- Project Title: Title of the project, such as "Wireless internet service provider internet connections" or "WordPress website pages with digital marketing."
- Hourly/Fee Rate: Displays the budget range, either hourly or fixed (e.g., "$40.00 - $59.00/hr").
- Sellers Required: Shows the number of sellers the client is looking for.
- Experience Level: Indicates whether the project is for entry-level, mid-level, or expert sellers.
- Skills Required: Lists some of the skills required for each related project.
Sellers can click View Project to see the full project details and potentially apply for those projects as well.
How to Apply for a Project
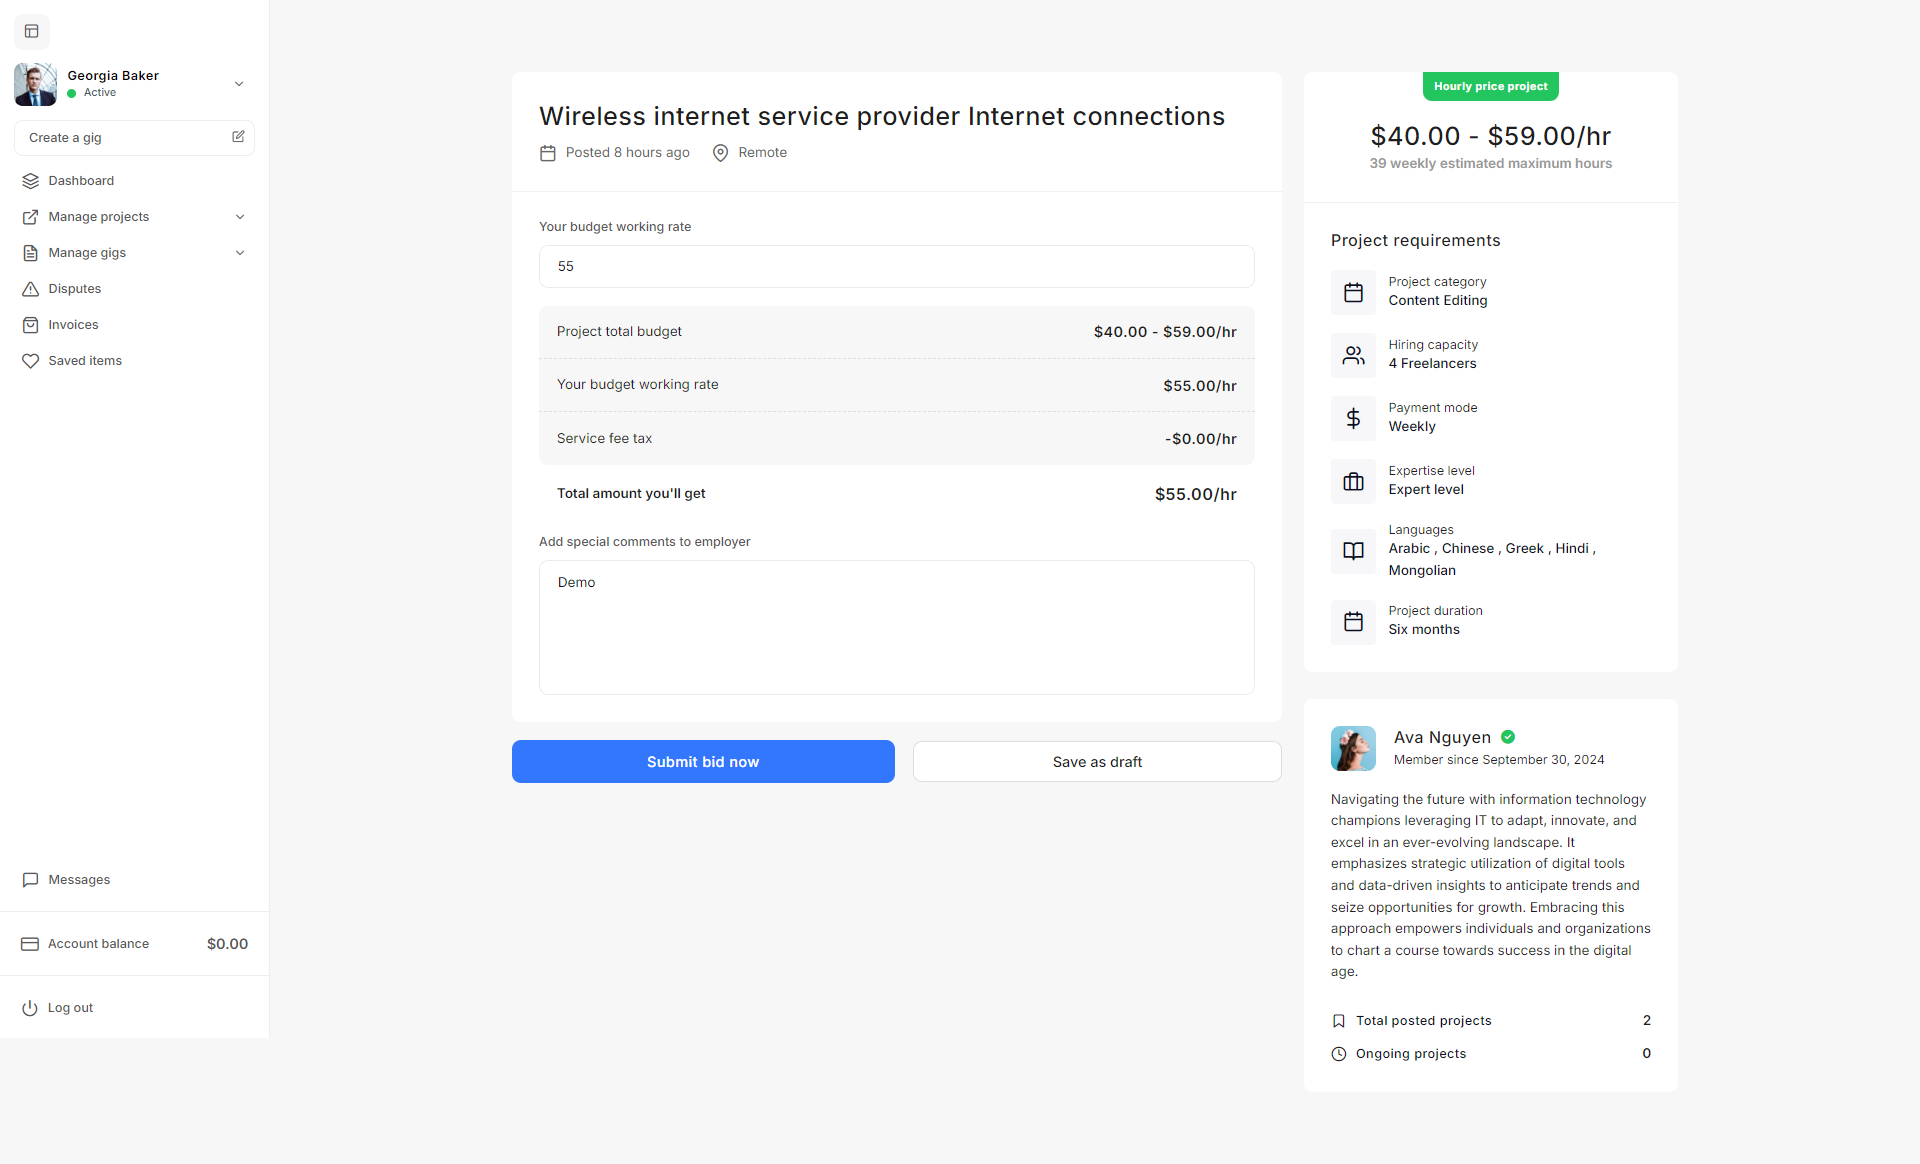
Hourly Price Projects
Hourly price projects on Taskup allow sellers to charge clients based on the number of hours worked, with a pre-agreed hourly rate. In contrast to fixed-price projects, where you are paid a lump sum upon completion, hourly price projects allow you to track and submit hours for payment on a regular basis.
Understanding Hourly Price Projects
- Hourly Rate: Clients specify an hourly rate range for the project (e.g., $40.00 - $59.00/hr). The seller’s bid must fall within this range.
- Payment Mode: Payment for hourly projects is typically done on a weekly basis, depending on the hours submitted and approved.
- Estimated Maximum Weekly Hours: Some hourly projects include an estimated number of maximum weekly hours (e.g., 39 hours/week), which indicates the client’s expectation of how many hours the seller will be required to work.
Bidding on an Hourly Price Project
- Your Budget Working Rate: Enter the hourly rate you would like to bid for the project. This should fall within the client’s specified range (e.g., $40.00 - $59.00/hr).
- Example: If you choose an hourly rate of $55.00, the system will automatically calculate the total amount you’ll earn based on this rate.
- Service Fee: Taskup may deduct a service fee from the hourly rate, which will be displayed during the bidding process.
- Add Special Comments to Employer: You can include additional information or comments for the client, explaining why you are the right fit for the project, or clarifying any specific details related to the bid.
Once you are satisfied with your bid:
- Click Submit Bid Now to officially send your proposal to the client.
- Alternatively, click Save as Draft if you want to save your bid and submit it later.
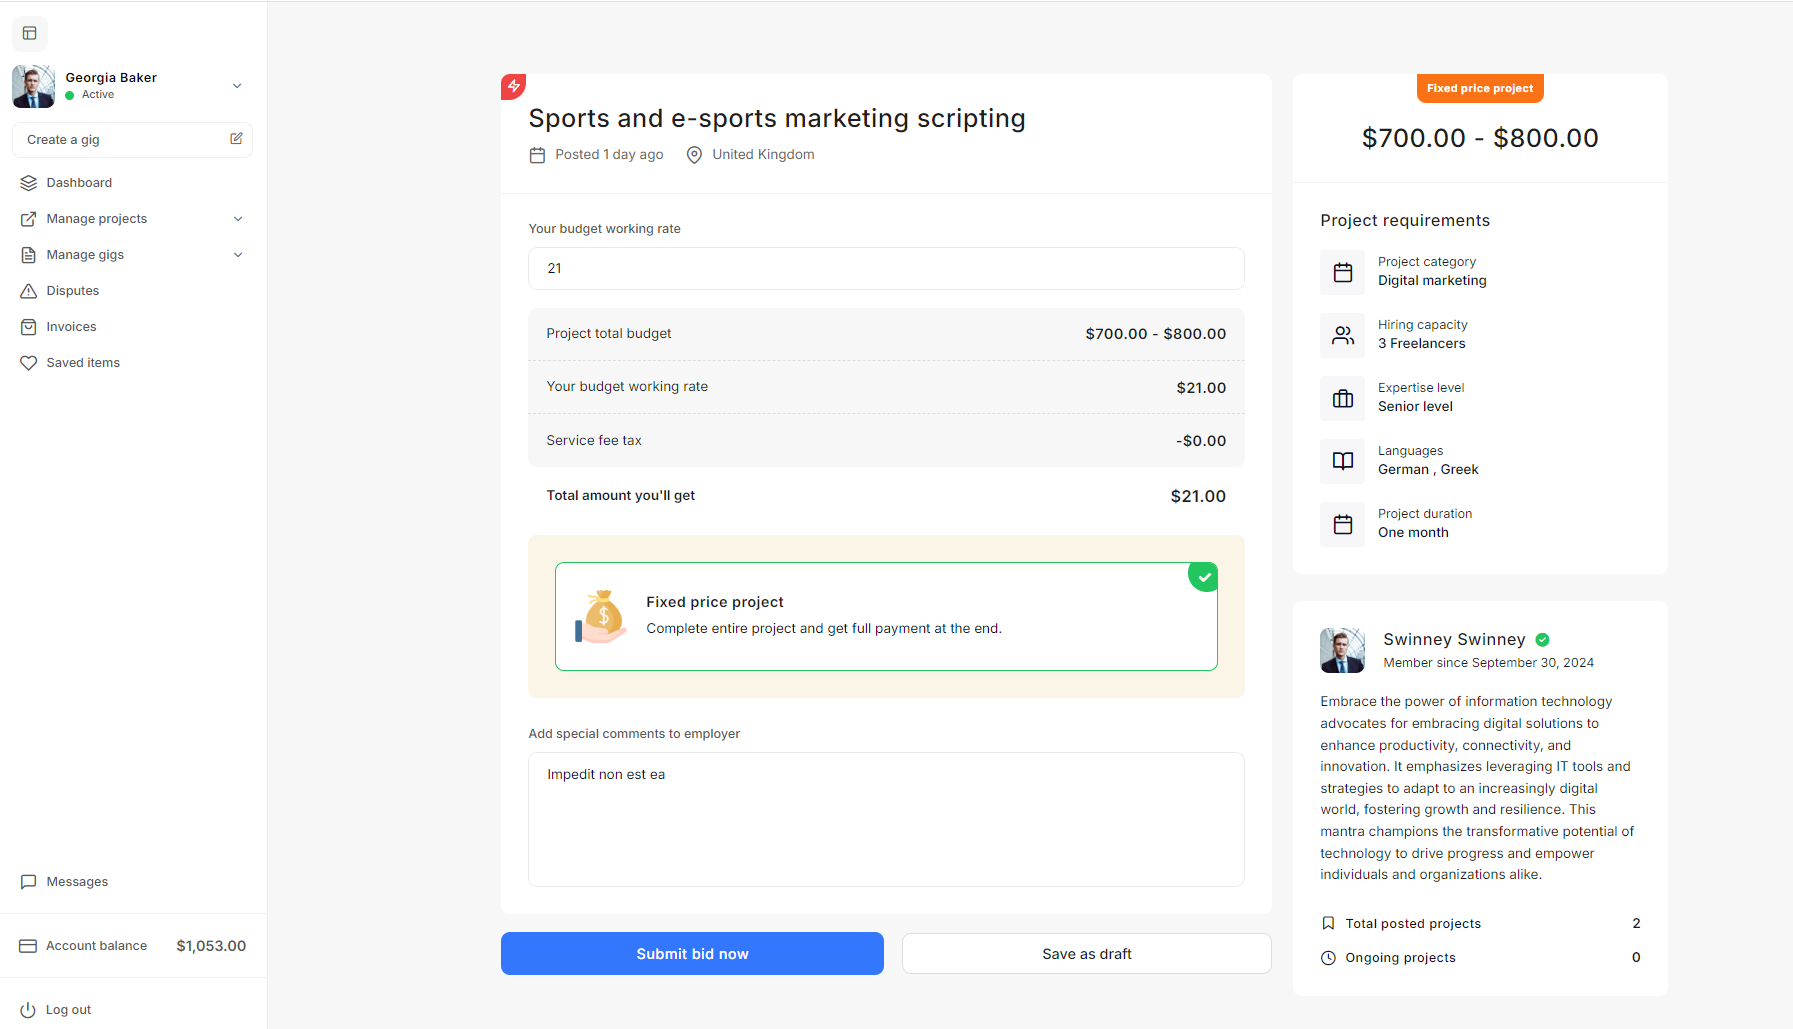
Fixed Price Projects
Fixed-price projects on Taskup offer sellers the opportunity to complete a project for a predetermined total budget. In contrast to hourly projects, the payment for a fixed-price project is made once the entire job is completed and approved. This guide will walk you through the process of managing and bidding on fixed-price projects.
Understanding Fixed Price Projects
- Total Budget: For fixed-price projects, clients set a budget range (e.g., $700 - $800). This is the total amount the client is willing to pay for the completed project.
- Service Fee: Taskup may deduct a service fee from the total amount, and this fee is automatically calculated when you submit your bid.
- Full Payment at Completion: Payment is only released once the entire project is completed and approved by the client. Partial payments are not made during the project.
Bidding on a Fixed Price Project
- Your Budget Working Rate: Enter the hourly rate or working rate that you estimate for the project. This should reflect the amount you expect based on the total budget and the amount of work required.
- Total Amount You’ll Get: Based on your working rate and any service fees, Taskup will display the total amount you’ll receive upon completion of the project.
- Add Special Comments to Employer: This section allows you to include a personalized message to the client, explaining why you are the right fit for the project, or clarifying any specific project details.
Once you are satisfied with your bid:
- Click Submit Bid Now to officially send your proposal to the client.
- Alternatively, click Save as Draft if you want to save your bid and submit it later.
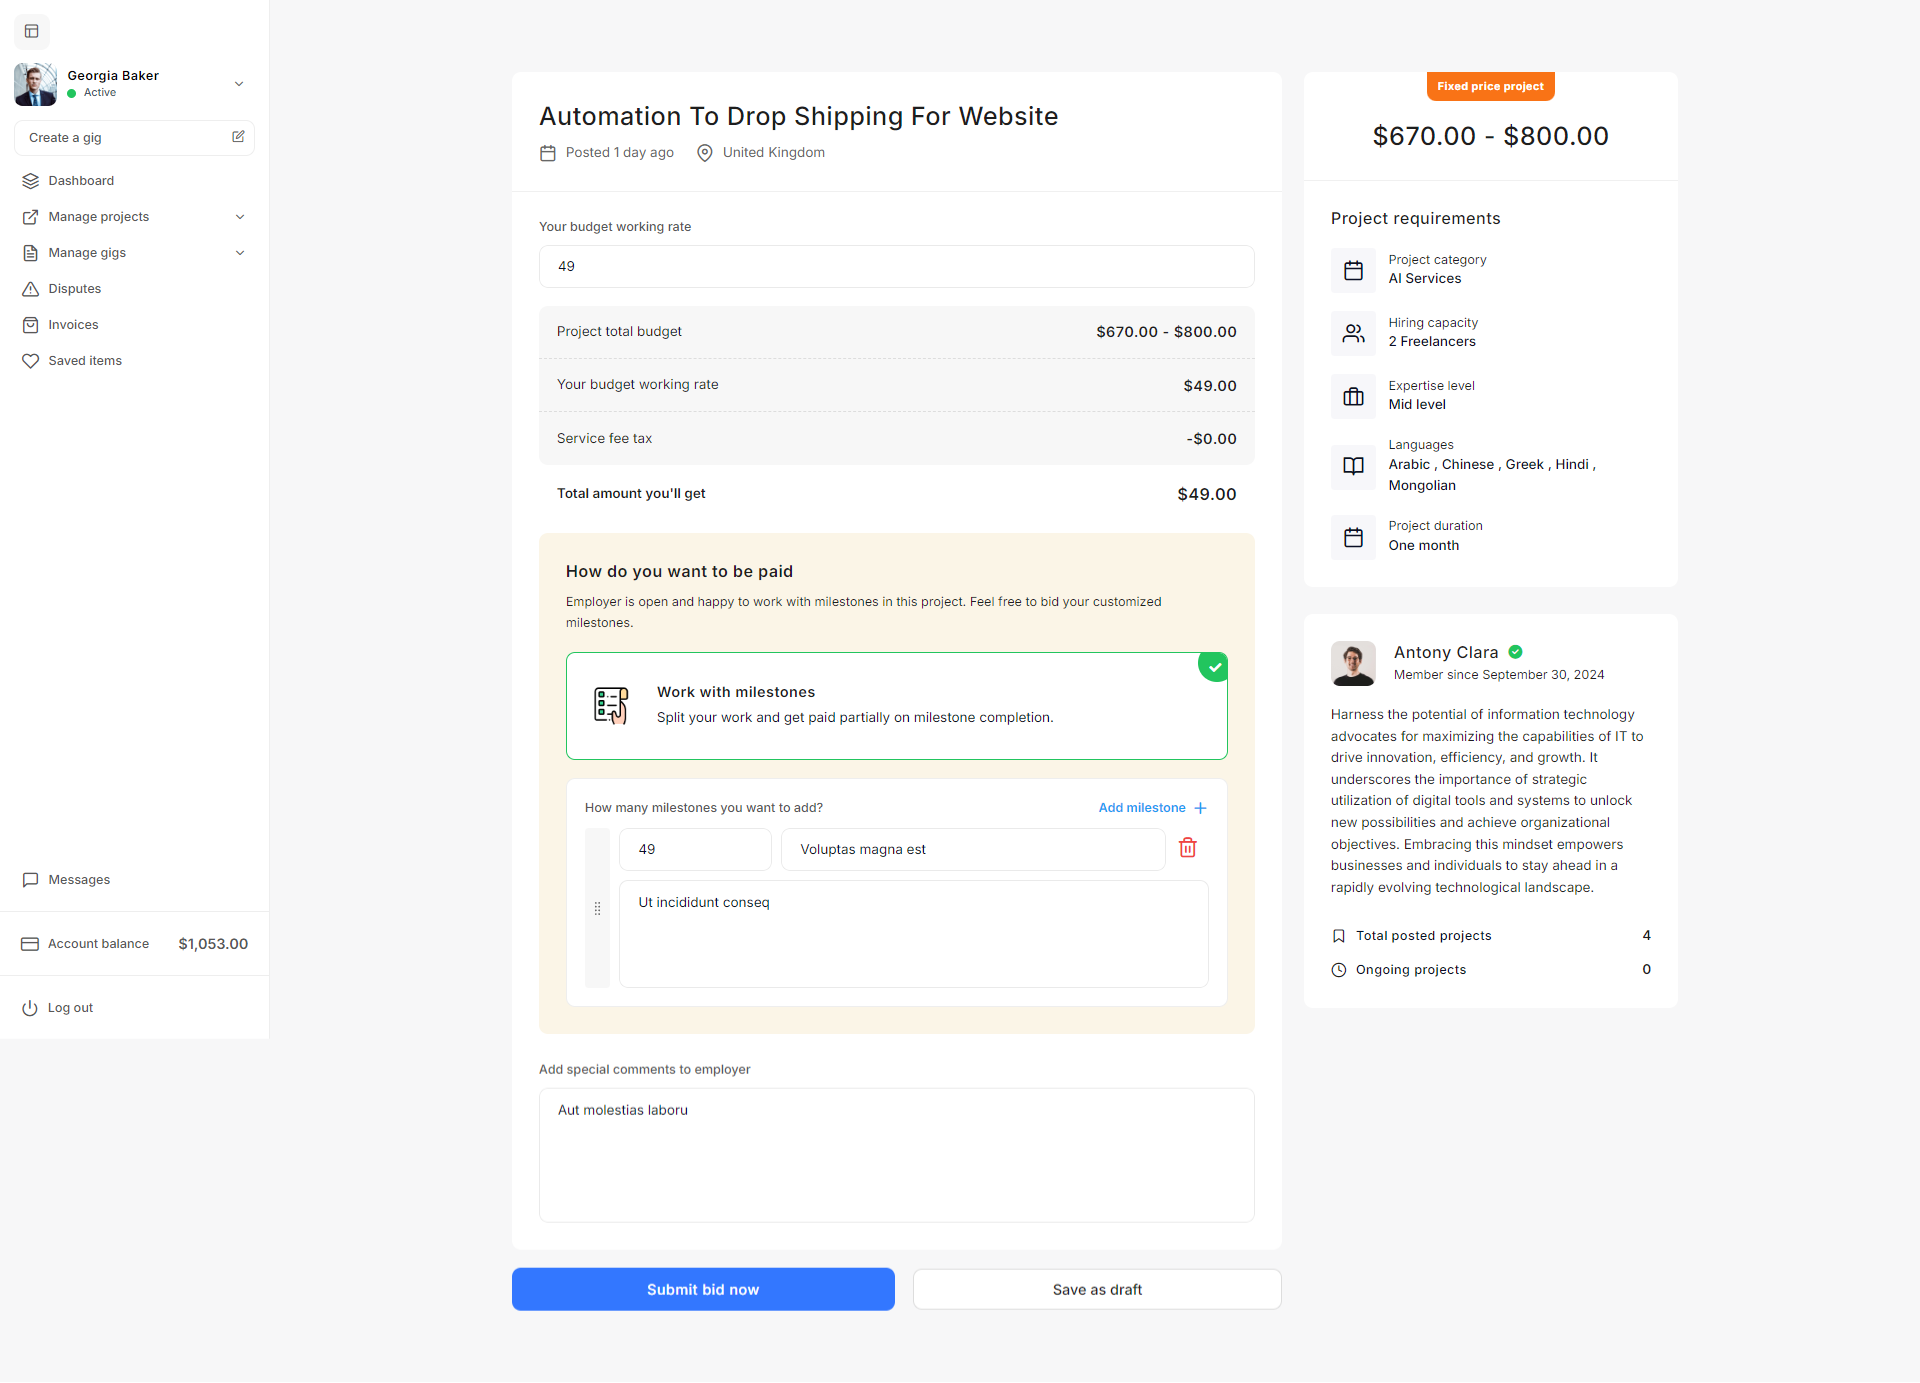
Milestone-Based Fixed Price Projects
In addition to standard fixed-price projects, Taskup allows sellers and clients to work with milestones. This structure splits a project into smaller, manageable segments, with payments being made upon the completion of each milestone. Milestone payments help ensure a steady workflow and enable both parties to track progress more effectively.
Understanding Milestone-Based Projects
- Fixed Price: Like other fixed-price projects, the total budget for the project is predefined (e.g., $670.00 - $800.00). However, instead of receiving the full payment upon project completion, payments are split based on milestone completion.
- Working with Milestones: You and the client agree on dividing the project into multiple milestones, each representing a specific deliverable or task. You receive partial payment upon completing and getting approval for each milestone.
Bidding on a Milestone-Based Project
- Your Budget Working Rate: Enter the working rate you plan to bid. In this example, the rate is $49 per milestone. This rate will be used as a basis to calculate the total amount for each milestone.
- Total Budget: The project’s total budget is specified by the client (e.g., $670.00 - $800.00).
- Service Fee: If applicable, Taskup’s service fee is deducted and will be automatically shown during the bidding process.
- Add Special Comments to Employer: Use this section to explain any specific details related to your bid or how you plan to tackle the project.
Once your bid and milestones are ready:
- Click Submit Bid Now to officially send your proposal.
- You can also click Save as Draft if you wish to save the bid and complete it later.
Working with Milestones
Taskup provides the option to divide the project into milestones that correspond to specific stages or deliverables. Here’s how to structure them:
- How Many Milestones Do You Want to Add?: In this section, you can add one or more milestones, with each milestone representing a key task or deliverable within the project.
- Example: You can add a milestone for completing the first draft of a website or delivering the setup of an e-commerce system.
- Milestone Budget: Set the budget for each milestone based on the scope of work associated with it. You will get paid the amount specified for each milestone upon its completion and approval.
- Add Milestone: Click the Add Milestone button to introduce additional milestones. For each milestone, specify:
- Milestone Amount: The amount you want to be paid for completing that milestone.
- Description: Provide a clear description of the work that will be completed during that milestone.
- Milestone Example: You could structure milestones as follows:
- Milestone 1: Research and planning for $150.00.
- Milestone 2: Initial draft of website setup for $300.00.
- Milestone 3: Final review and delivery of the project for $200.00.
Projects
In Taskup, managing your projects effectively is crucial for staying organized and keeping track of your workflow. The Project Status filter allows you to categorize and monitor your projects based on their current status, making it easier to manage your tasks. Below is the guide for understanding and using the project status filters.
Project Status Filters
You can filter your projects by status using the dropdown options in the Project Status filter. These include:
- All Projects:
- This option shows all the projects you are involved with, regardless of their status. It combines projects in all different stages (drafted, pending verification, in queue, etc.).
- Drafted:
- Drafted projects are those that are saved as drafts but not yet submitted. These are projects you may still be working on or editing before finalizing and submitting a proposal to a client.
- To view these, select the Drafted filter in the project status dropdown.
- You can edit or delete draft projects by selecting the options menu for each project.
- Your Verification is Pending:
- If your account verification is not complete, projects will show the Your Verification is Pending label.
- Projects with this status cannot proceed until the verification process is completed.
- You can still view, edit, or even prepare your proposals, but you will not be able to move forward until verification is approved.
- In Queue:
- In Queue projects are those that have been approved and are ready to be started once you're available.
- These are projects that you are scheduled to work on but haven’t started yet due to time constraints or scheduling.
- You can view these projects and prepare to begin work once your current workload allows.
Project Actions
Once you have filtered your projects based on their status, you will have several options for managing each project:
- Edit Proposal: You can modify the details of your proposal if the project has not been submitted or finalized.
- Delete Proposal: If you no longer wish to pursue the project, you can delete your proposal.
- View Project: This allows you to view the full project details, including client requirements and project scope, regardless of its status.
Project Type Filter
In conjunction with the Project Status filter, you can also use the Project Type filter to further refine your search. The options include:
- Fixed: Displays only fixed-price projects.
- Hourly: Displays only hourly-rate projects.
- All Projects: Displays both fixed and hourly projects.

Create a Gig
Access the "Create a Gig" Section
- From your dashboard, locate the "Create a gig" option on the left sidebar.
- Click on it to begin setting up a new gig.
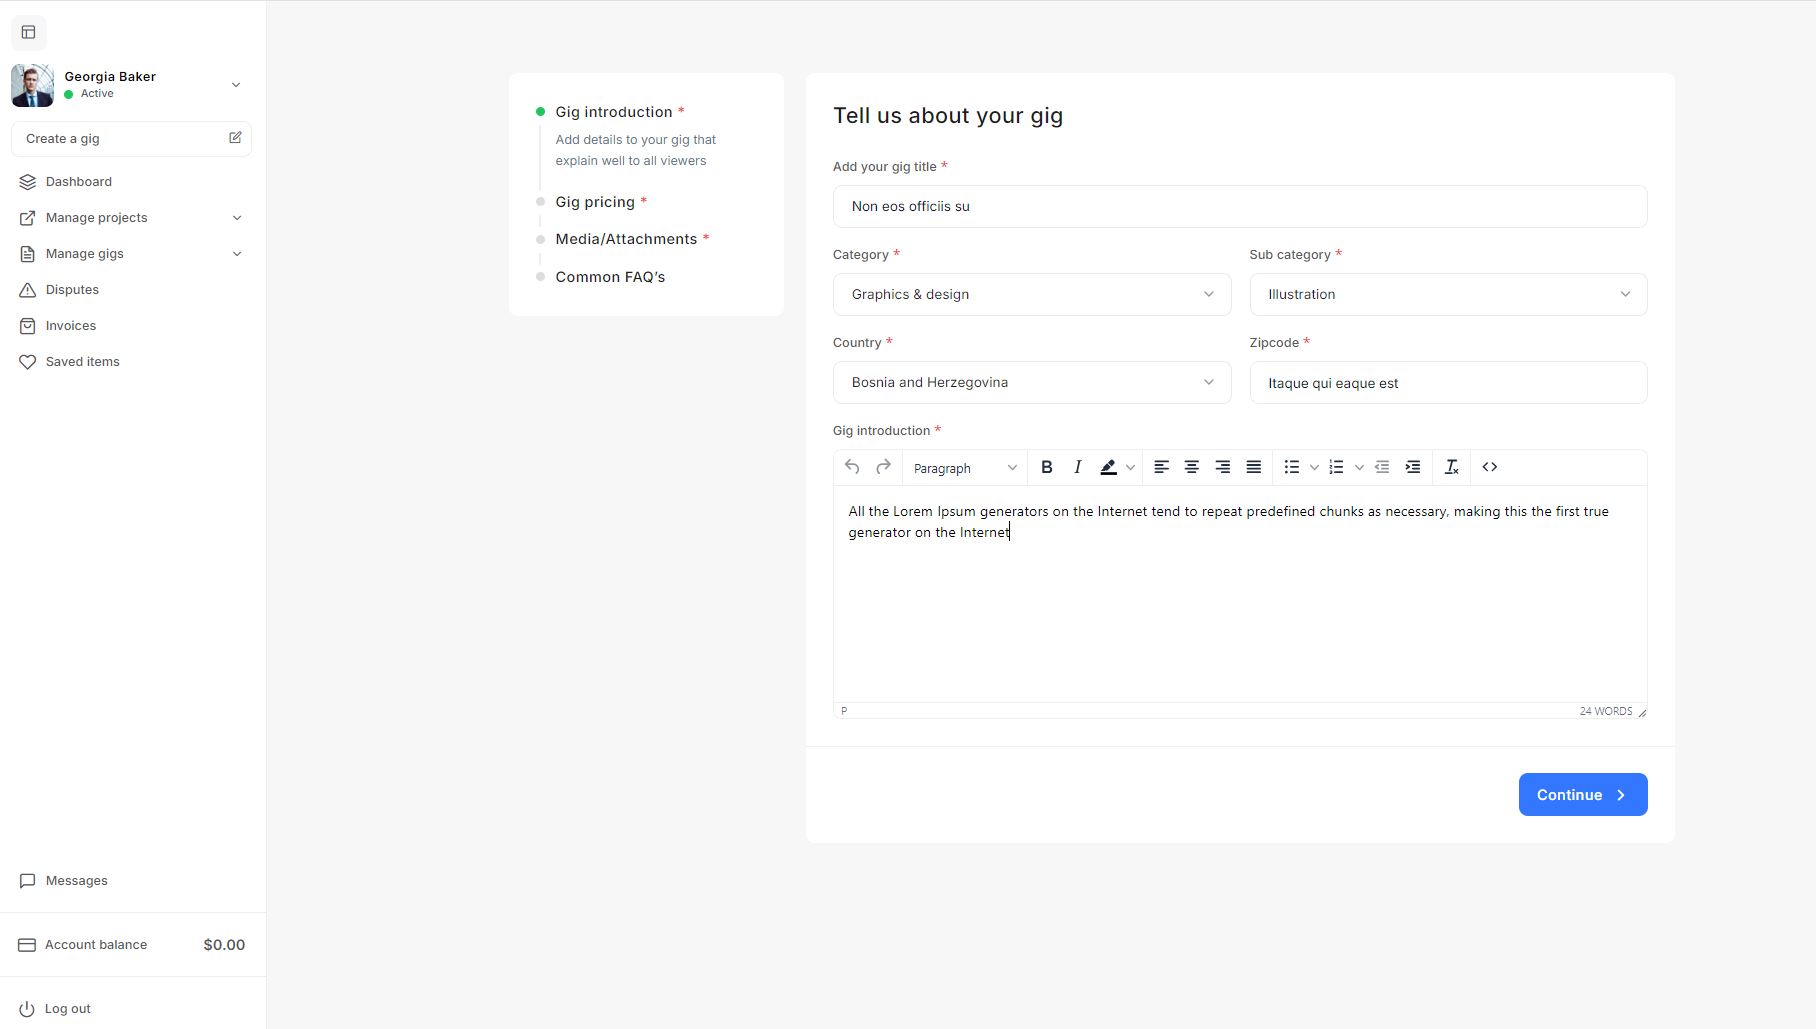
Gig Introduction
- Add your gig title: Choose a clear and descriptive title for your gig. This title should reflect the service you're offering, so potential clients know exactly what to expect.
- Category and Sub-category: Select the category that best matches your gig from the dropdown menu (e.g., "Graphics & Design"). Then choose a relevant sub-category to further specify your service (e.g., "Illustration").
- Country: Indicate your country of residence to help clients understand your location and potential time zone differences.
- Zipcode: Add your postal code to complete location details.
- Gig introduction: In this section, write a detailed description of your gig. Explain what you offer, why you're qualified, and what clients can expect from your service. Use bullet points or short paragraphs to make the information easier to digest.
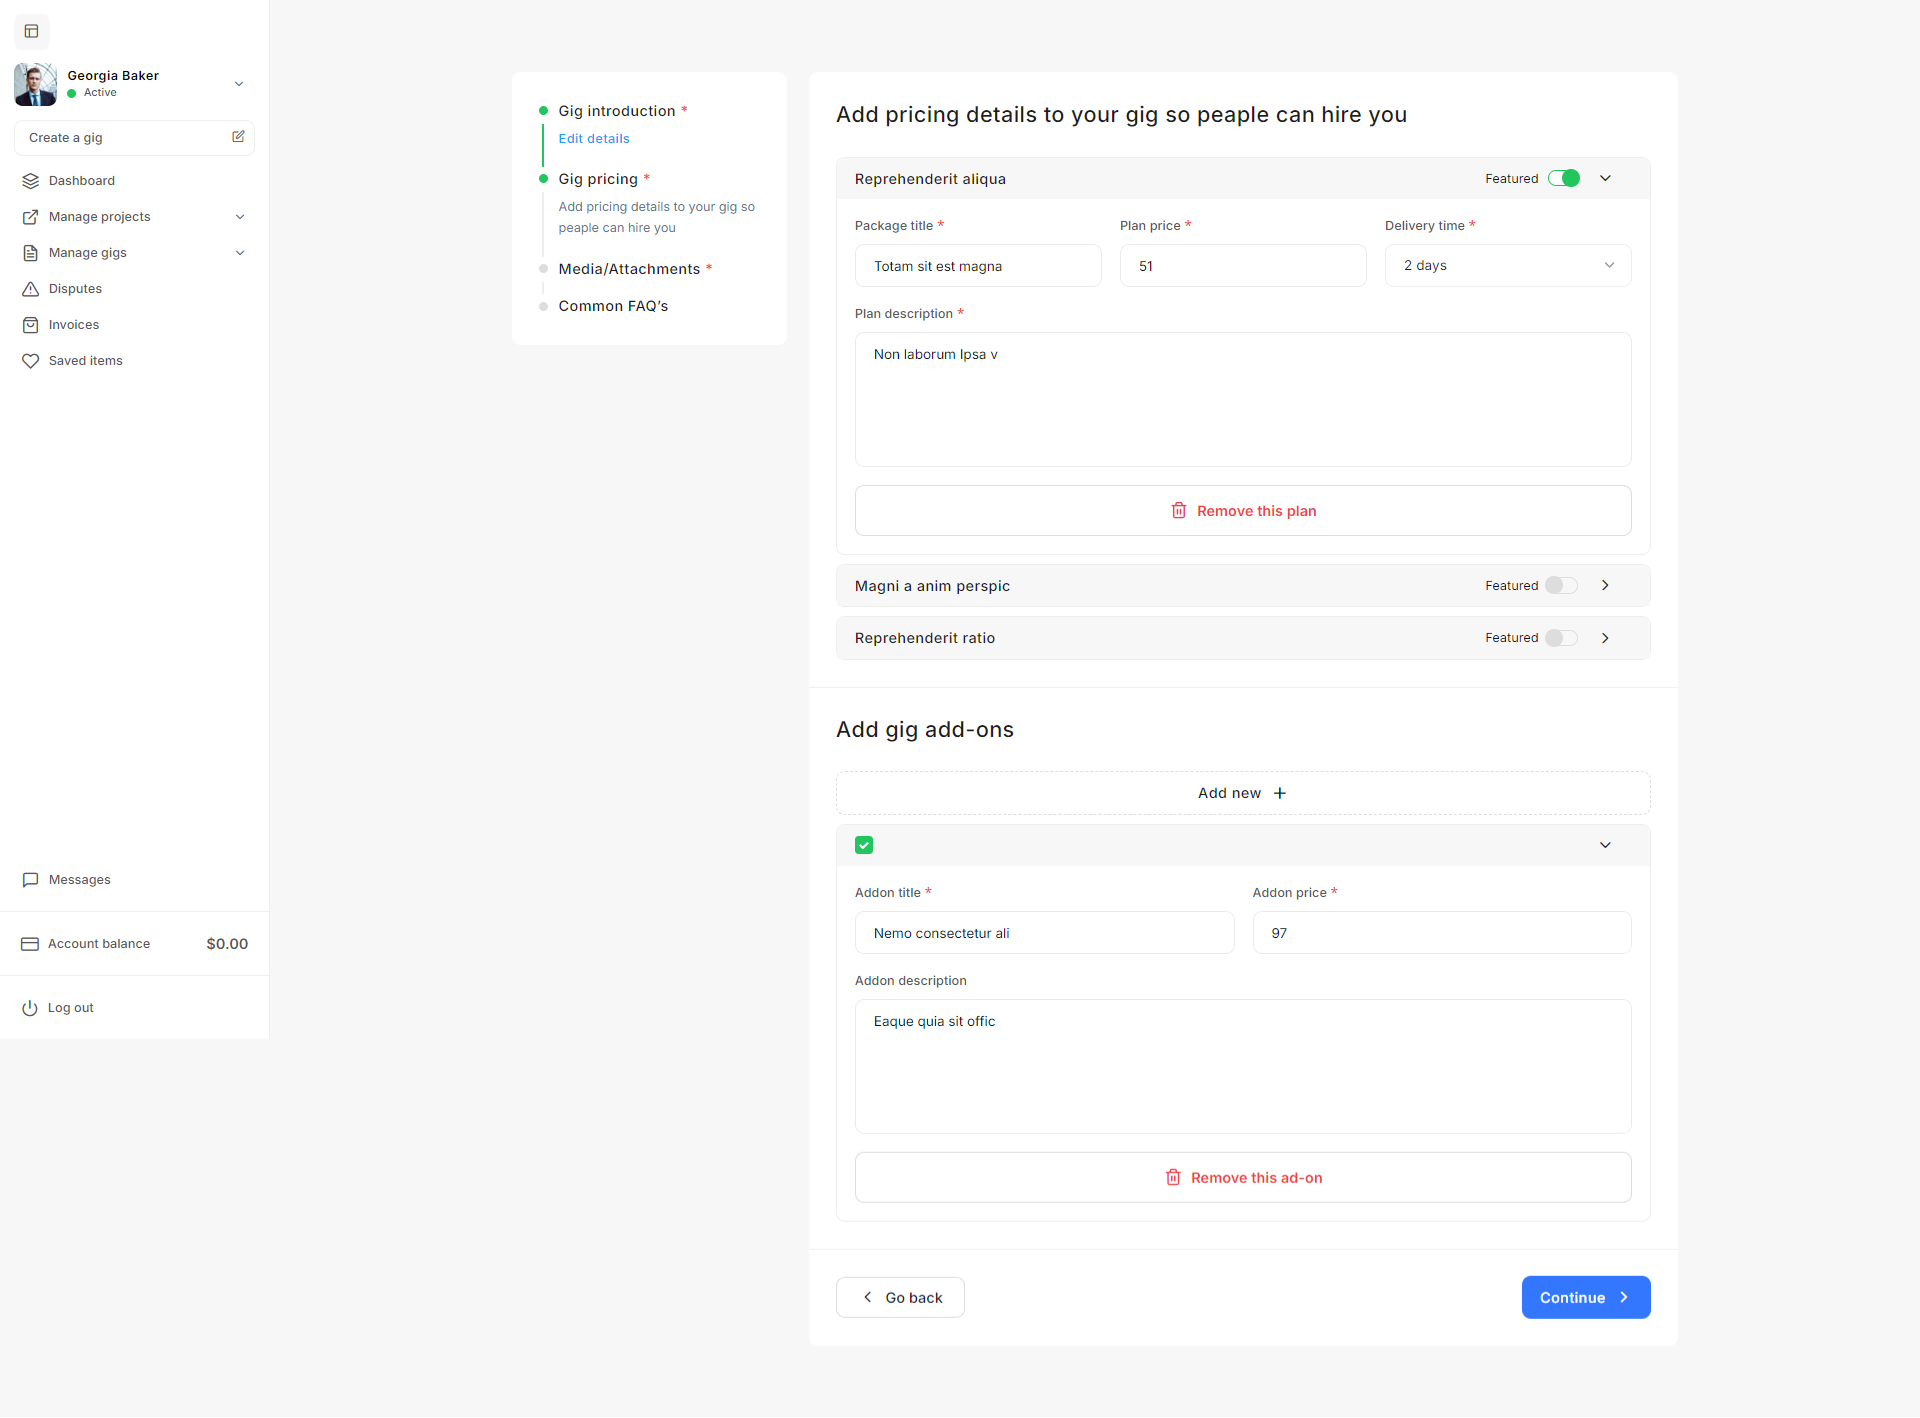
Gig Pricing
In this section, you will add pricing information for your gig. This is an important step, as it allows potential clients to understand the cost and scope of your service. Follow the steps below to correctly set up your gig pricing:
Package Details
- Package Title: Create a descriptive title for the package (e.g., "Basic Package," "Standard Package"). Each package should have a clear name that reflects the service level.
- Plan Price: Enter the price for the selected package. Make sure the price aligns with the scope of work and the level of service you are offering.
- Delivery Time: Set the expected delivery time for this service package. Ensure it is realistic and matches the complexity of the task.
- Plan Description: Provide a detailed description of what is included in this package. This might include:
- The specific services you will deliver (e.g., logo design, illustration, web development).
- The number of revisions or updates allowed.
- Any conditions or limits for the package.
- Featured Option: If you want to highlight this package to potential buyers, toggle the "Featured" option to make this plan more visible on your profile.
Managing Multiple Packages
- You can create multiple pricing tiers (e.g., "Basic," "Standard," "Premium") to cater to different client needs and budgets.
- Each package should offer a clear difference in the level of service, delivery time, or additional features provided.
- To remove a package, simply click the "Remove this plan" button if needed.
Adding Gig Add-ons
Gig add-ons allow you to offer additional services or options for an extra fee. These add-ons can provide further customization and flexibility for clients who want more value from your gig.
- Addon Title: Create a title for the add-on service (e.g., "Fast Delivery," "Additional Revision"). Be clear and concise.
- Addon Price: Set the price for the add-on. This should reflect the added value or extra work that the client will receive.
- Addon Description: Provide details about what the add-on includes. For example, if the add-on is for fast delivery, explain how much quicker the client will receive the final product compared to the standard package.
To add more add-ons, click on "Add new", fill in the details, and set the price accordingly. To remove an add-on, use the "Remove this ad-on" button.
Finalizing the Pricing
- After entering all pricing and package details, click the "Continue" button to proceed to the next step of your gig setup.
- Ensure all pricing tiers and add-ons are correctly set, and that they clearly define the services you are offering at each level.
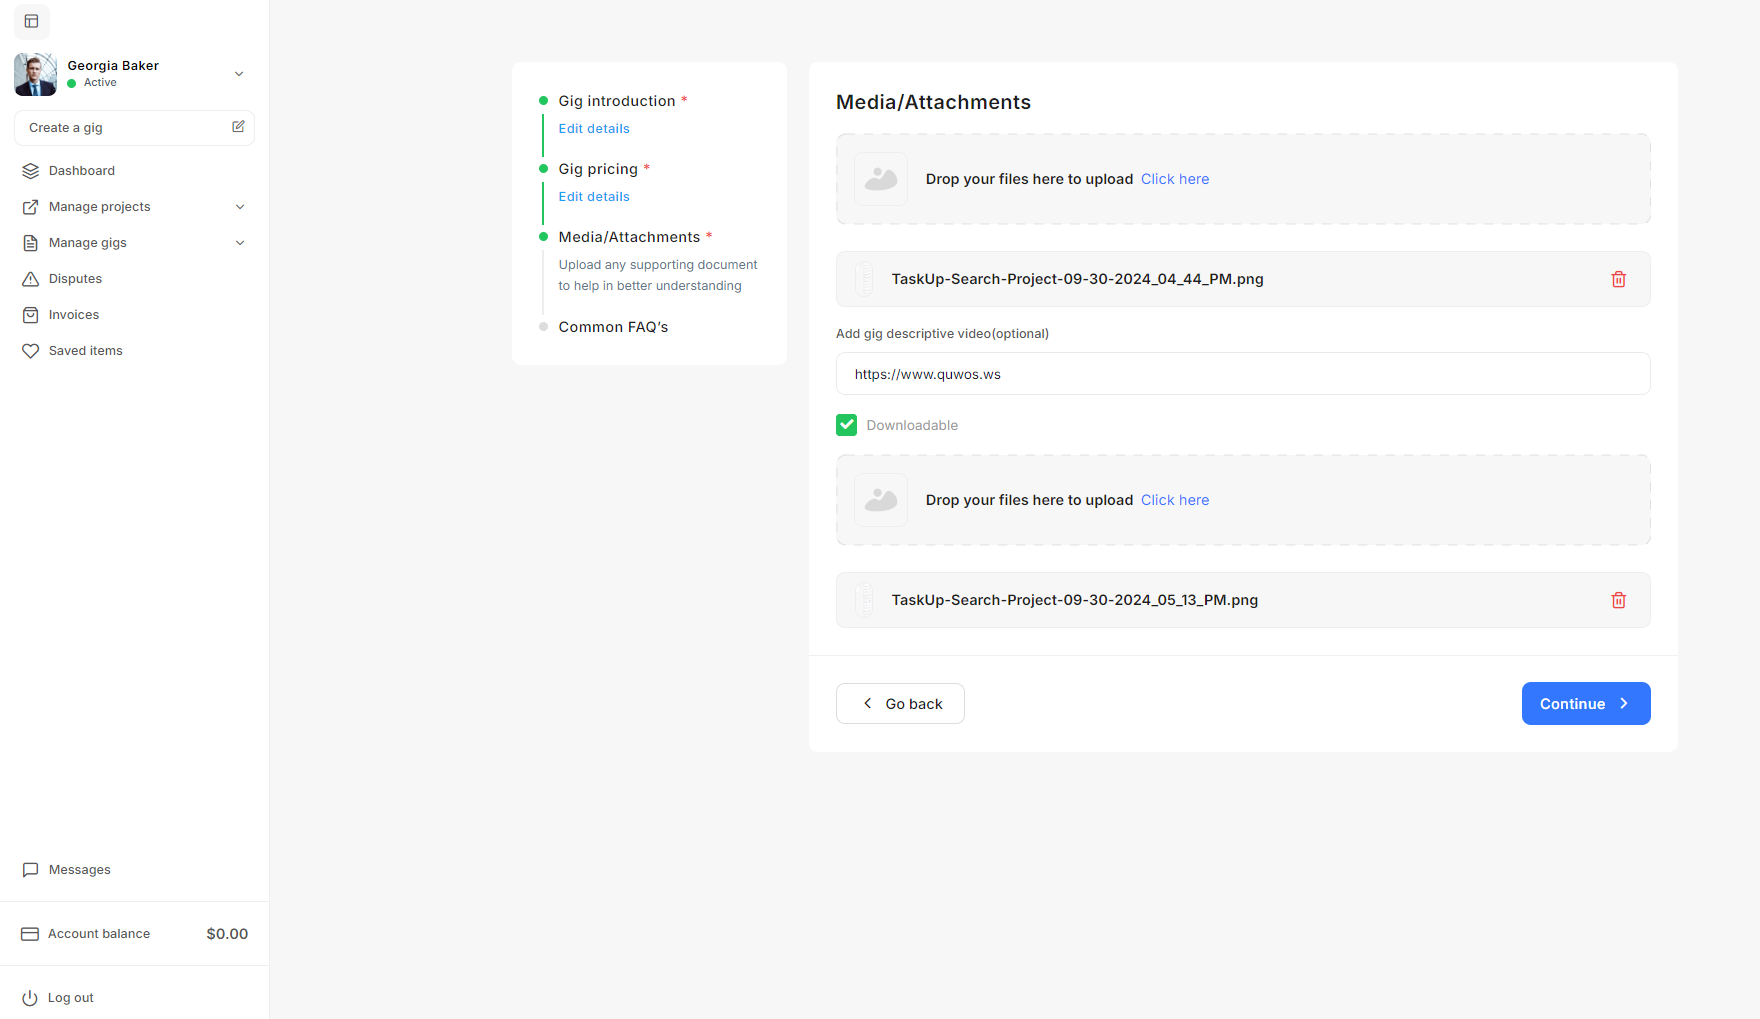
Media/Attachments
In this section, you will upload media files and attachments to showcase your work and help clients better understand the services you're offering. Follow the steps below to correctly upload and manage media for your gig:
Uploading Media Files
- Drag-and-Drop or Click to Upload: In the "Media/Attachments" section, you have the option to upload images, videos, or documents that are relevant to your gig. You can either:
- Drag and drop the files directly into the upload area.
- Or click on "Click here" to browse your computer and select the files manually.
Supported File Types
- Images: Upload high-quality images that represent your work (e.g., screenshots of completed projects, visual samples of designs, etc.). Common file formats include PNG, JPEG, or GIF.
- Videos: You can upload videos that explain your services or provide demonstrations of your work process. This can be especially useful for video editors, animators, or service providers needing a dynamic portfolio.
- Documents: If your gig involves providing documents, you can upload relevant files such as presentations, PDFs, or any other supplementary material.
Add a Gig Descriptive Video (Optional)
- If you'd like to include a video that describes your gig in more detail, you can provide a video link. Simply paste the link to your video (hosted on an external platform, like YouTube or Vimeo) in the "Add gig descriptive video" field. This is optional, but highly recommended to provide potential clients with a better understanding of your services.
Downloadable Option
- If you want the media files you upload to be downloadable by clients, check the "Downloadable" checkbox. This feature is helpful if you're sharing sample files, templates, or other resources that you wish clients to have direct access to.
Managing Uploaded Files
- Once files are uploaded, they will appear below the upload area as a list of files. You can review the uploaded files, and if necessary, delete a file by clicking the red Trash icon next to the file name. You can upload multiple files, and each uploaded file will be listed in the order of upload.
Finalizing Media Upload
- After uploading all necessary media and adding an optional descriptive video, click the "Continue" button to proceed to the next step in the gig creation process. Ensure that the uploaded files represent the quality of your work and align with the services you're offering.
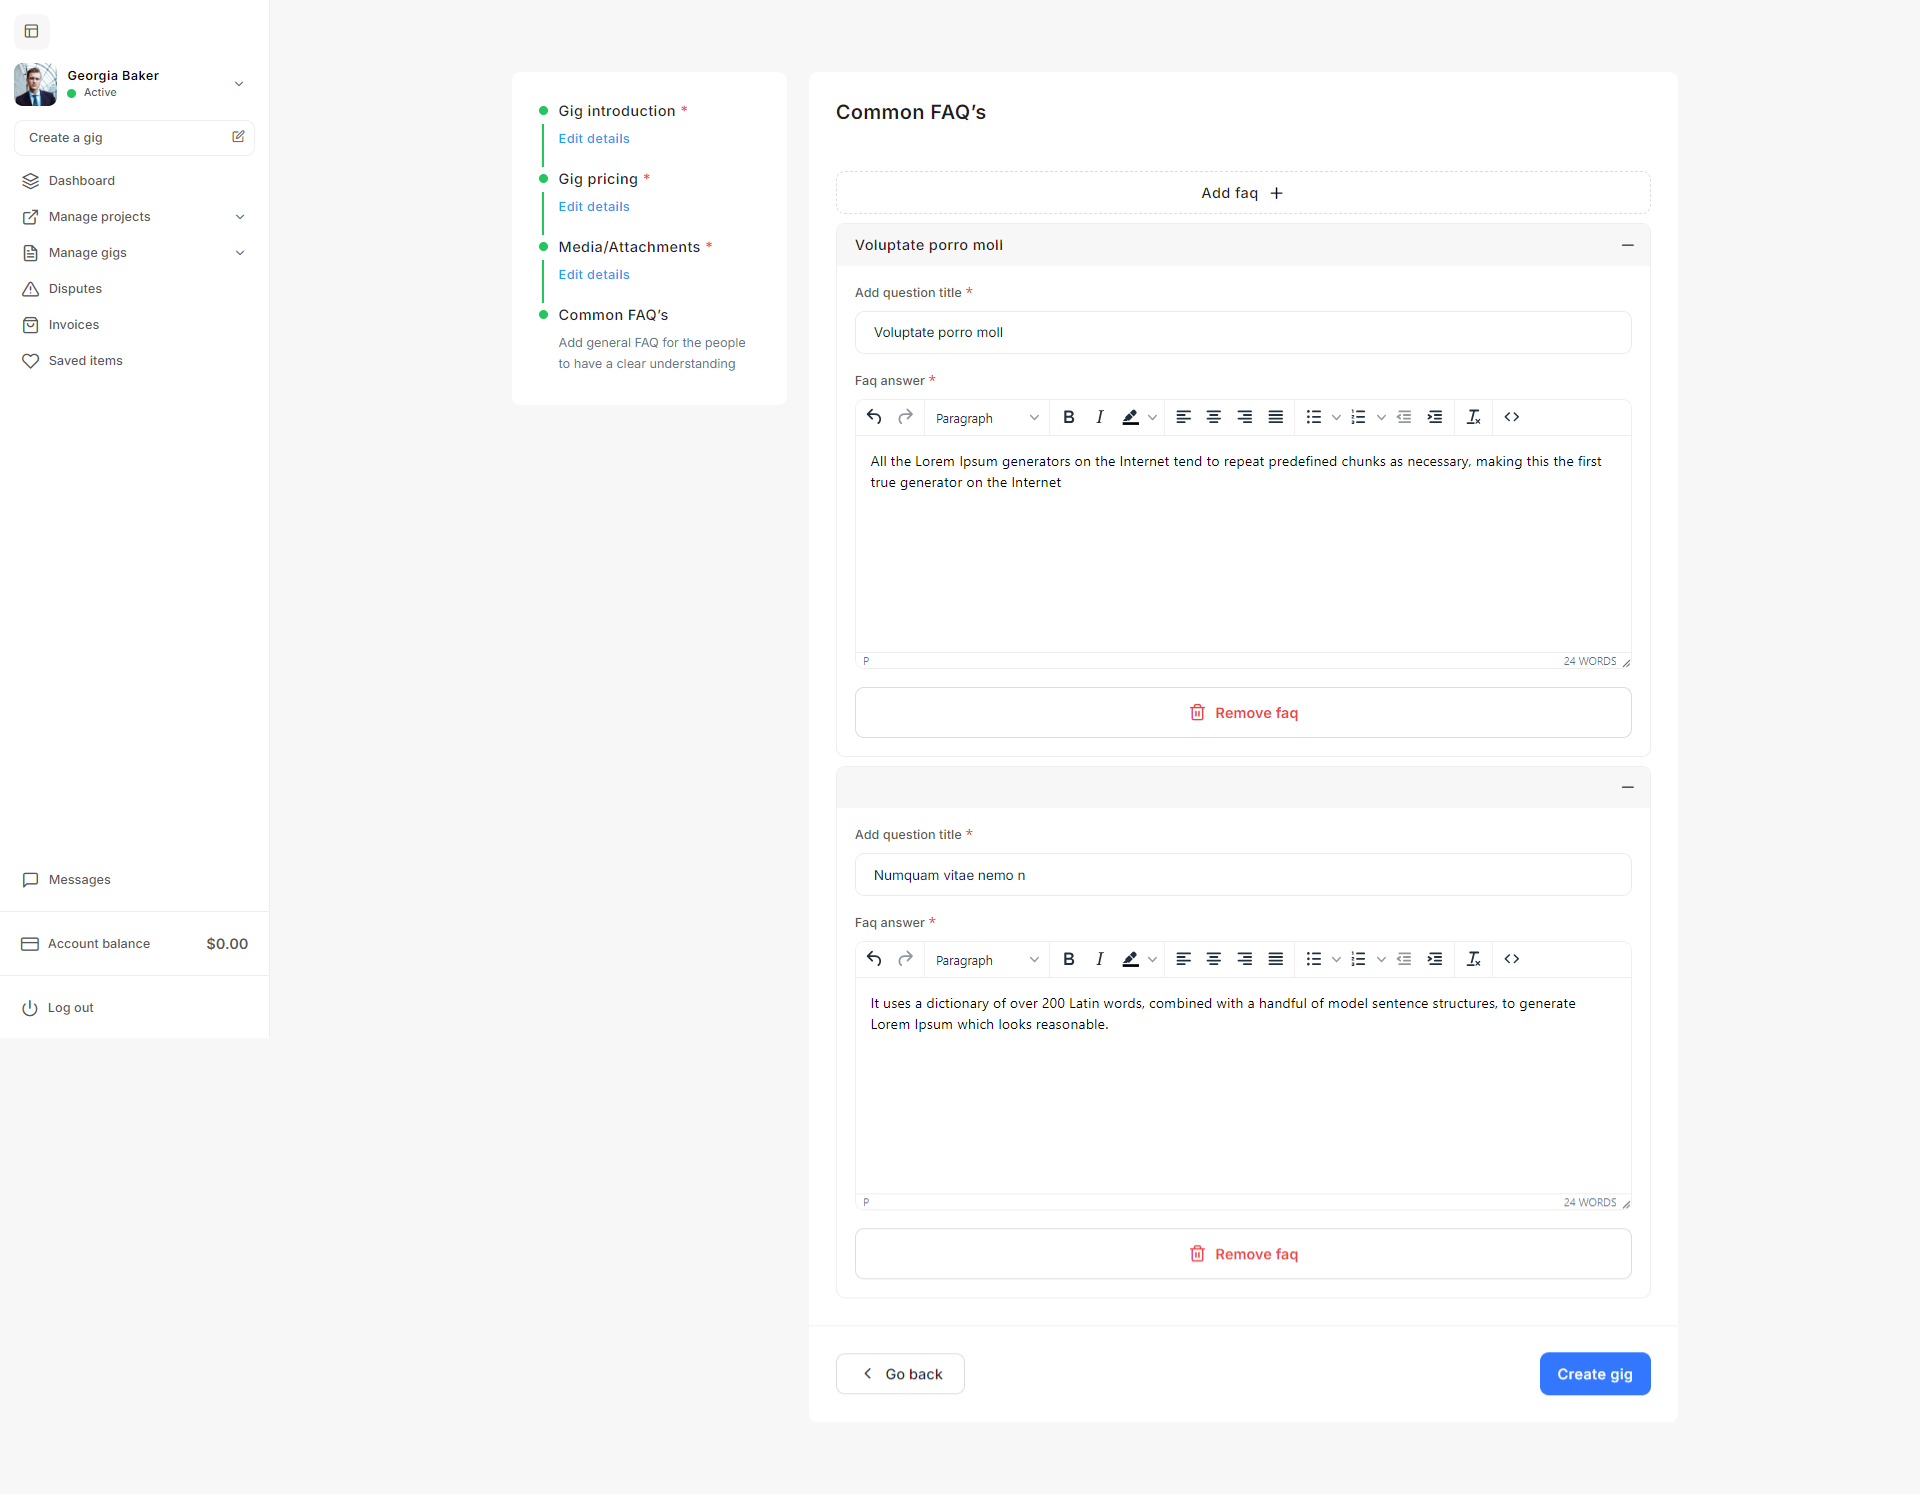
Common FAQ's
The Common FAQ's section is an essential part of your gig setup. It allows you to pre-emptively answer frequently asked questions from potential clients, ensuring they have a clear understanding of your services before they reach out. Here's how you can effectively set up the FAQ section for your gig:
Adding a New FAQ
- Click on the "Add FAQ" button at the top to add a new question and answer to your gig's FAQ section.
Question Title
- In the "Add question title" field, enter the frequently asked question that potential clients might have about your service.
- Some common examples might include:
- "What is the typical delivery time?"
- "How many revisions are included?"
- "What do I need to provide before you start the project?"
FAQ Answer
- In the "FAQ answer" field, provide a detailed but concise response to the question. Use this space to clarify key details such as:
- The scope of your services.
- The process you follow for revisions.
- Any requirements you need from the client (e.g., project files, specific instructions).
- You can also format the text with headings, bullet points, or numbered lists using the text editor.
Managing Multiple FAQs
- Add as many FAQs as necessary by clicking the "Add FAQ" button again for each new question.
- If you need to remove an FAQ, simply click the "Remove FAQ" button located under the respective question and answer.
Finalizing the FAQ Section
- After adding all relevant questions and answers, ensure they are clearly written and address potential concerns or misunderstandings.
- Click the "Create Gig" button to finalize and publish your gig, including the FAQ section.
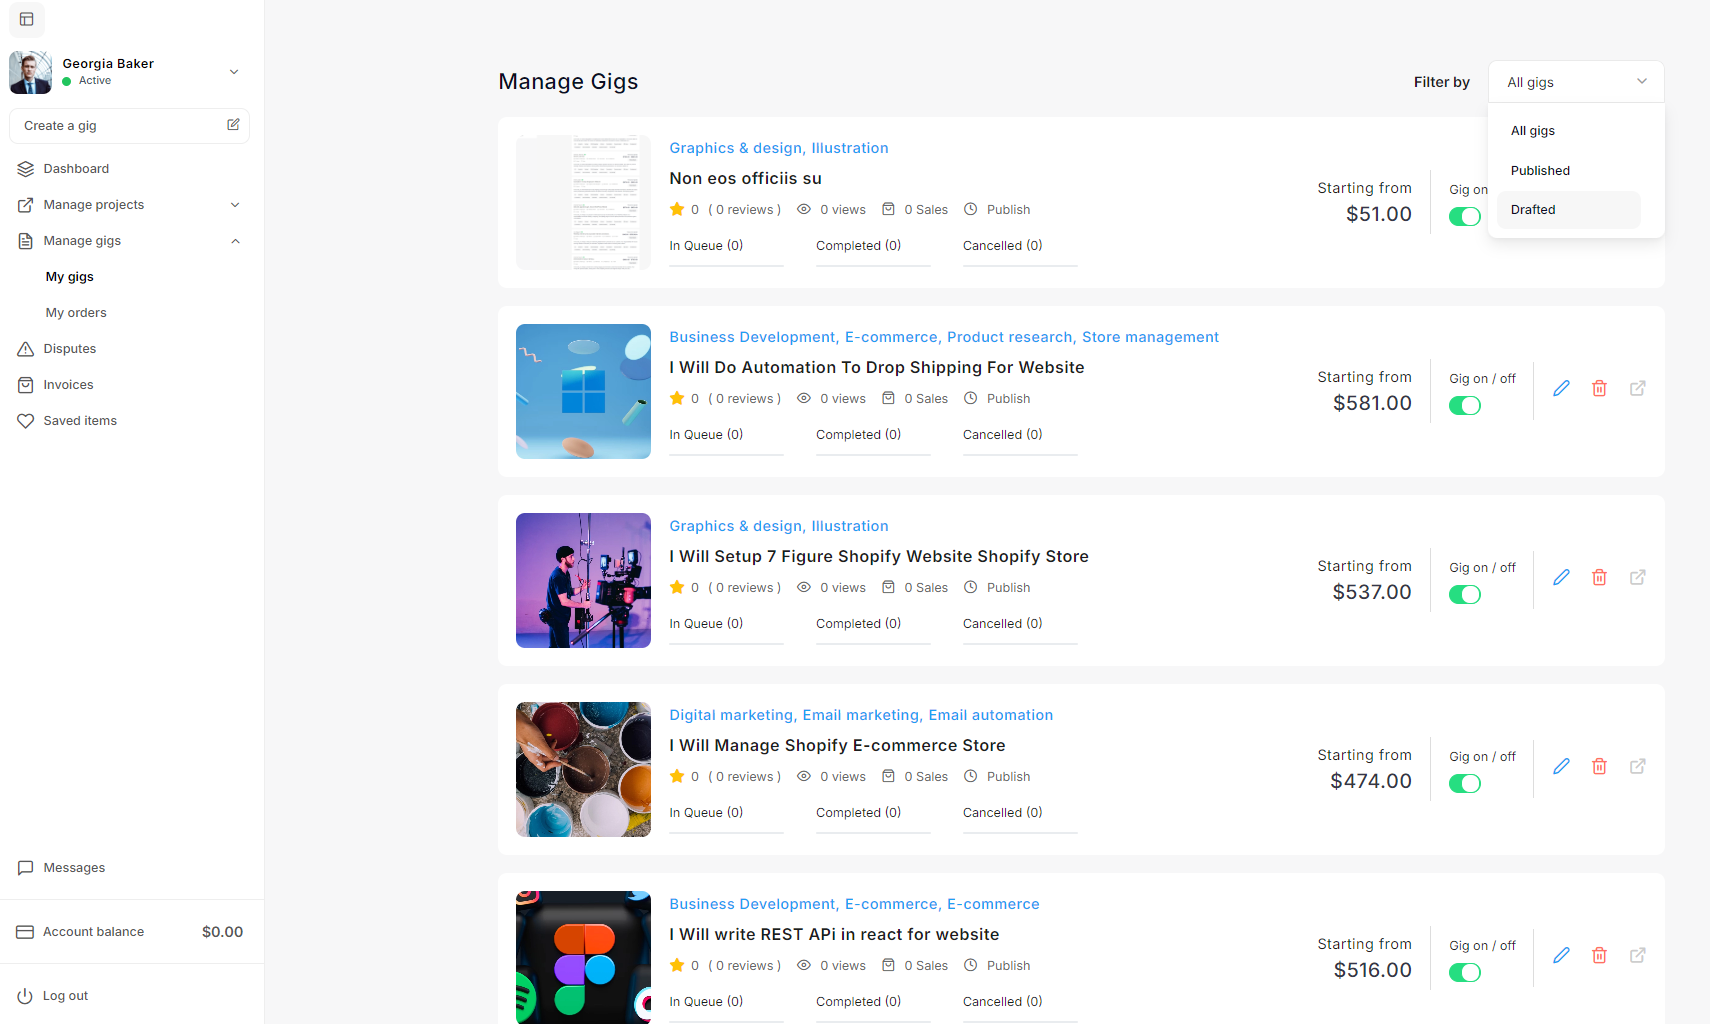
Managing Gigs
In the Manage Gigs section of Taskup, you can filter, review, and manage all of your gigs, whether they are published and available for clients or still in draft mode. Here's a detailed guide on how to use this feature effectively:
Filter Gigs
- In the Manage Gigs section, located at the top-right corner of the gig list, there is a Filter by dropdown menu.
- You can filter your gigs based on the following options:
- All gigs: This shows all gigs, regardless of their status (published or drafted).
- Published: Displays only the gigs that are live and visible to clients.
- Drafted: Displays gigs that are still in draft form and have not been published yet.
Published Gigs
- These are the gigs that are live and available for clients to view and purchase. Published gigs are displayed with a status of "Published".
- For each published gig, the following actions can be taken:
- Toggle Gig On/Off: Use the green toggle switch next to each gig to activate or deactivate the gig.
- On: The gig is available for clients to view and purchase.
- Off: The gig is hidden from clients but can still be edited or managed internally.
- Edit Gig: Click the pencil icon to edit any details of the published gig, such as pricing, description, or media. This allows you to update the gig even after it has been published.
- Delete Gig: Click the trash icon to permanently delete the gig. Be cautious when using this option, as deleted gigs cannot be recovered.
- Toggle Gig On/Off: Use the green toggle switch next to each gig to activate or deactivate the gig.
Drafted Gigs
- Drafted gigs are those that you have started creating but have not yet published. They remain hidden from clients until you decide to publish them.
- For each drafted gig, the following actions can be taken:
- Edit Gig: Similar to published gigs, you can edit drafted gigs by clicking the pencil icon. Complete the gig setup, including adding pricing, descriptions, media, and FAQs, before publishing.
- Delete Gig: If you no longer need the drafted gig, you can delete it by clicking the trash icon.
Gig Status Indicators
- Each gig card contains status information such as:
- In Queue: Indicates how many current orders are in progress for this gig.
- Completed: Shows how many orders have been successfully completed.
- Canceled: Displays the number of canceled orders related to this gig.
Price and Sales Information
- Each gig shows the Starting Price for that particular service, based on the pricing tiers you have set during gig creation.
- Sales: You can track the number of sales your gig has generated.
Reviews and Ratings
- For published gigs, clients can leave reviews and ratings. You can view the number of reviews and ratings for each gig to track customer satisfaction and improve your services.
Publishing a Drafted Gig
- To publish a drafted gig, simply edit it by clicking the pencil icon, complete any missing fields, and click Publish. The gig will then be visible to clients and available for purchase.
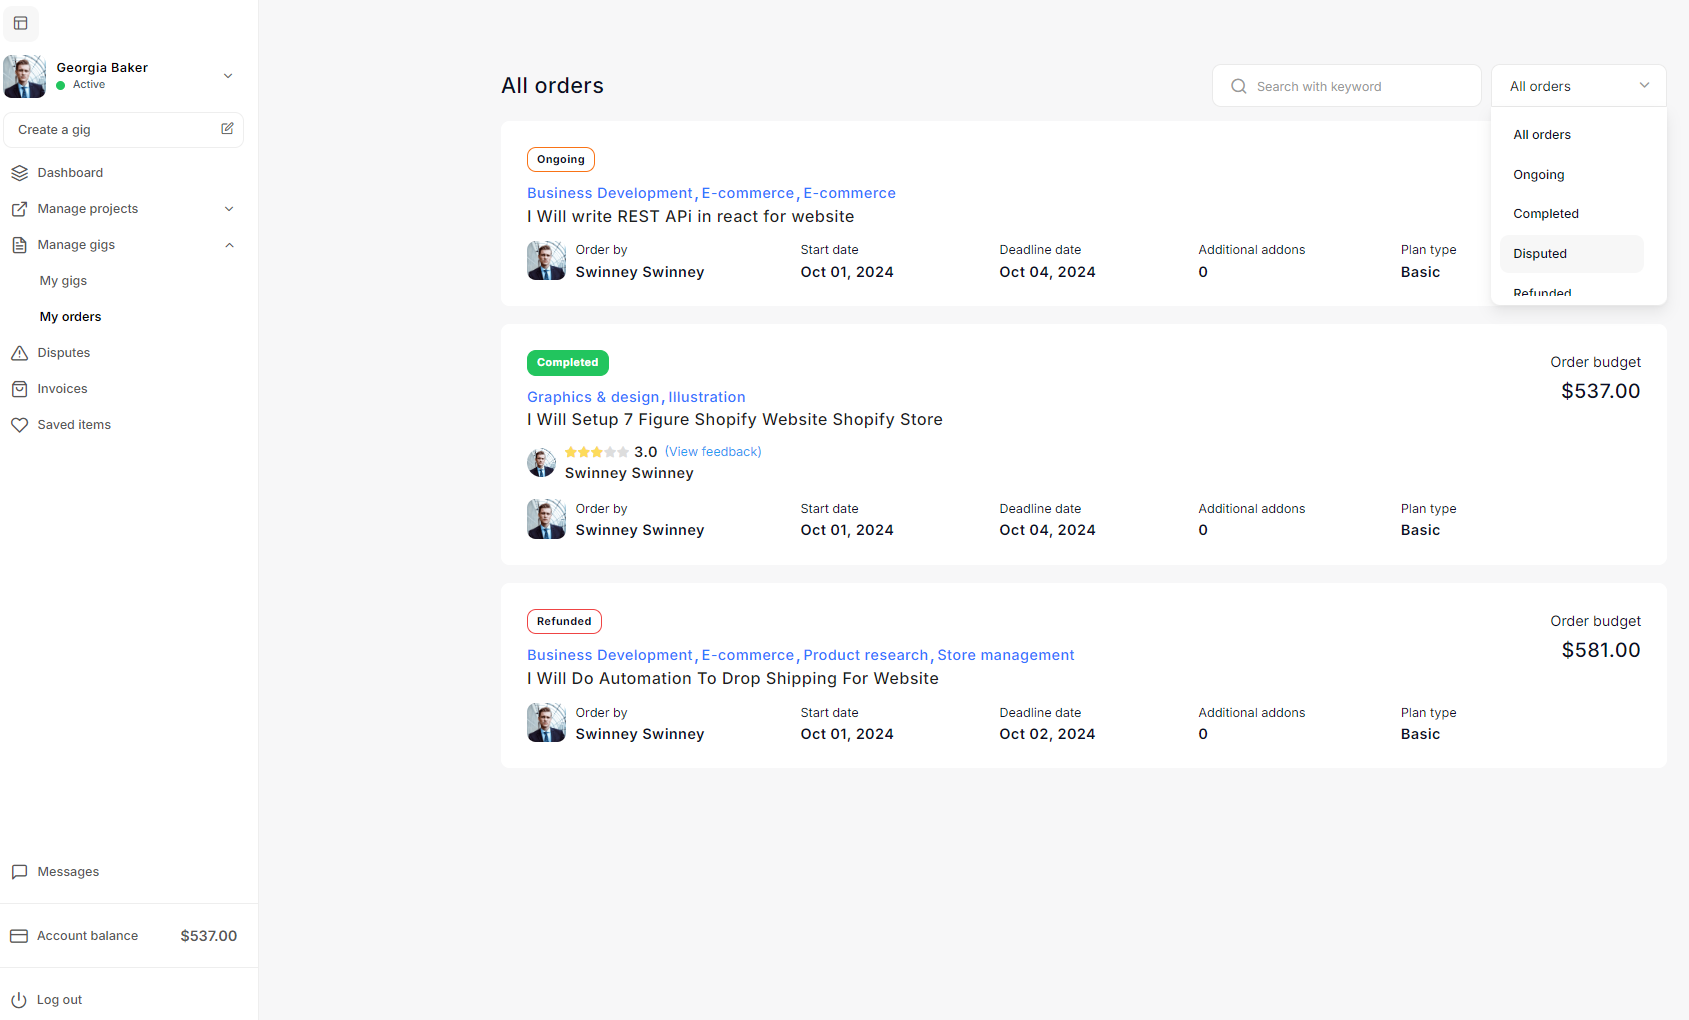
My Orders
The My Orders section in Taskup allows sellers to manage all ongoing, completed, disputed, and refunded orders related to their gigs. Keeping track of your orders is essential for ensuring smooth project management and maintaining good relationships with clients. Below is a detailed guide on how to navigate and manage your orders efficiently.
Accessing Orders
- From your dashboard, click on Manage gigs and then select My orders.
- This will take you to a list of all orders related to your gigs, displaying key details such as the order status, client name, budget, and deadlines.
Order Statuses
Each order is assigned a status, which helps you track its current stage:
- Ongoing: These are active orders you are currently working on.
- Completed: Orders that have been successfully delivered and marked as finished by both parties.
- Disputed: Orders that are in dispute due to disagreements between you and the client.
- Refunded: Orders where the client has been refunded, usually due to a cancellation or unresolved dispute.
Viewing Order Details
For each order, the following details are shown:
- Order Title: The title of the gig or service the client has ordered (e.g., “I Will Write REST API in React for Website”).
- Client Name: The name of the client who placed the order.
- Start Date: The date the project started.
- Deadline Date: The date the project is due to be completed.
- Additional Add-ons: If the client has requested additional services or features beyond the initial gig, the number of add-ons will be shown here.
- Plan Type: This reflects the package plan (e.g., Basic, Standard, Premium) selected by the client.
- Order Budget: The total value of the order, based on the package price and any additional add-ons.
Filtering Orders
- You can filter orders based on their status by using the Filter by dropdown menu at the top right of the page.
- Options include:
- All orders: Displays all orders, regardless of status.
- Ongoing: Shows only the active, in-progress orders.
- Completed: Displays orders that have been successfully delivered and completed.
- Disputed: Shows orders currently in dispute.
- Refunded: Lists orders where refunds have been processed.
- You can also use the search bar to find specific orders by typing in keywords.
Managing Ongoing Orders
- For ongoing orders, ensure that you monitor the deadline date and communicate with the client regularly to manage expectations.
- If the client requests additional work (add-ons), make sure to update the order accordingly.
- Once the work is complete, mark the order as delivered, and wait for the client to confirm completion.
Completed Orders
After completing an order, clients have the option to leave feedback. A completed order will display:
- Client Rating: A star rating and any feedback provided by the client.
- Review: You can view the client's feedback by clicking on View feedback. Positive reviews help build your reputation on the platform.
Always aim to complete orders by the deadline to maintain a positive relationship and receive favorable reviews.
Disputed Orders
Disputes occur when there is a disagreement between you and the client regarding the quality of work, delivery time, or other aspects of the order.
- Orders marked as disputed require special attention, and you may need to communicate with Taskup’s support team or the client to resolve the issue.
- It’s important to keep calm and provide clear communication during disputes to find a fair resolution.
Refunded Orders
If an order has been refunded, it will be marked with a Refunded status. This usually occurs after a cancellation or unresolved dispute.
- Refunded orders may affect your overall rating on the platform, so it's important to minimize cancellations by setting clear expectations with clients upfront.
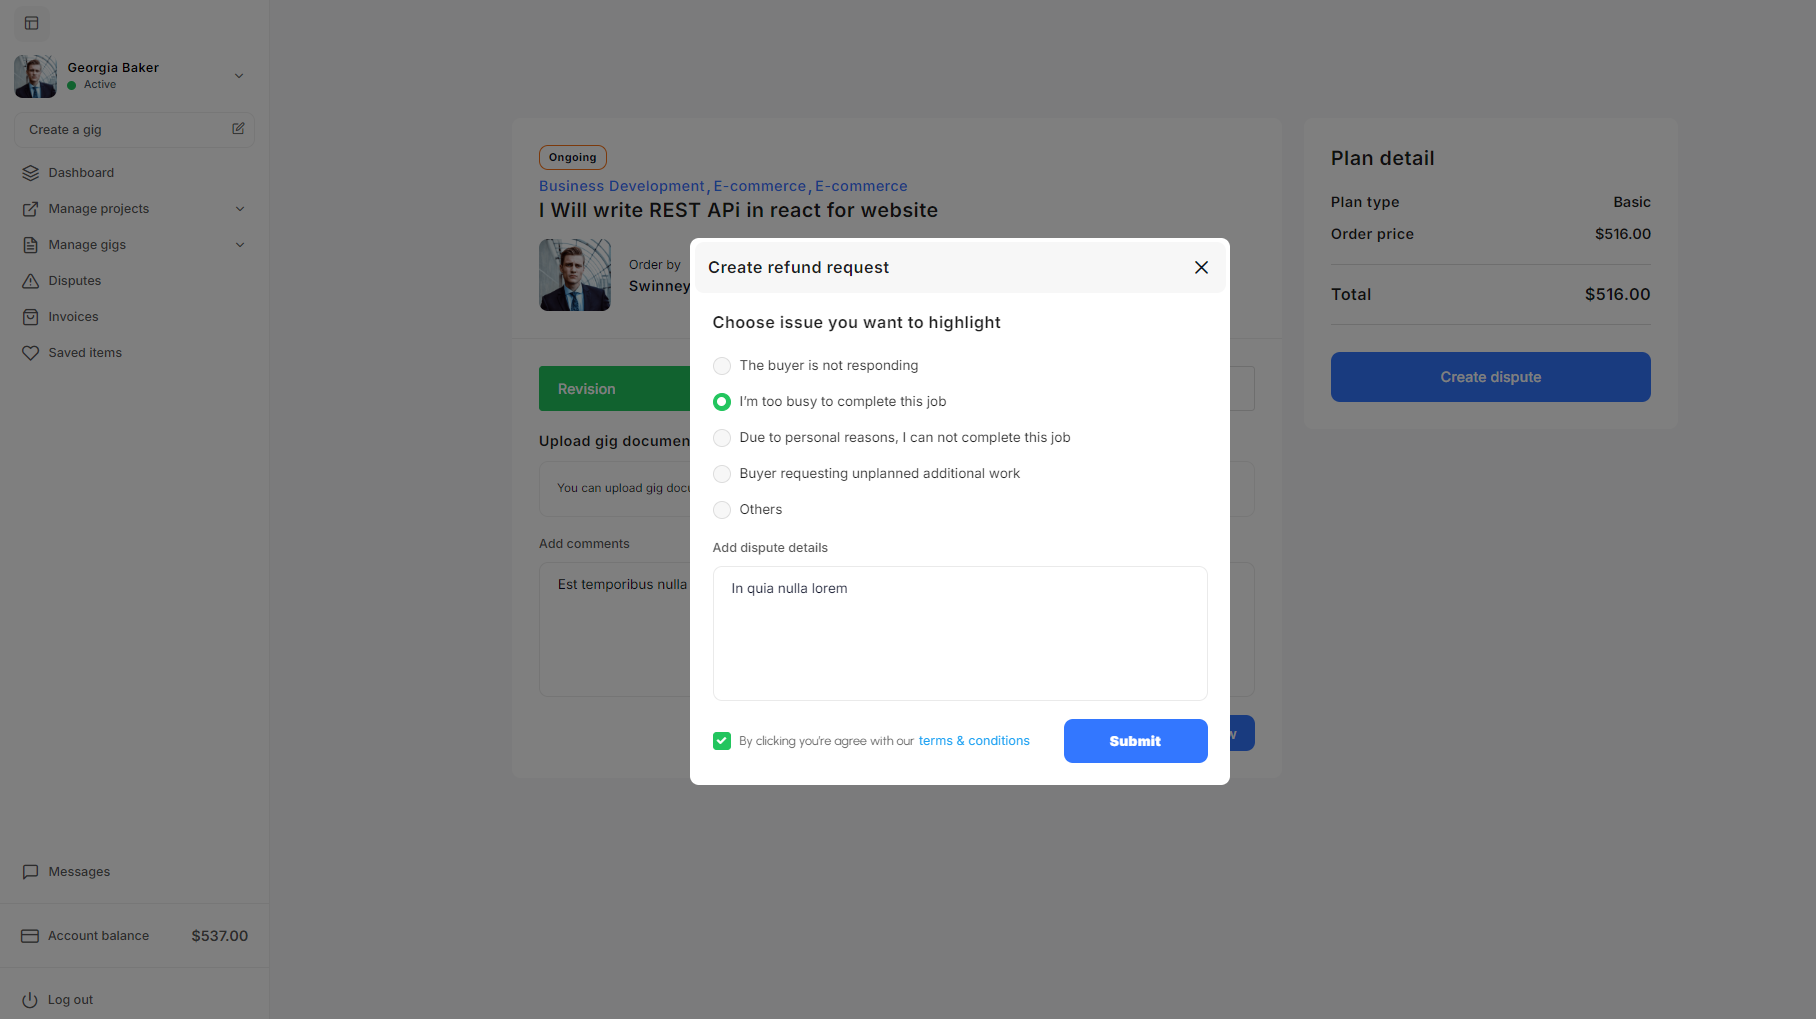
Creating a Dispute
Disputes arise when there is a disagreement between a seller and a client regarding a gig. Taskup provides a straightforward process for sellers to create a dispute if issues arise during the fulfillment of an order. Below is a step-by-step guide on how to create a dispute.
Accessing an Ongoing Gig
- From your dashboard, go to Manage gigs and select My orders.
- In the My orders section, you will see a list of all your ongoing and completed gigs.
- Click on the title of the ongoing gig for which you want to create a dispute. This will take you to the detailed view of the gig.
Creating a Dispute
- On the right-hand side of the gig detail page, under Plan detail, you will see the button Create dispute.
- Click on the Create dispute button to start the process.
Filling Out the Dispute Request
A pop-up window titled Create refund request will appear. This form allows you to specify the issue and provide details about the dispute.
- Choose the issue you want to highlight: Select the reason for the dispute from the provided list:
- The buyer is not responding: Use this option if the client has been unresponsive.
- I'm too busy to complete this job: Select this if you are unable to complete the job due to time constraints.
- Due to personal reasons, I cannot complete this job: Choose this if personal circumstances prevent you from completing the job.
- Buyer requesting unplanned additional work: If the client is asking for additional work that was not originally agreed upon, choose this option.
- Others: Select this if none of the above reasons apply and provide a custom explanation in the comments.
- Add dispute details: In the text box below the reasons, provide additional information explaining the nature of the dispute. This should include specific details about the problem, any communication issues, or reasons for requesting the dispute.
Submit the Dispute
- After filling out the form and providing all necessary details, review the information.
- Check the box confirming that you agree to Taskup’s terms & conditions.
- Click the Submit button to officially create the dispute.
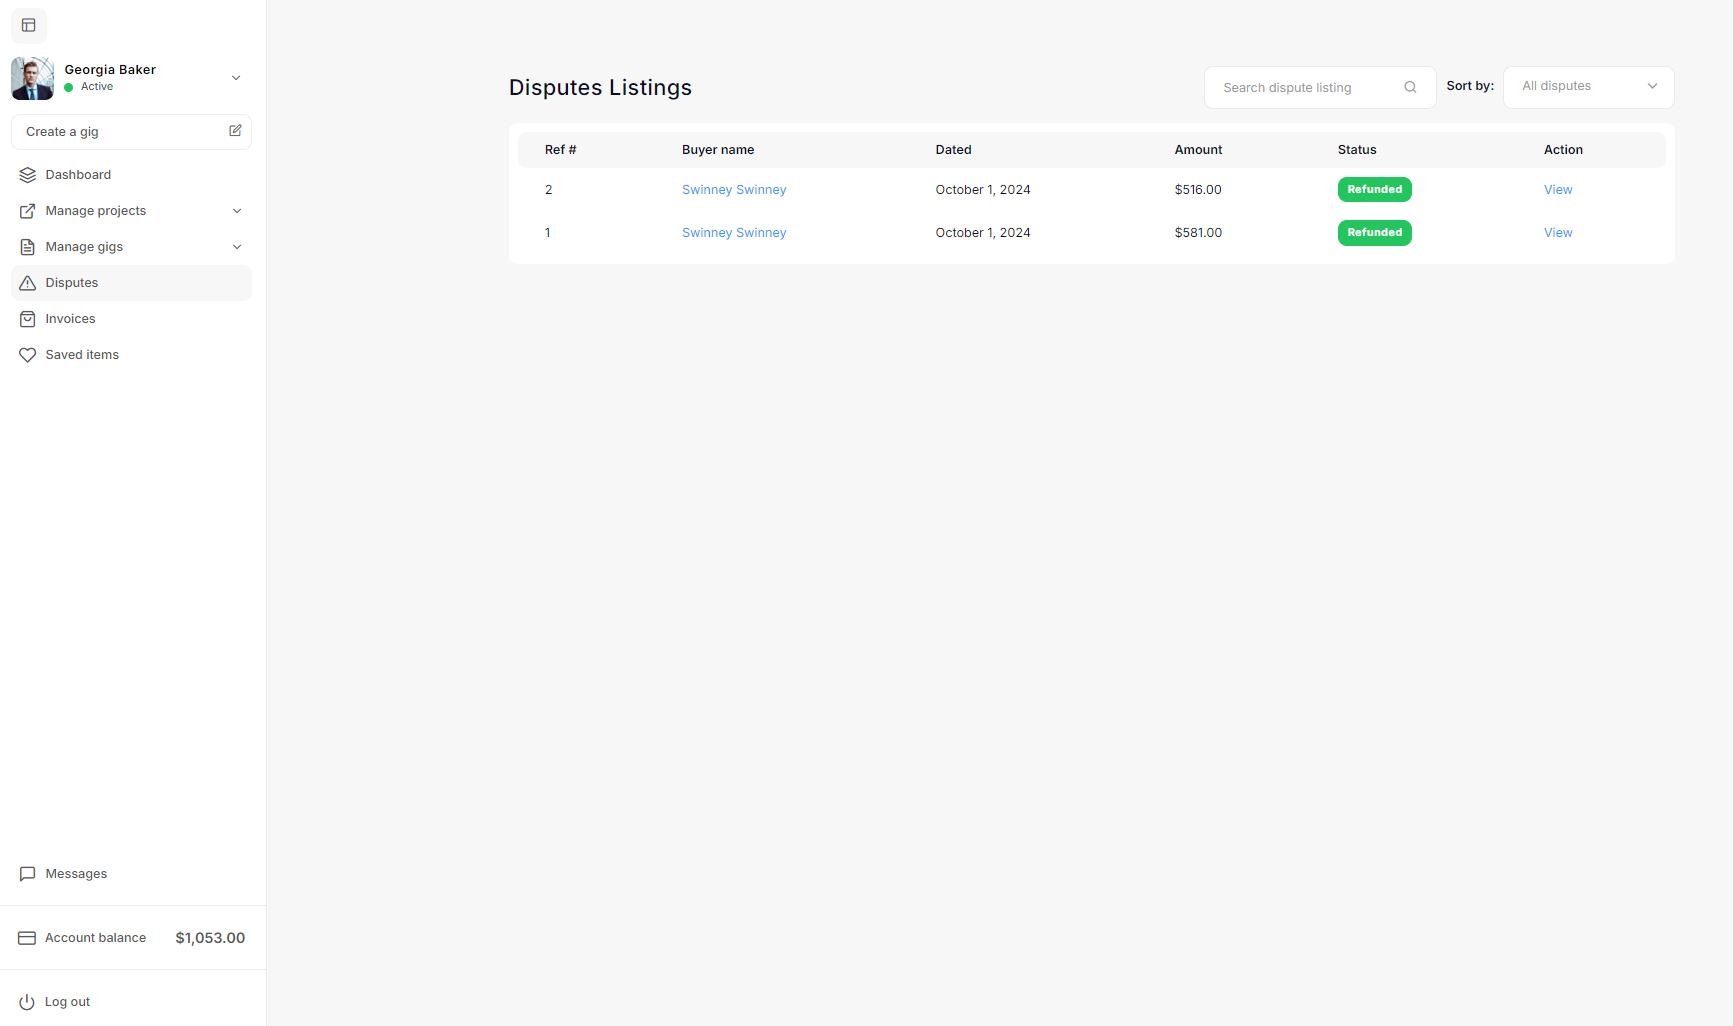
Disputes
The Disputes Listings section in Taskup allows you to monitor and manage any disputes that arise between you and your clients. Disputes can occur due to various reasons, including disagreements over project delivery or refund requests. This section provides an overview of all disputes, their status, and actions you can take to resolve them.
Accessing the Disputes Listings
- From the left sidebar, click on Disputes under the Manage gigs section.
- This will bring you to the Disputes Listings page, where all current and past disputes are listed.
Sorting and Filtering Disputes
- You can sort and filter disputes by their status to quickly find and manage ongoing issues.
- Sort by: Use the dropdown menu at the top-right of the dispute table to filter disputes by:
- All Disputes: Shows all disputes, regardless of their current status.
- New Disputes: Displays disputes that have recently been filed and need attention.
- Refund Requested: Lists disputes where a refund has been requested by the buyer.
- Search Dispute Listing: You can also use the search bar at the top-right corner to search for specific disputes by entering relevant keywords or reference numbers.
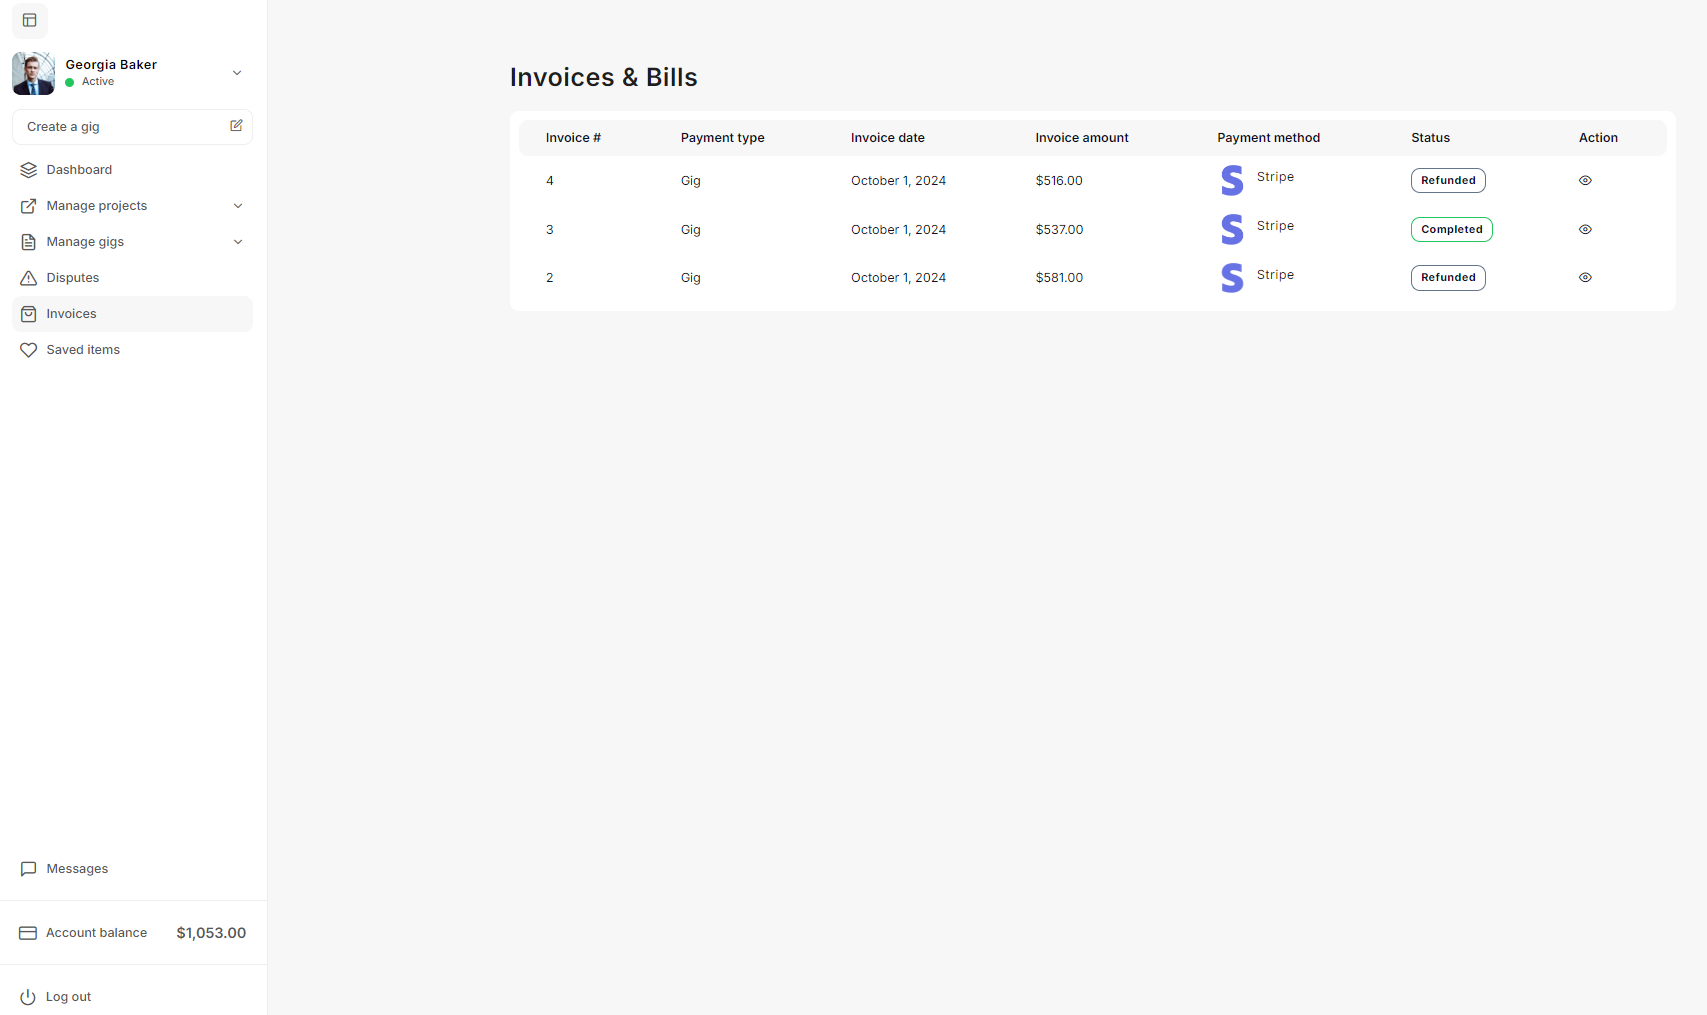
Invoices & Bills
The Invoices & Bills section in Taskup helps sellers track their payments, view transaction details, and manage invoices for completed gigs. This feature is essential for managing your earnings and maintaining financial records. Below is a detailed guide on how to use and understand the Invoices & Bills section.
Accessing Invoices
- From your dashboard, click on the Invoices tab in the left-hand sidebar.
- This will open the Invoices & Bills page, where you will see a list of all invoices generated for your completed gigs.
Viewing Invoice Details
- To view the details of a specific invoice, click on the eye icon under the Action column. This will open the detailed view of the invoice, where you can see additional information such as:
- A breakdown of the services provided.
- The payment breakdown, including any taxes or fees applied.
- Client information and payment reference.
Tracking Payment Status
- The Status column helps you track the current state of your payments:
- Processed: Payments that are in the middle of processing, meaning the transaction is underway but not yet completed.
- Completed: These are payments that have been fully processed, and the funds should be in your payout method.
- Refunded: Indicates that the payment was returned to the client, typically following a dispute or cancellation.
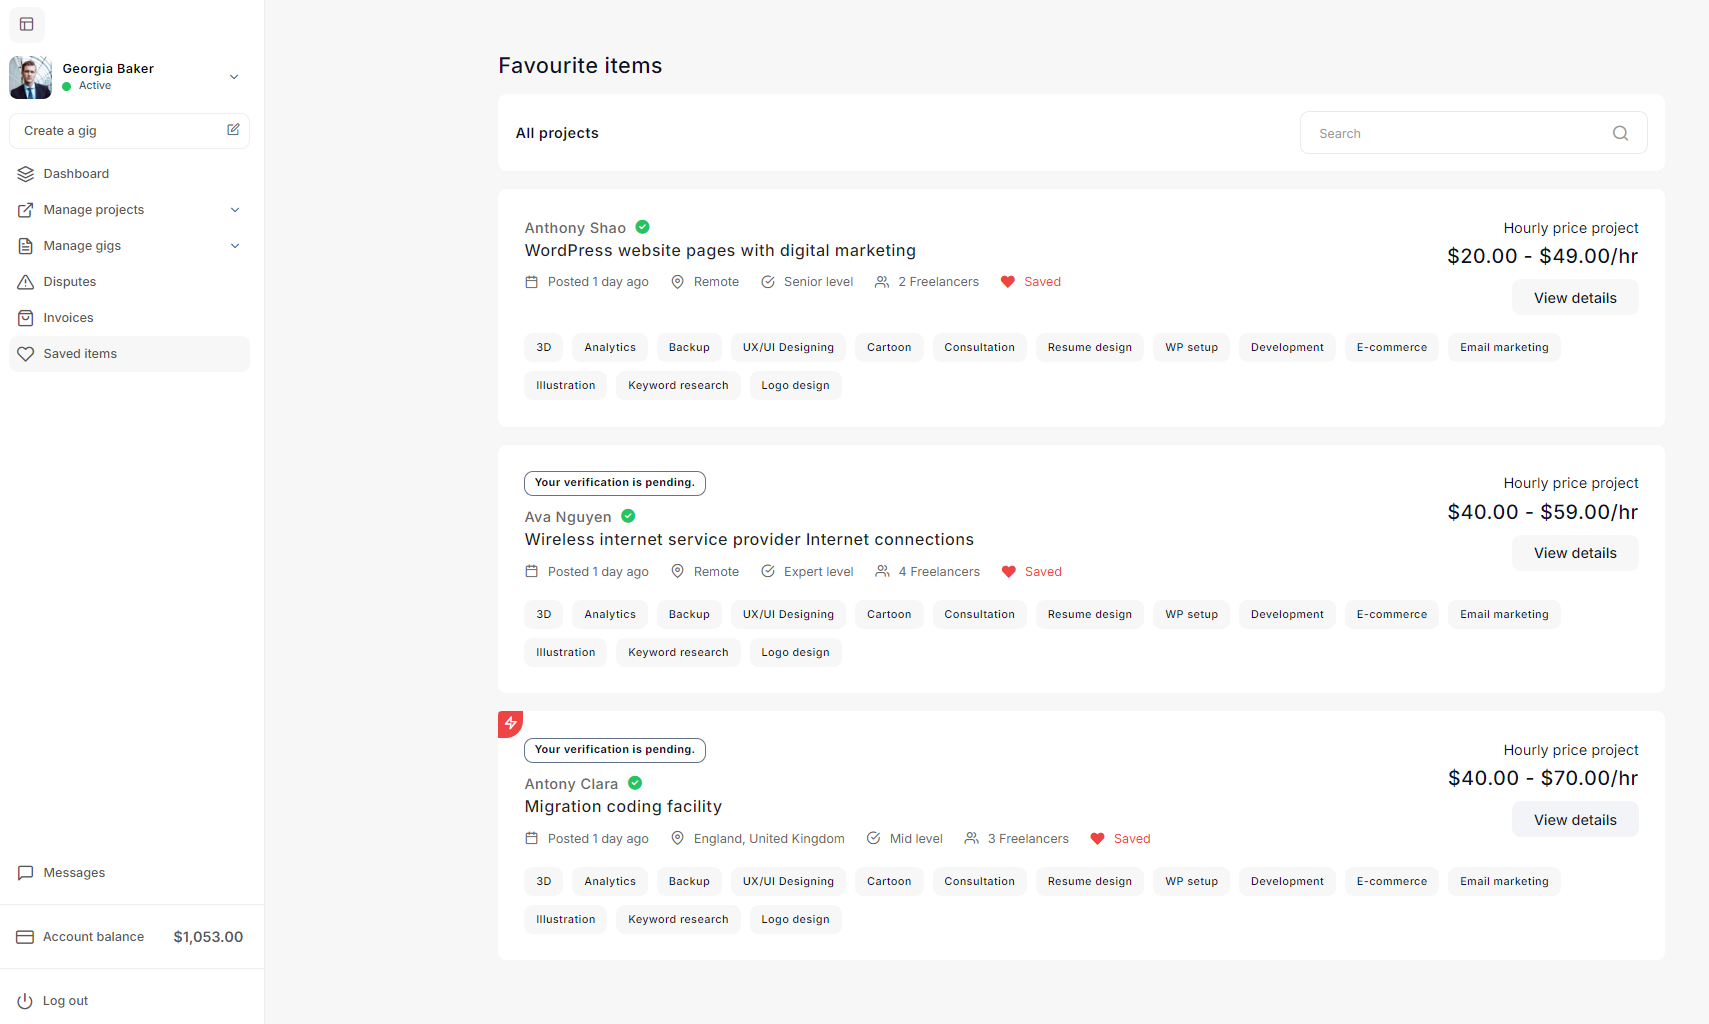
Favorite Items
The Favorite Items section in Taskup allows sellers and clients to save and organize projects and gigs that they are interested in. This feature helps you quickly access jobs or opportunities you may want to revisit later without having to search for them again.
Accessing Favorite Items
- On the left sidebar, click on Saved items.
- This will take you to the Favorite Items page, where all the projects or gigs you have saved are listed.
Project Status and Verification
- Verification Status: If your profile verification is pending, the page may show a banner that says Your verification is pending. This means that while you can browse and save projects, you may need to complete the verification process before applying for certain jobs.
- Job Posted Time: You can see when the job was posted (e.g., “Posted 1 day ago”) to determine the freshness of the project.
Managing Saved Projects
- View Details: For each saved project, you can click the View details button to see the full project description, client details, and any other requirements. This allows you to review the project in more detail before deciding to apply or take further action.
- Removing from Favorites: If you no longer wish to keep an item saved, you can click the Saved icon (red heart) again to remove it from your favorites list.
Searching and Sorting Saved Items
- Search Bar: You can search for specific saved projects by typing relevant keywords in the search bar at the top of the page. This is especially useful if you have many saved items and need to find a specific one quickly.
- Sorting: Depending on the interface, you may have options to sort the saved items by different criteria (e.g., most recent, highest pay, etc.).
Messages Area
The Messages Area enables sellers to communicate with buyer using a variety of real-time messaging features, enhancing the overall learning experience.
Features of the Messages Area
-
User List and Search:
- On the left side, you will find a list of users with whom you have active conversations.
- Use the Search bar to find and initiate a chat with a specific buyer or contact.
-
Real-time Chat:
- Engage in instant messaging with buyers. The chat interface supports:
- One-to-One Chat: Send private messages to individual buyers.
- Audio and Video Calls: Send audio and video files directly from the chat window.
- Media Sharing: Share various types of media, such as images, documents, and locations.
- Voice Notes: Send voice messages to communicate effectively without typing.
- Engage in instant messaging with buyers. The chat interface supports:
-
Send Friend Requests:
- Before starting a conversation, sellers can send a friend request to buyers or other users to establish a connection.
-
View Message Notifications:
- Notifications for new messages or friend requests are displayed at the top left of the chat area, ensuring sellers stay updated on all communications.
-
Welcome Screen:
- The center of the messages area displays a welcome message, encouraging the seller to start a conversation, share ideas, ask questions, or greet the buyers.
By utilizing these features, sellers can effectively manage their earnings and foster productive communication with their buyers on the Taskup platform.

Buyer Settings
Buyer Demo Account
To access the Buyer dashboard, use the following credentials:
- Email address: adolfo@amentotech.com
- Password: google
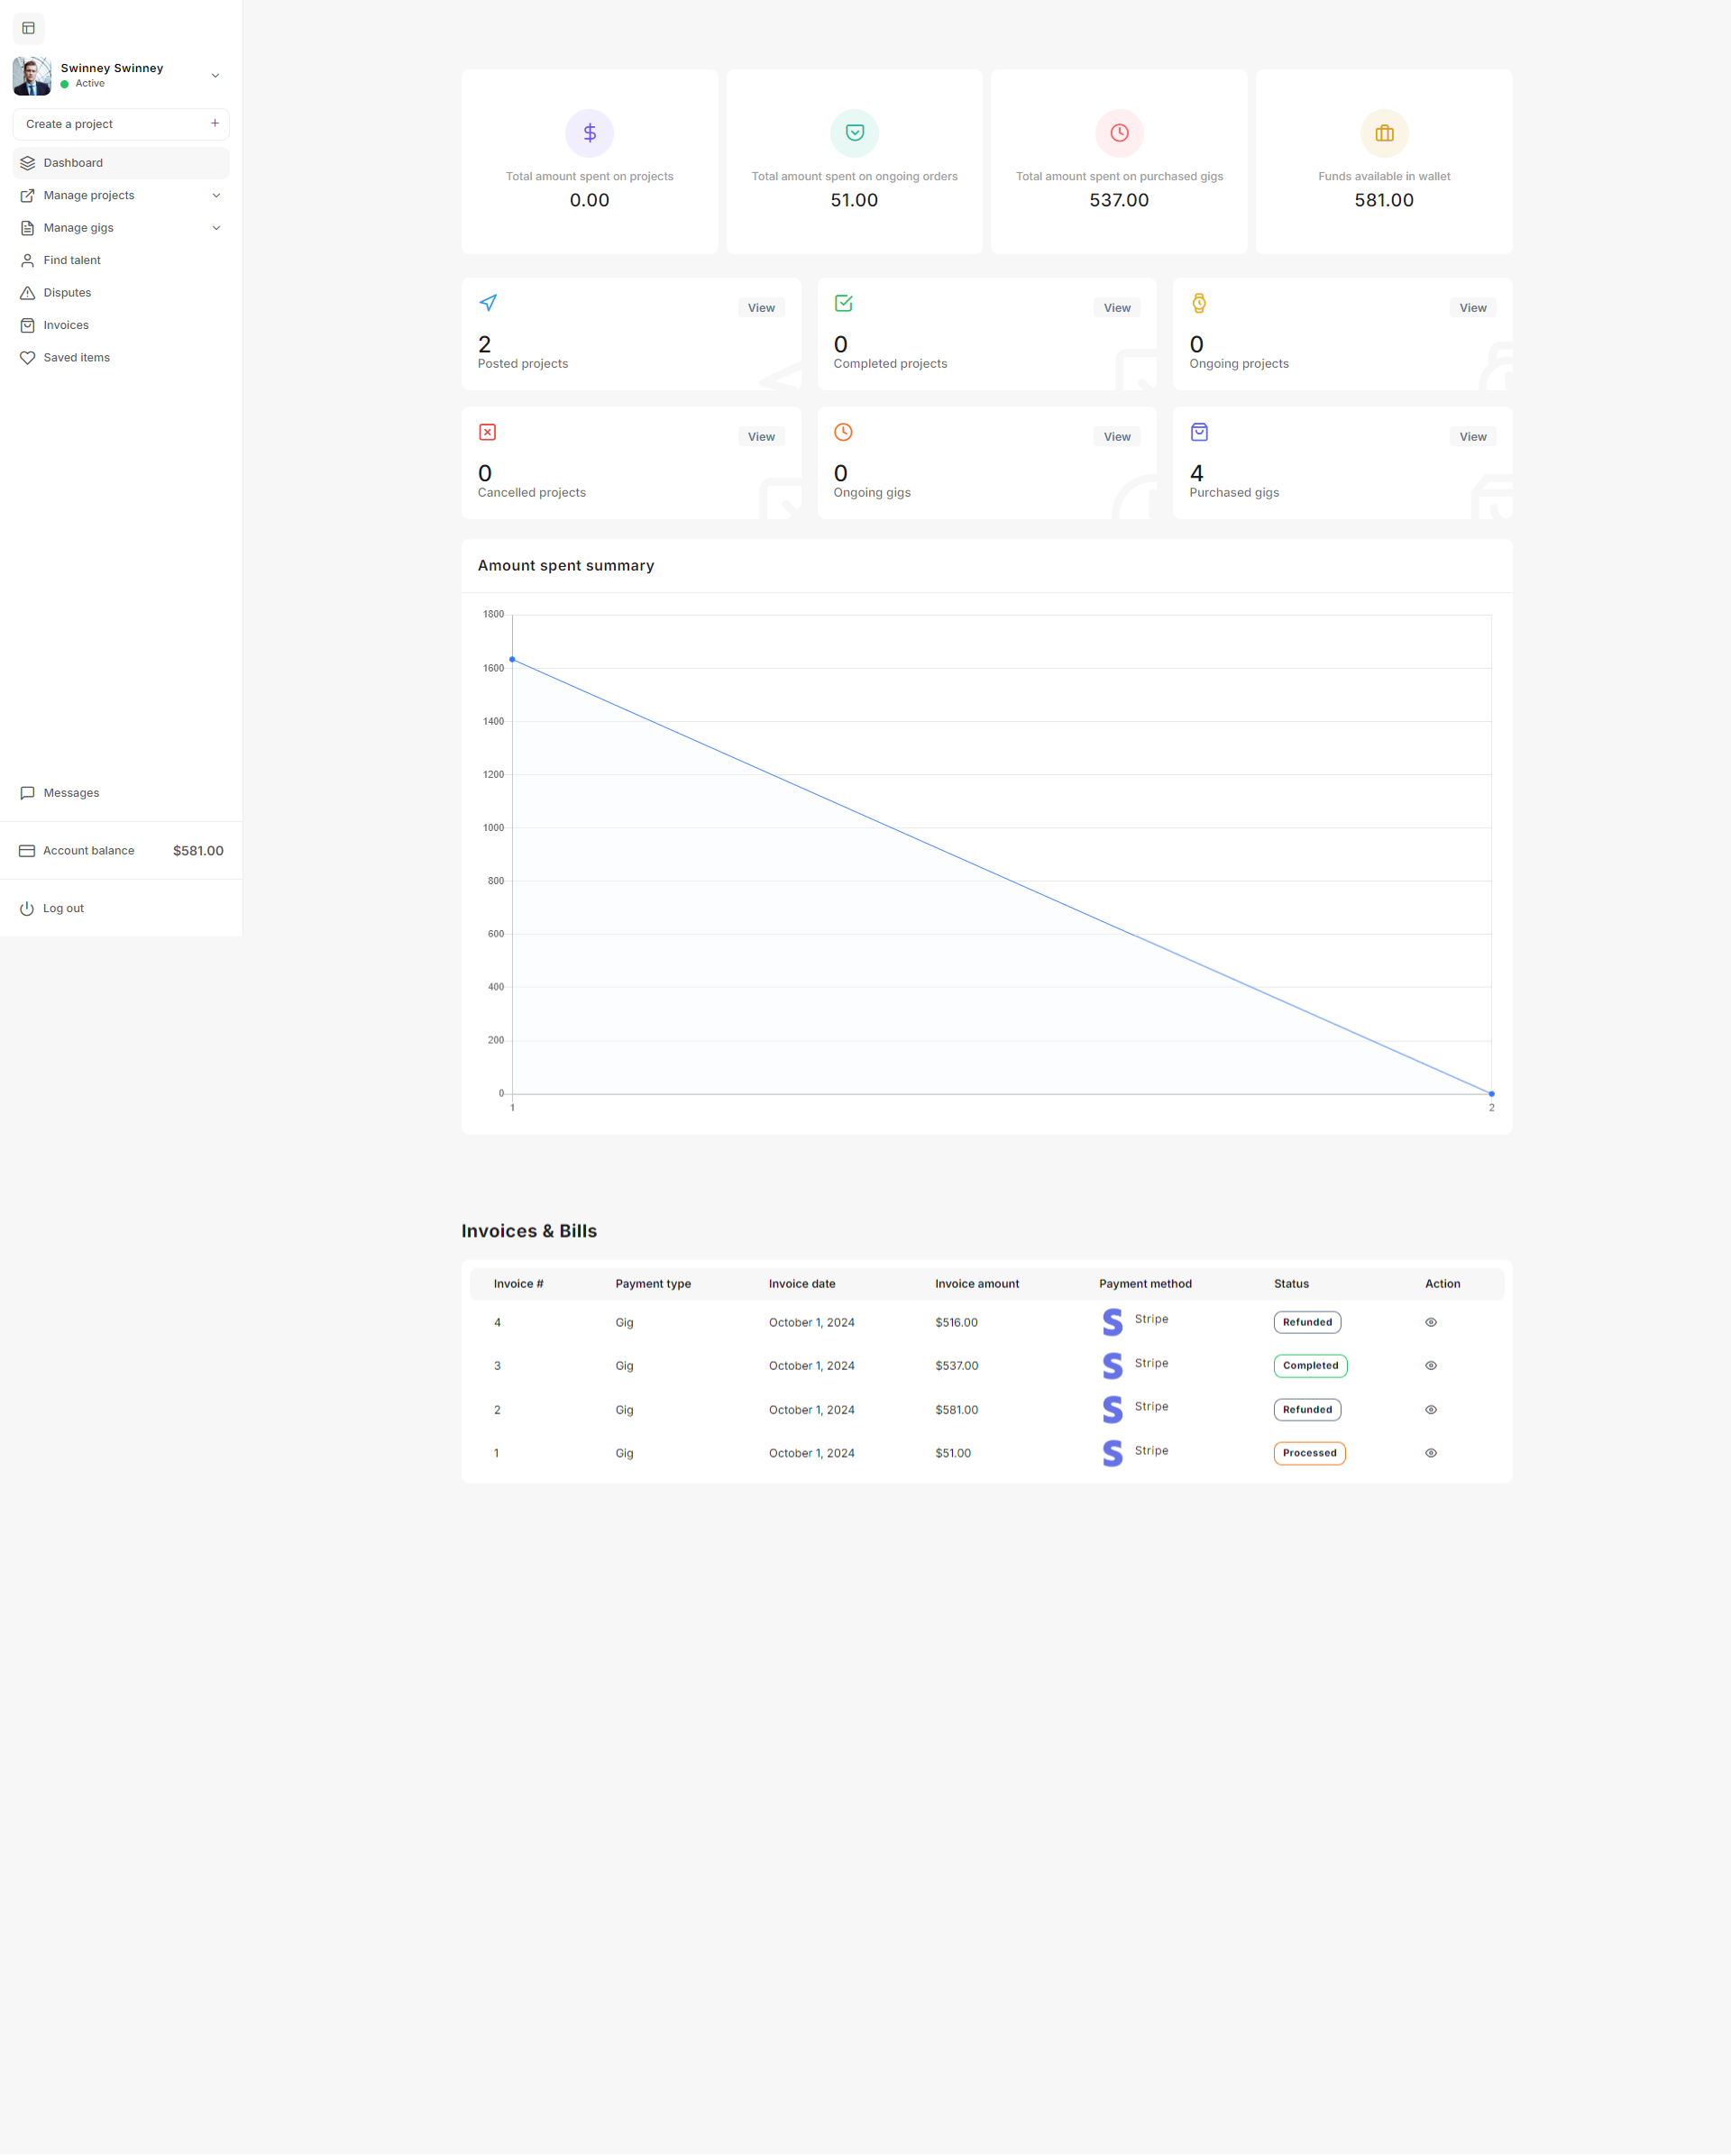
Dashboard Documentation
The Dashboard in Taskup gives users an overview of their account's financial status, project management, and billing history. Below is a guide to understanding and navigating the different sections of the Dashboard.
Top Financial Overview
The top section of the dashboard provides a quick financial summary of your spending and wallet balance on Taskup:
- Total amount spent on projects: Displays the total amount you’ve spent on completed projects.
- Total amount spent on ongoing orders: Shows how much you are currently spending on active projects.
- Total amount spent on purchased gigs: Summarizes the amount spent specifically on gigs purchased through the platform.
- Funds available in wallet: Displays the balance of funds available in your Taskup wallet, which can be used for payments.
Project Overview
This section provides details about the status of your various projects:
- Posted Projects: Shows the number of projects you’ve posted on the platform. Click View to see more details about each project.
- Completed Projects: Displays the number of projects you’ve successfully completed. Click View for further details.
- Canceled Projects: Indicates how many projects were canceled. Click View for the full list.
- Ongoing Projects: Shows the number of active projects. Click View to manage these projects.
- Ongoing Gigs: Shows how many gigs you are currently working on.
- Purchased Gigs: Displays the total number of gigs you have purchased. Clicking View will give you more details.
Amount Spent Summary (Graph)
The dashboard also includes a Graphical Summary that visually represents your spending over time. This graph shows a trend of the amount spent across different projects and gigs. The x-axis represents time, while the y-axis shows the monetary amount spent.
Invoices & Bills
At the bottom of the dashboard, the Invoices & Bills section lists the details of your recent financial transactions, such as payments for gigs and projects:
- Invoice #: The unique invoice number for each transaction.
- Payment Type: Indicates whether the payment was for a project or gig.
- Invoice Date: The date the invoice was issued.
- Invoice Amount: The total amount of the invoice.
- Payment Method: Shows how the payment was processed (e.g., Stripe, PayPal).
- Status: Displays the current status of the payment, such as Processed, Refunded, or Completed.
- Action: You can view more details by clicking the eye icon in the Action column.
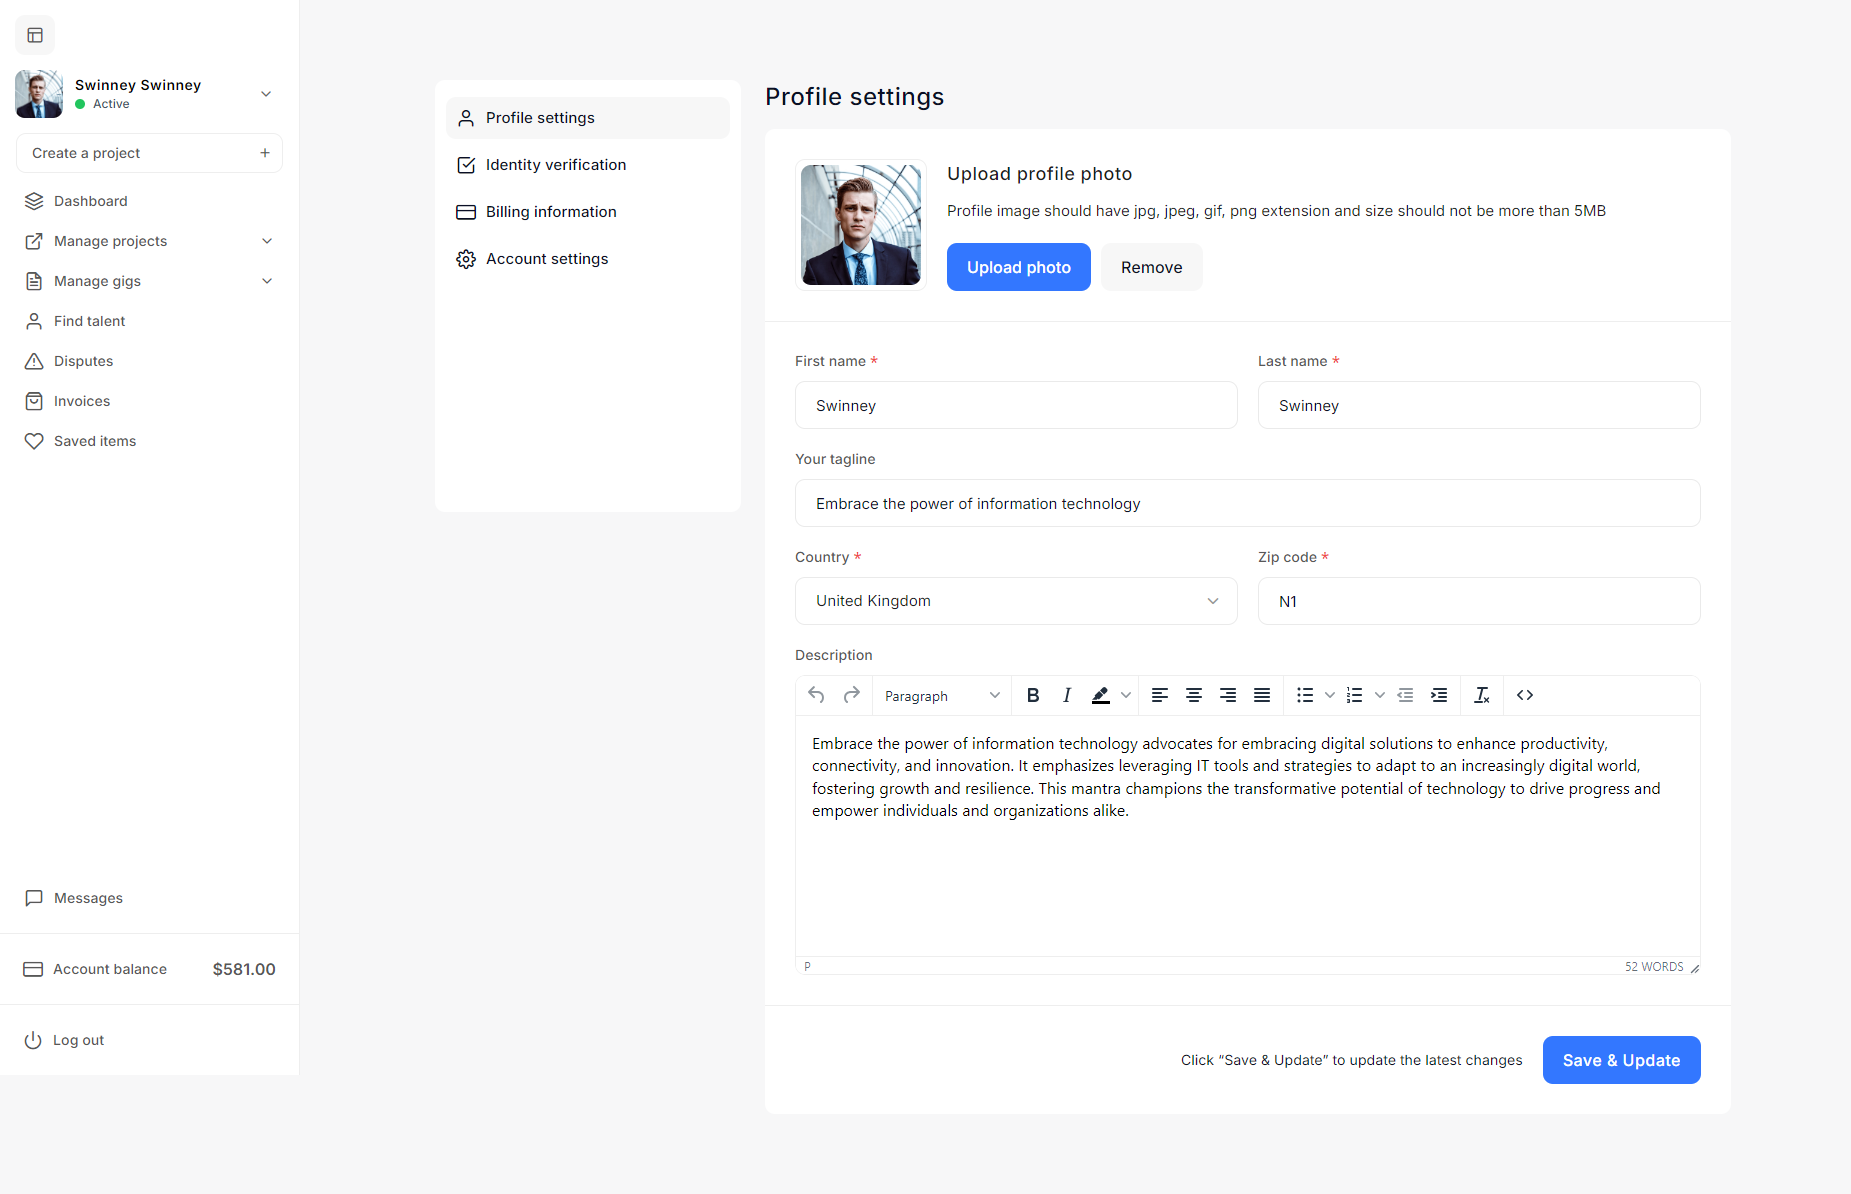
Profile Settings
The Profile Settings page allows users to manage their personal information and update their profile to ensure it accurately reflects their professional identity. Here's a step-by-step guide on how to manage your profile settings:
Accessing the Profile Settings
- After logging into your Taskup account, you can access your profile settings by clicking on your name or avatar in the left-hand sidebar. This will open a dropdown menu where you can select Profile Settings.
Profile Photo
- Upload Profile Photo:
- You can upload a new profile picture by clicking the Upload Photo button. Make sure the file is in JPG, JPEG, GIF, or PNG format and does not exceed the size limit of 5 MB.
- If you want to remove your current profile picture, click the Remove button.
Editing Personal Information
- First Name and Last Name:
- You can edit your first and last name by typing in the provided text fields.
- Tagline:
- This field allows you to write a short, attention-grabbing line that summarizes your skills or professional identity. Example: "Embrace the power of information technology."
Location Details
- Country:
- From the dropdown menu, select the country where you are located.
- Zip Code:
- Enter your postal code in the provided field.
Description
- Professional Description:
- This section is where you can provide a more detailed description of yourself, your services, or your professional background. Use this area to highlight your skills, work experience, and unique value. The description editor allows basic text formatting, such as:
- Bold and italic text.
- Lists (bulleted and numbered).
- Paragraph alignment (left, center, right).
- Hyperlinks to relevant work or social profiles.
- This section is where you can provide a more detailed description of yourself, your services, or your professional background. Use this area to highlight your skills, work experience, and unique value. The description editor allows basic text formatting, such as:
Saving Changes
- Once you have updated your profile information, click the Save & Update button to ensure your changes are applied. A notification or confirmation message will appear indicating the profile has been successfully updated.
Identity Verification
To maintain the integrity of the Taskup platform, users are required to verify their identity by uploading a valid government-issued ID. Follow these steps to complete the identity verification process:
Accessing the Identity Verification Page
- Log in to your Taskup account.
- On the left-hand sidebar, navigate to Profile Settings.
- Click on Identity Verification to open the identity submission page.
Filling in Personal Details
- Your Name: Ensure that your full legal name is entered in this field, as it appears on your government-issued ID.
- Contact Number: Provide a valid phone number where you can be reached. This may be required for further verification.
- National Identity Card, Passport, or Driver’s License Number: Enter the unique identification number from one of your valid government-issued documents (e.g., passport number, national ID number, or driver's license number).
- Add Address: Enter your full residential address, including street name, city, postal code, and country.
Uploading Identity Documents
- Document Upload:
- You can upload a scanned copy or clear photo of your identification document by clicking the Click here link or dragging your file into the designated box.
- Accepted file types typically include images (JPG, PNG) or PDFs. Ensure the file size does not exceed platform limits, and the document is clearly visible.
- After the document is uploaded, a preview of the file will appear in the upload section, allowing you to review the upload before submission.
Submit Your Identity for Verification
- Once all the required fields have been filled in and your document is uploaded, click the Send Now button to submit your information for verification.
- Taskup will review your submission, and you will be notified once your identity has been successfully verified or if further steps are needed.
Saving Updates
- If you need to make changes before submitting, click the Save & Update button at the bottom of the page to ensure all your information is saved.
Billing Information
The Billing Information section in Taskup enables users to store their payment details for invoicing and transactions. It's crucial to ensure that all details are accurate for smooth financial transactions.
Accessing the Billing Information Page
- After logging into your Taskup account, go to the Profile Settings section on the left-hand sidebar.
- Click on Billing Information to open the billing details form.
Filling in Billing Information
- First Name: Enter your first name as it appears in your official billing records.
- Last Name: Provide your last name or family name.
- Company Title: If you're representing a company, enter the official name of your business or organization. If you're an individual, this field can be left blank.
- Country: Select your country from the dropdown menu. This will help ensure your address is formatted correctly for invoicing.
- State: Choose your state or region if applicable.
- City: Enter the city where you or your company is located.
- Postal Code: Provide the postal or ZIP code that corresponds to your billing address.
- Address: Enter the full address where your billing information should be directed. Include any street names, apartment numbers, or P.O. boxes necessary.
- Phone Number: Provide a valid contact number, including the country code.
- Email: Enter your preferred email address for receiving billing-related notifications, invoices, and other important payment information.
Saving Billing Information
- Once you’ve completed the form, click the Save & Update button to save your billing information.
- You will see a confirmation message or notification that your billing details have been successfully updated.

Account Settings
The Account Settings page on Taskup provides users with the ability to manage their security settings, update passwords, and control privacy options. Below is a guide on how to use these features.
Changing Your Password
If you want to update your password for security reasons, follow these steps:
- Current Password: Enter your current password to verify your identity before making changes.
- New Password: Input the new password you would like to set. Be sure to choose a strong password that contains a mix of upper and lowercase letters, numbers, and special characters.
- Retype Password: Re-enter the new password to confirm there are no mistakes.
Once you’ve entered the necessary information, click the Update Now button to save your new password.
Privacy & Notification Settings
The privacy settings allow you to control the visibility of your profile photo and notifications:
- Make my profile photo visible to friends and everyone:
- Toggle this switch to enable or disable visibility. If enabled, your profile photo will be visible to others. When disabled, your profile photo will remain hidden.
After adjusting the settings, click Update Now to save any changes.
Creating a Project
Taskup allows users to post projects to find freelancers suited to their needs. Below are the steps involved in creating a new project.
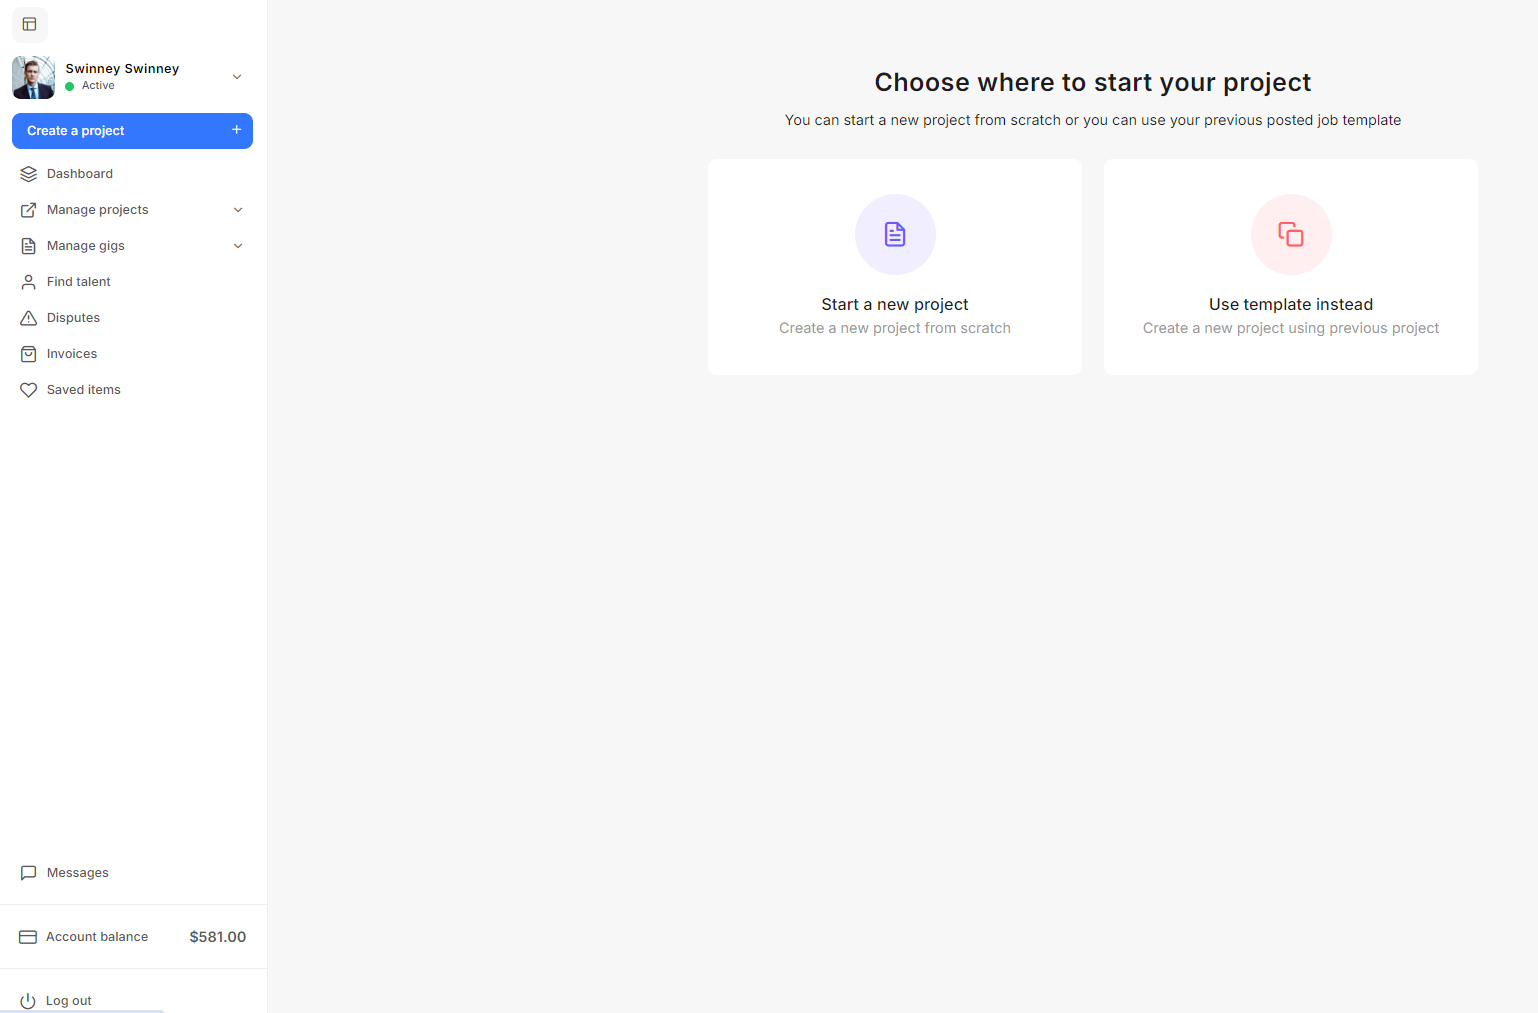
Starting a New Project
- On the left-hand sidebar, click Create a Project.
- You will be presented with two options:
- Start a New Project: This option allows you to create a project from scratch.
- Use Template Instead: This option lets you reuse details from a previously posted job template, saving time if you're posting similar projects.
- Choose the option that best fits your needs.
Step 1: About Project
Once you choose to create a new project, you will be taken to the project details form. Here you will need to provide information about the project you are posting.
Project Title
- Enter a clear and specific project title to give freelancers an immediate understanding of the job.
Project Type
You will need to select a project payment structure:
- Fixed: Pay freelancers a fixed amount for the entire project.
- Hourly: Pay freelancers based on their hourly rate.
Milestones
You can choose to split your project payments into milestones or make a full payment at the end of the project. The milestone option allows you to release payments after each phase of the project is completed. Options include:
- Fixed: Pay the entire budget at the end of the project.
- Milestone: Set payments based on specific project milestones.
- Both: Use a combination of fixed and milestone payments.
Budget
- Minimum Fixed Budget: Enter the minimum amount you are willing to pay for the project.
- Maximum Fixed Budget: Enter the maximum budget you are willing to allocate for the project.
Project Duration
Select the duration of the project. Options may include short-term, one-month, or custom durations based on the scope of the project.
Project Category
Choose the category that best describes your project. Categories may include areas like:
- Design
- Writing
- Development
- Marketing, etc.
Location
Indicate whether the project is:
- Onsite: Requires the freelancer to work from a specific location.
- Remote: Can be completed from any location.
If the project is onsite, enter the location details.
Project Description
This is one of the most important parts of your project post. Be clear and detailed in your description:
- Outline the project scope, specific tasks, and deliverables.
- Specify any requirements or qualifications you expect from the freelancer.
- You can format the description using the text editor to make your post more structured and readable.
Attachments and Media (Optional)
- You have the option to include media or attachments to your project posting. This can include project files, images, or a descriptive video to provide additional context for freelancers.
- To add attachments, simply drag and drop files into the provided area or click the Upload button to select files from your computer.
Submit Your Project
After filling out all the required information, click the Continue button to proceed. Review the project details and make any necessary adjustments. Once you're satisfied, publish the project to start receiving applications from freelancers.
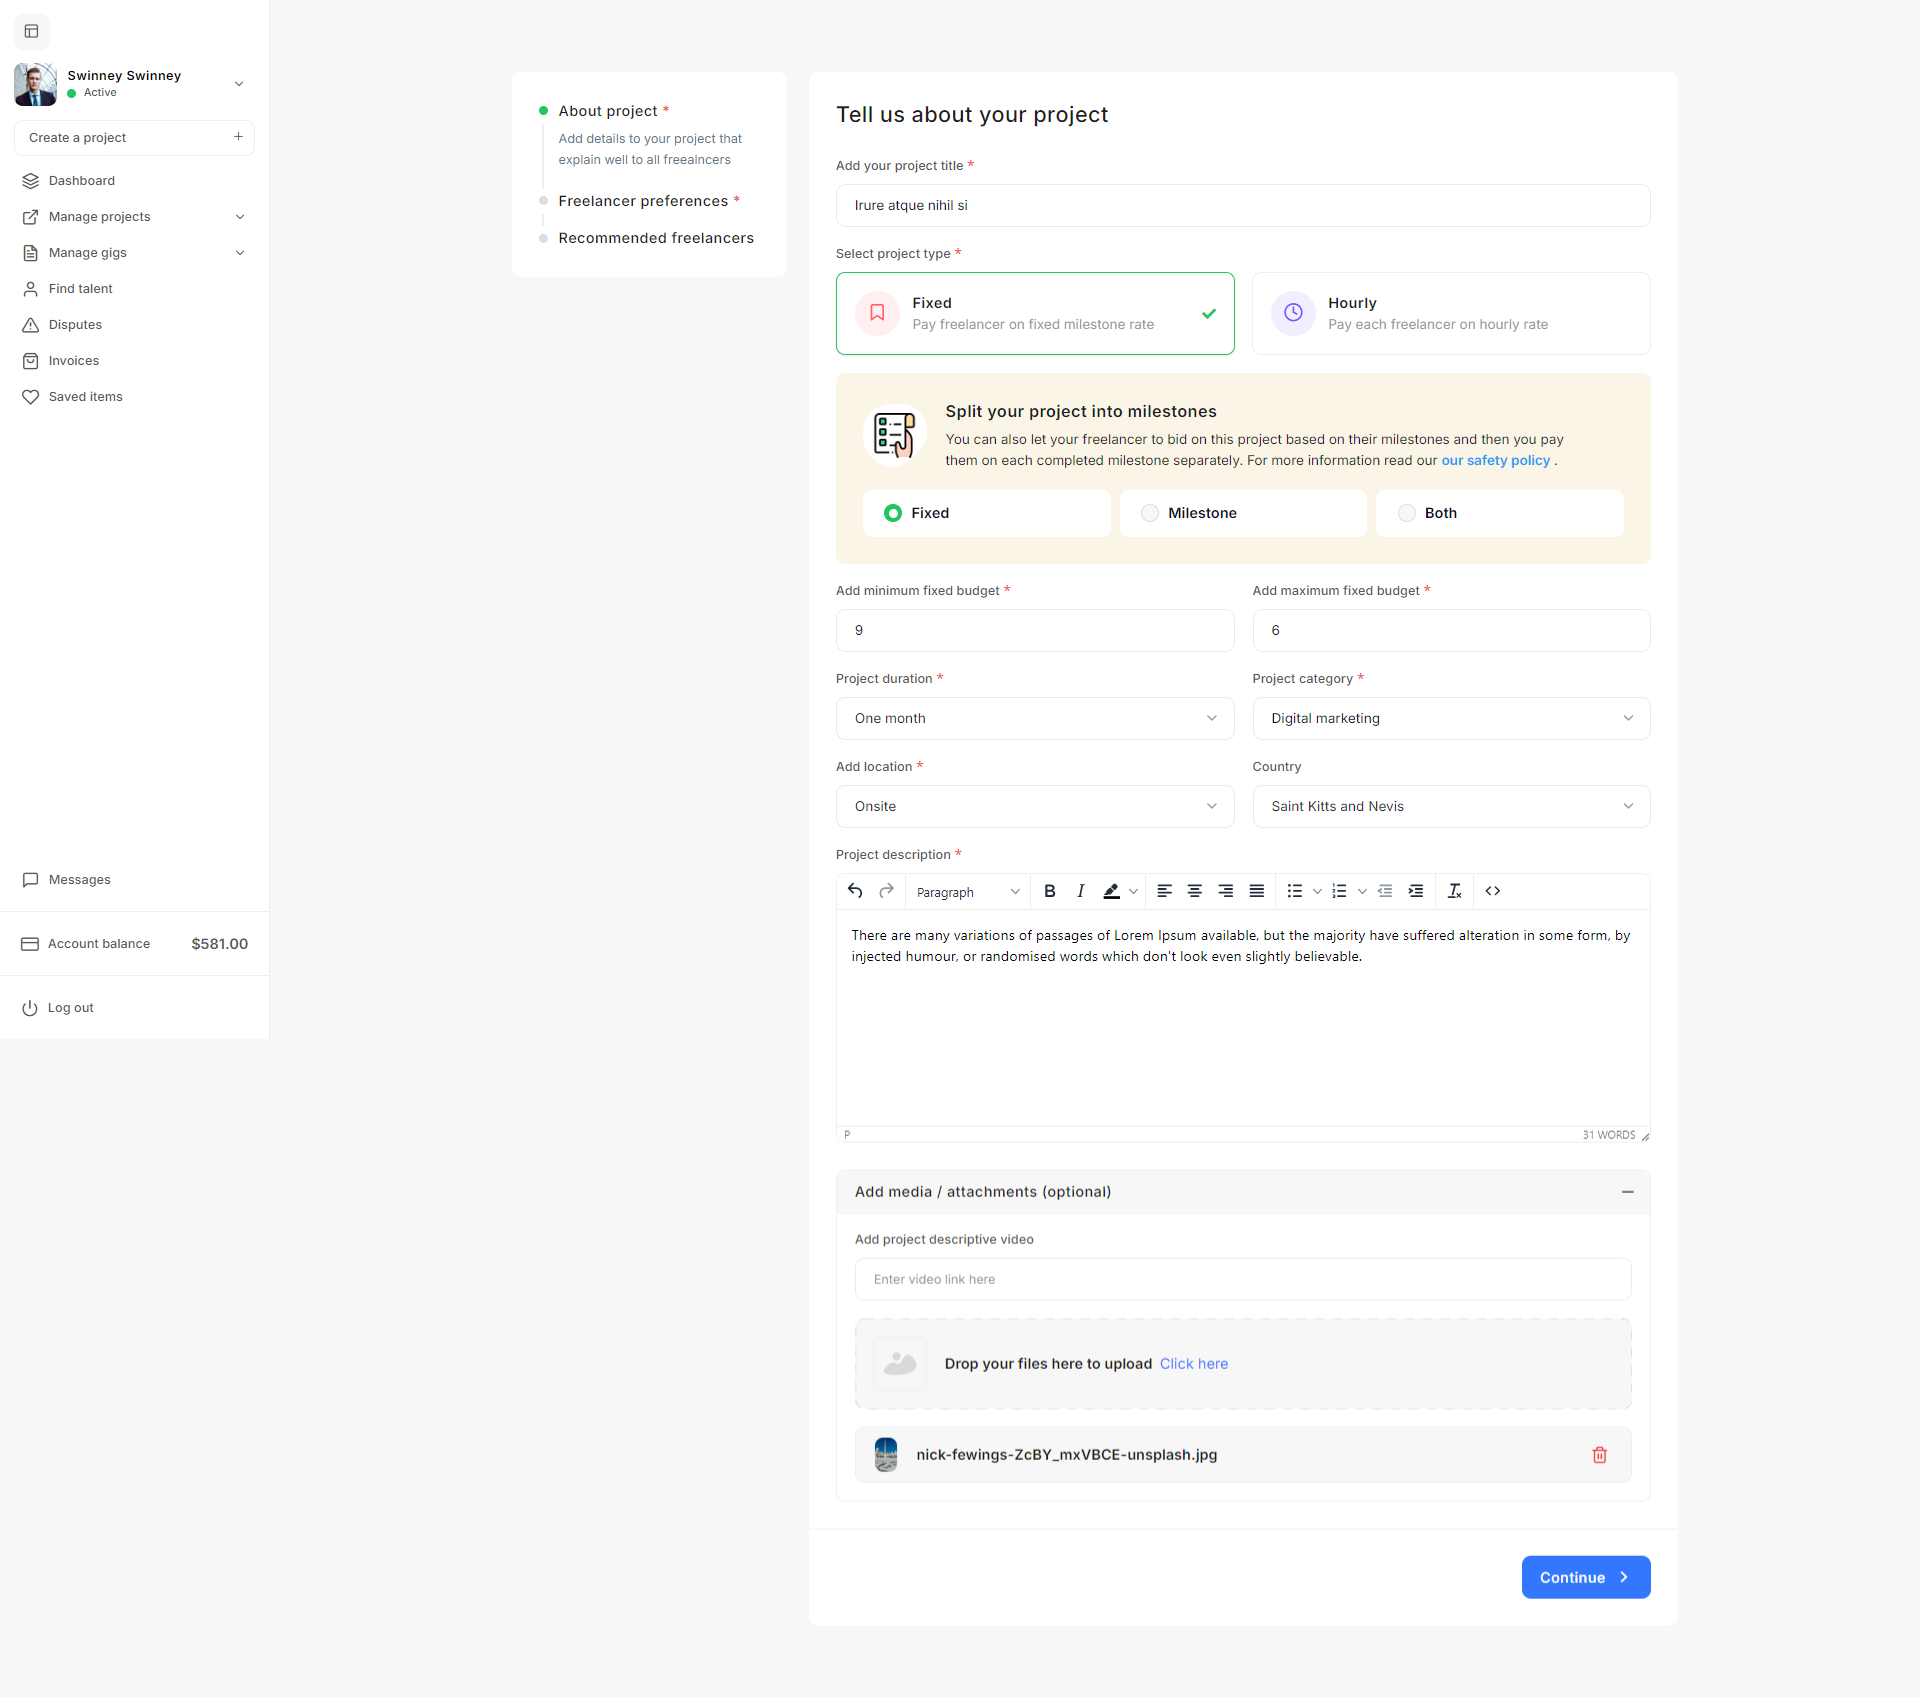
Filling Out Hourly Project Details
Once you opt to create a new project, you'll be directed to a form where you can enter all the necessary details about the project.
Project Title
- Enter a clear and descriptive project title that quickly communicates the scope of the project. Example: "Voluptas et recidendi".
Project Type
- Select Hourly as the project type to pay freelancers based on the hours they work.
Payment Mode
Choose how often you want to pay freelancers for the hours worked. Options might include:
- Daily: Pay after daily work completion.
- Weekly: Pay at the end of each week based on hours worked.
- Monthly: Pay at the end of each month.
Maximum Hours
- Specify the maximum number of hours per day, week, or month (based on your selected payment mode) that you expect the freelancer to work. This helps ensure the freelancer doesn't exceed your expected time commitment.
Hourly Rate
- Set the Minimum Hourly Rate: This is the lowest rate per hour that you’re willing to pay the freelancer.
- Set the Maximum Hourly Rate: Define the highest hourly rate you are willing to pay. This provides freelancers with a range to guide their bids.
Project Duration
- Select how long the project will last. For instance, you might specify a duration of one week, one month, or other custom durations, depending on the nature of the job.
Project Category
Choose the appropriate category for your project. Categories include various specializations like:
- Google Ads
- Web Development
- Design
- Marketing, and more.
Location
- Specify whether the project is Onsite (requiring the freelancer to work at a specific location) or Remote. If onsite, specify the location (e.g., Mozambique, as shown in the example).
Project Description
- Provide a detailed description of the work required for this project. Clearly communicate expectations, specific tasks, goals, and any qualifications or experience you’re looking for in a freelancer.
- Use the text editor to format your description, making it easier for freelancers to read and understand.
Media and Attachments (Optional)
- If relevant, you can add media files or project-related attachments to help freelancers better understand your project needs.
- You can upload documents, images, or add a descriptive video link by using the Add Media/Attachments section. Simply drag and drop the files or click Upload to select files from your device.
Submit Your Hourly Project
- Once you have entered all the necessary details, click the Continue button to proceed.
- Review your project one last time, and when you’re ready, click Publish Project to post it live on Taskup.
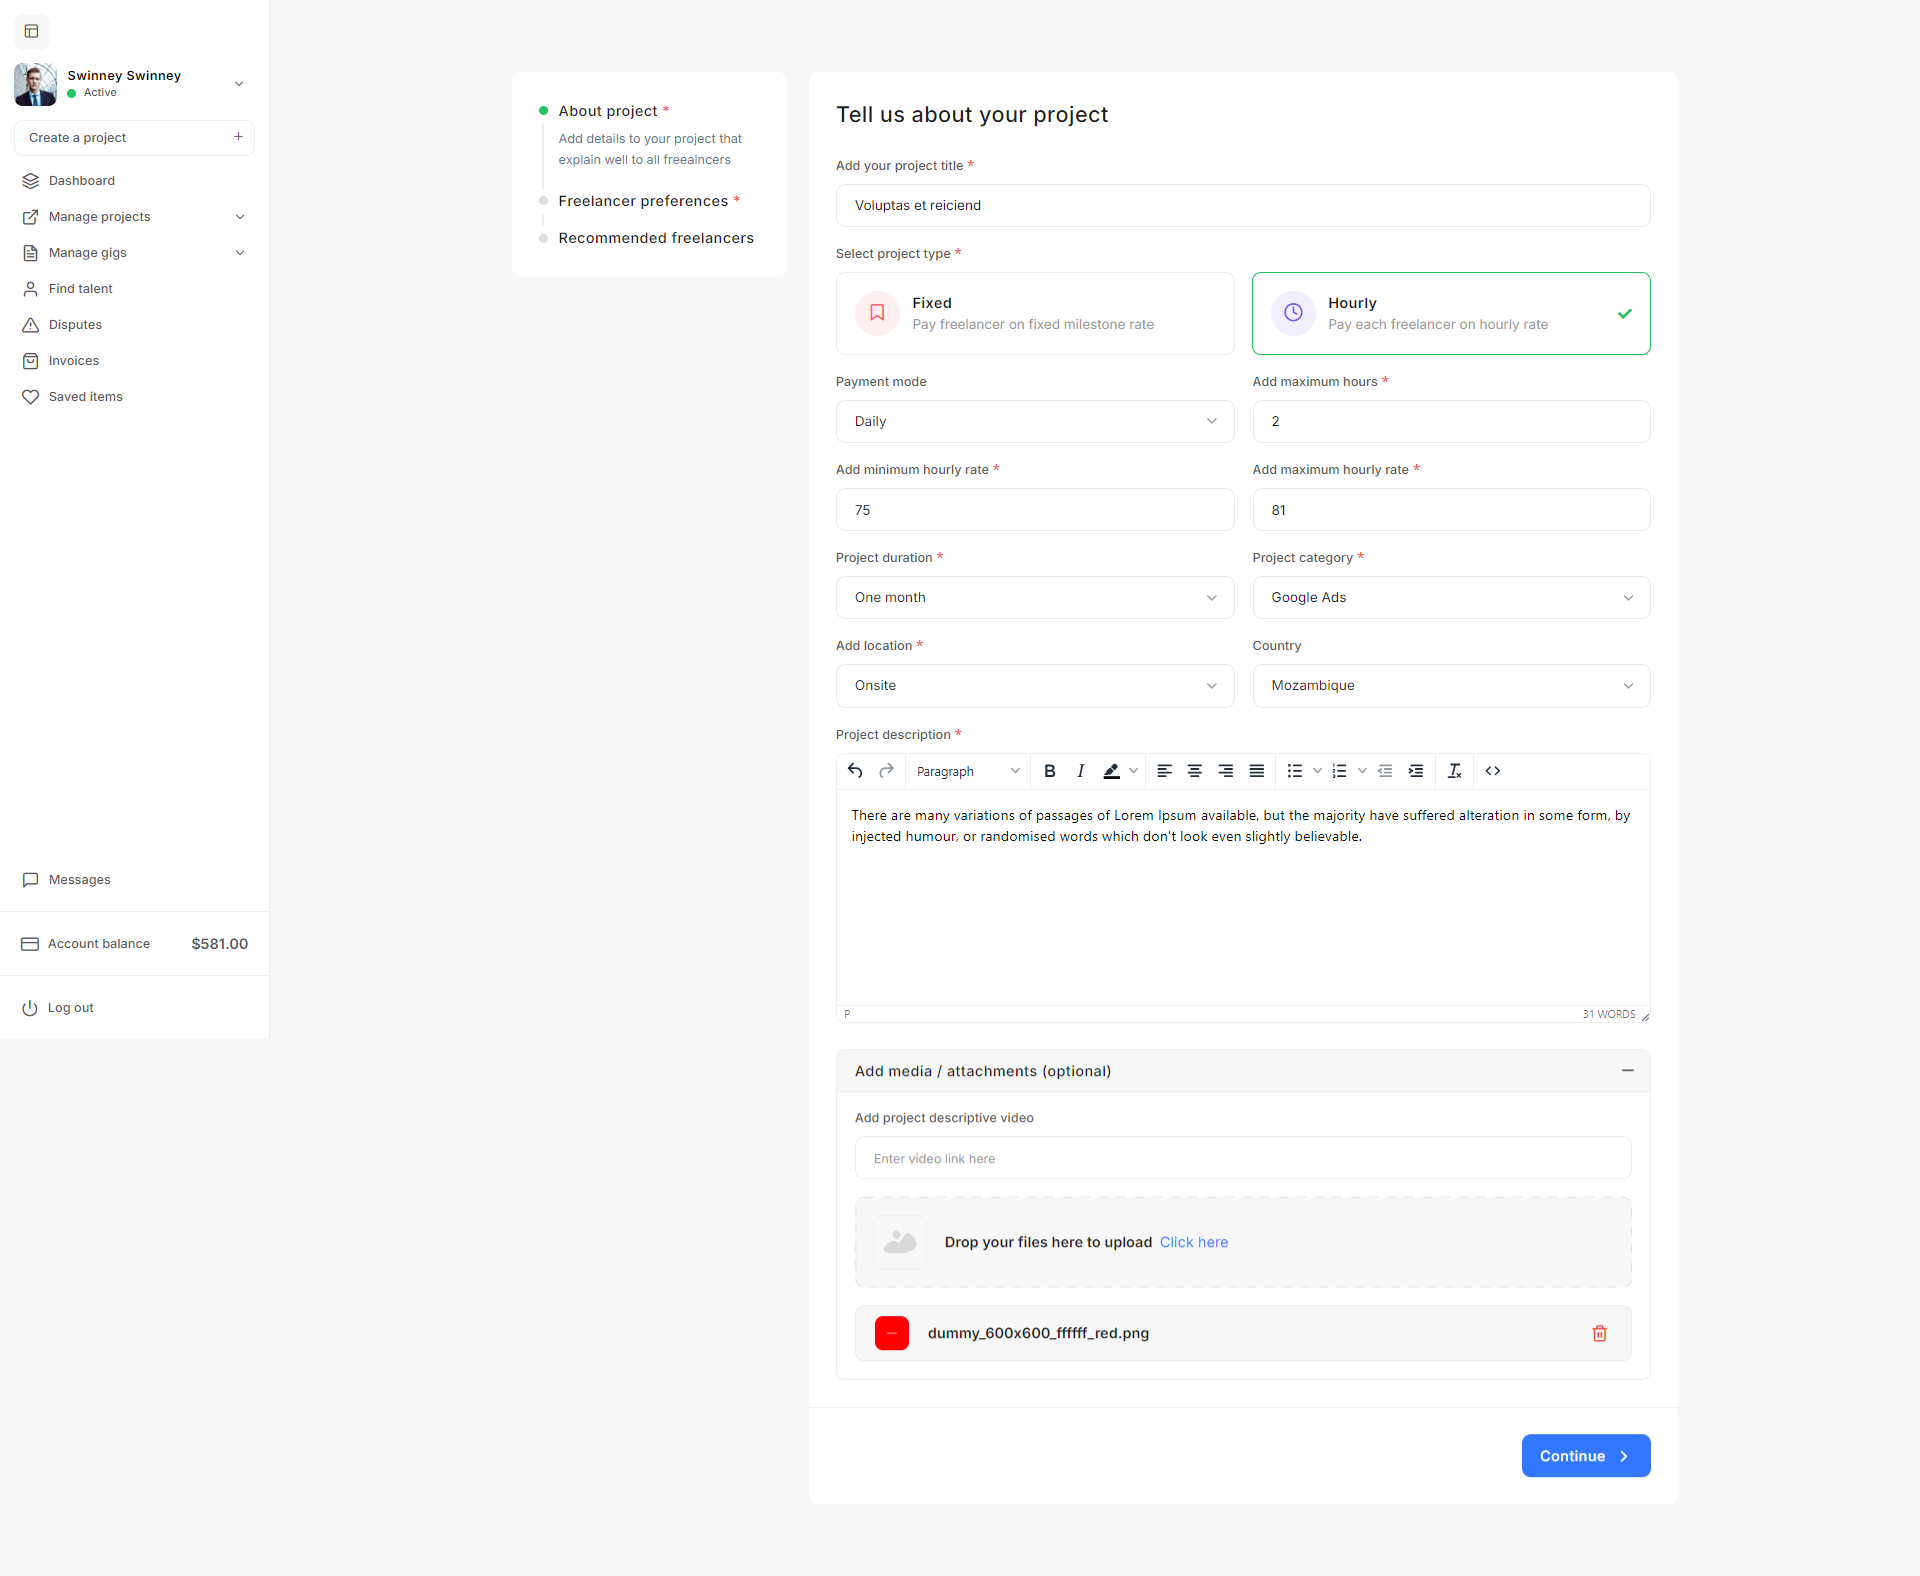
Step 2: Seller Preferences
When creating a project on Taskup, you can specify the skill requirements, expertise level, and other preferences for the sellers you want to hire. This ensures that only qualified candidates apply for your project. Here's how to complete the seller Preferences section.
Number of Sellers
- No. of sellers: Specify how many sellers you want to hire for the project. This number can range from 1 seller to a larger team, depending on the scope of your project.
Expertise Level
- Expertise Level: Select the experience level required for the seller. Options may include:
- Junior Level: Ideal for entry-level sellers.
- Mid Level: Suitable for sellers with moderate experience.
- Senior Level: Choose this for highly experienced professionals who have specialized skills.
Required Skills
- Skills Required: List the specific skills that are necessary to complete the project. You can add multiple skills by selecting from the available options. Example skills might include:
- Illustration
- E-commerce
- 3D Design
The more accurately you specify the skills, the better the chances of matching with sellers who have the right expertise for your project.
Languages
- Languages: Specify the languages the seller should be proficient in. This is especially useful if the project requires communication in certain languages or if you're targeting specific regions. You can add multiple languages from the available options. In the example provided, languages like Breton, Corsican, Finnish, Oriya, Persian, and Somali have been selected.
Saving Your Preferences
- After filling out the seller preferences, you have two options:
- Save as Draft: This allows you to save the project details and come back to edit them later.
- Save & Continue: Click this button to proceed to the next stage in the project creation process, such as reviewing or publishing your project.
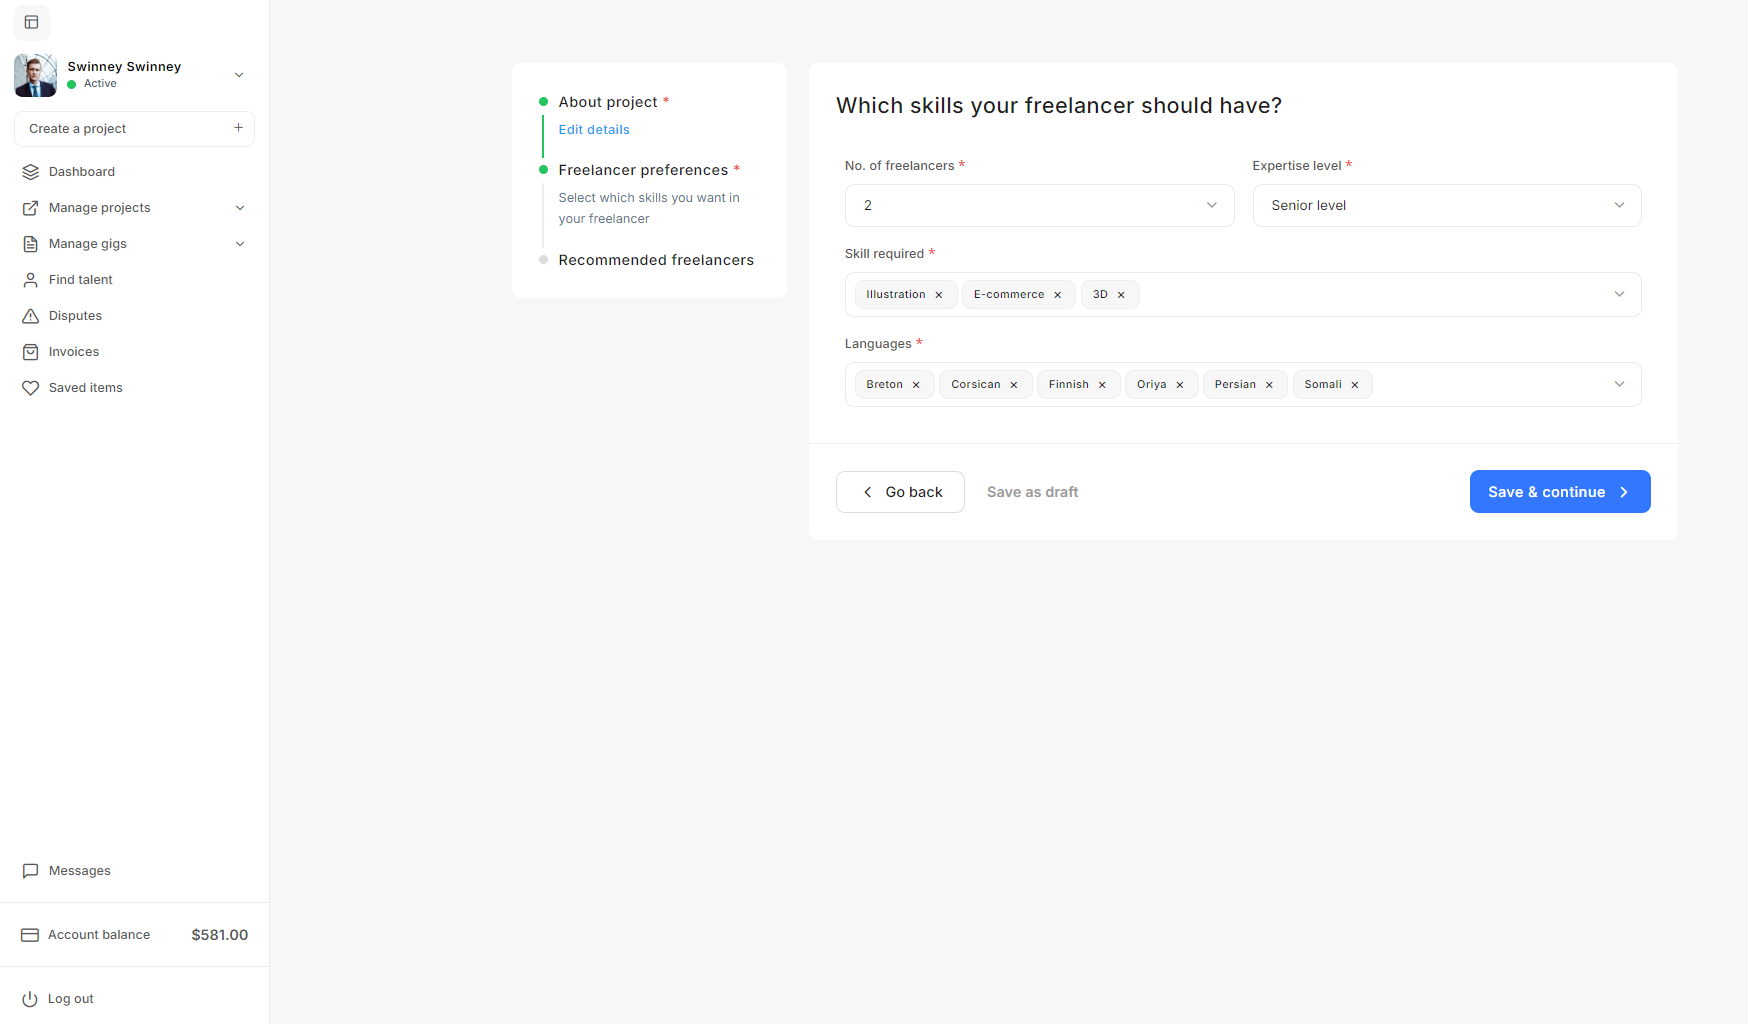
Step 3: Recommended Sellers
Once you have provided your Seller Preferences during the project creation process on Taskup, the platform will suggest a list of sellers that best match your project requirements. This section is known as Recommended Sellers, and here’s how to navigate and utilize it effectively:
Understanding the Recommended Sellers List
This page displays a list of sellers whose profiles match the skills, expertise level, and language preferences you defined in the previous step.
- Seller Information: For each recommended seller, you will see:
- Name and Profile Image: The seller’s display name and profile picture.
- Tagline: A short description or tagline that summarizes the seller’s specialization or expertise.
- Reviews and Ratings: The number of reviews the seller has received and their average rating, if any.
- Profile Views: The number of times the seller’s profile has been viewed by other clients.
- Save Option: You can save a seller's profile by clicking the Save button for easy reference later.
Actions Available
For each seller listed, you have several action options:
- View Profile: Click this link to see more details about the seller’s profile, including their full work history, portfolio, client reviews, and ratings. This helps you determine whether the seller is the right fit for your project.
- Invite to Bid: Click this button to send a direct invitation to the seller to bid on your project. This is a proactive way to engage sellers you are particularly interested in.
Navigation
If the list of recommended sellers is long, you can navigate through different pages by clicking the page numbers at the bottom of the list.
Finalizing Seller Invitations
Once you have reviewed the profiles of recommended sellers, you can proceed to invite multiple sellers to bid on your project. This allows them to submit proposals, and you can evaluate which one best aligns with your project’s goals and budget.
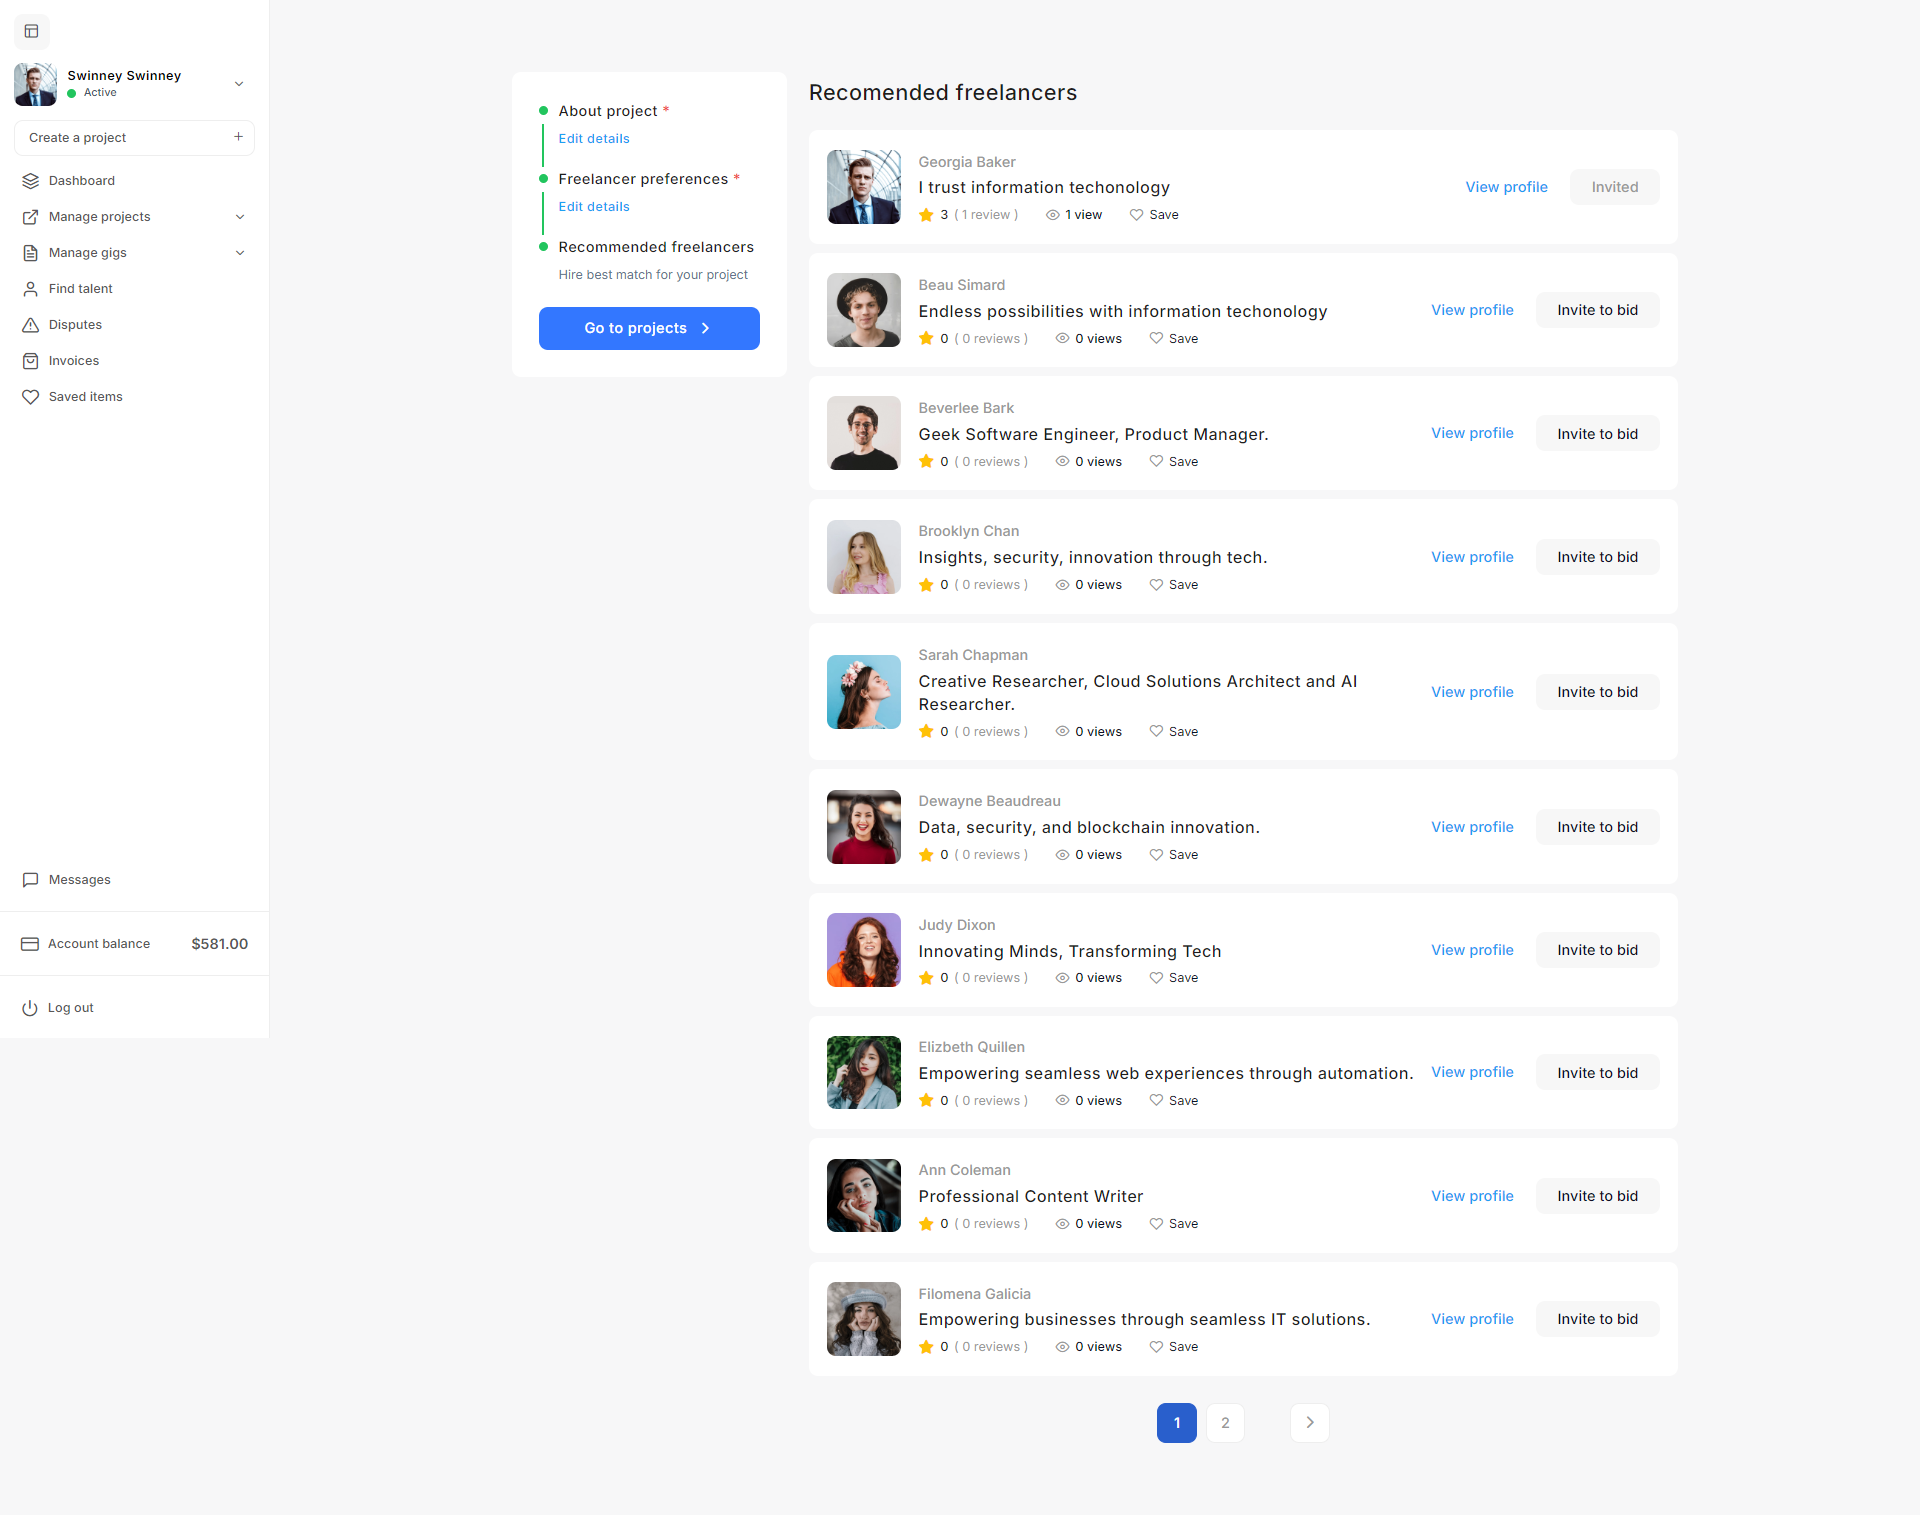
Creating a Refund Request for a Project
When managing a project on Taskup, you may encounter issues that require you to request a refund. Here's how to use the refund request popup:
Accessing the Refund Request Option
- Click on the three dots next to the project budget or order details to open additional options.
- Select the Create Refund Request option from the dropdown menu.
Choosing the Issue
In the popup, you will be asked to specify the reason for your refund request. The following options are available:
- The seller is not responding: Choose this if the freelancer has stopped communicating.
- The seller sent me an unfinished product: Select this if the work submitted does not meet the agreed terms.
- The seller is abusive or using unprofessional language: If the freelancer's conduct is inappropriate, select this option.
- Seller not sure with his/her skill set: Use this if the freelancer’s skills do not meet your project requirements.
- Others: If the issue doesn't fall under the specified categories, you can provide additional details.
Adding Dispute Details
In the Add dispute details section, provide a description of the issue and any relevant information that will help support your refund request.
Submitting the Request
- Check the box agreeing to Taskup’s terms & conditions.
- Click Submit to send your refund request for review.
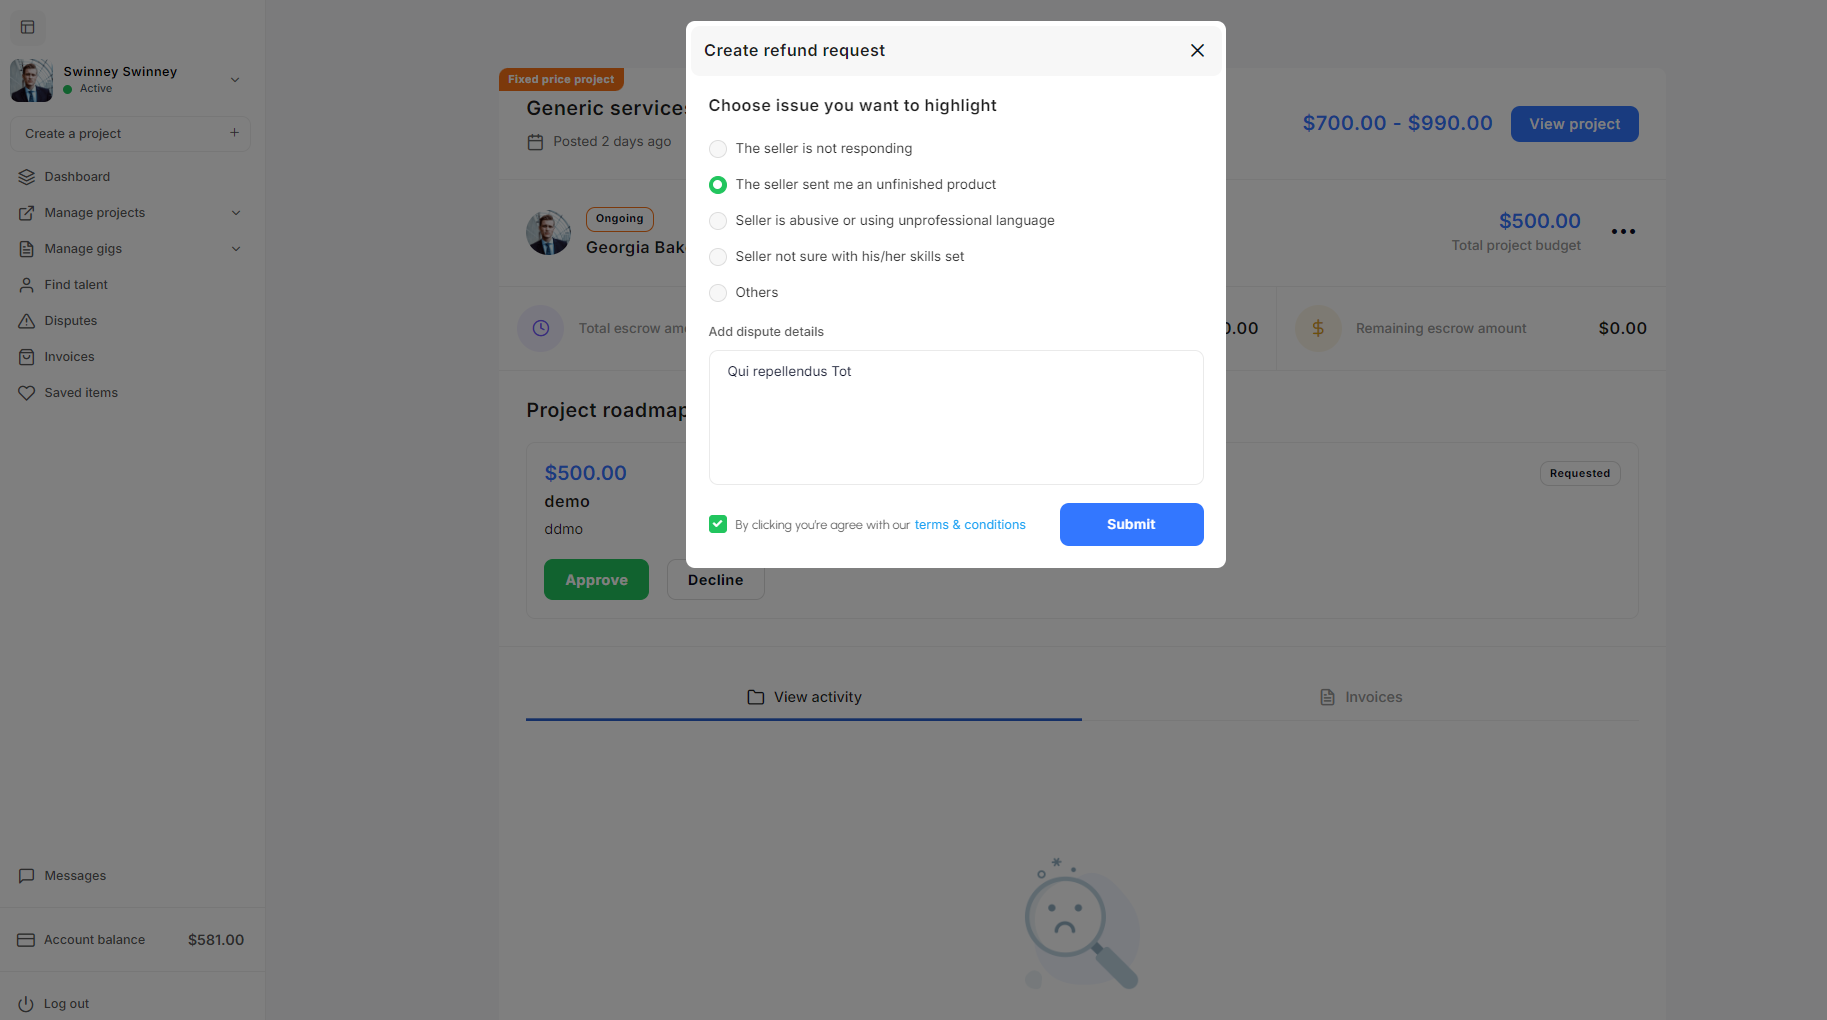
Favourite Items
The Favourite Items section in Taskup allows users to save and organize sellers or gigs they are interested in for easy access later. This is particularly useful when you want to return to certain sellers or services without performing a new search. Below is the documentation on how to use and manage your favourite items on Taskup.
Accessing the Favourite Items Section
Navigate to the left-hand sidebar and click on Saved Items. This will take you to the Favourite Items page, where you can manage the sellers (sellers) or gigs that you’ve saved.
Filter Options
At the top right, there is a Filter By dropdown menu that allows you to switch between viewing Sellers or Gigs.
- Sellers: Displays the list of sellers you’ve saved to your favourites.
- Gigs: Shows the gigs or services you’ve marked as favourites.
Search Bar
At the top of the page, there is a search bar that allows you to quickly find saved sellers or gigs by typing in relevant keywords.
Removing Saved Items
If you no longer want to keep a freelancer or gig in your favourites list, you can remove them:
- Visit the freelancer's profile or gig page, and click the "Saved" button again to unsave the item. This will remove the freelancer or gig from your favourites list.
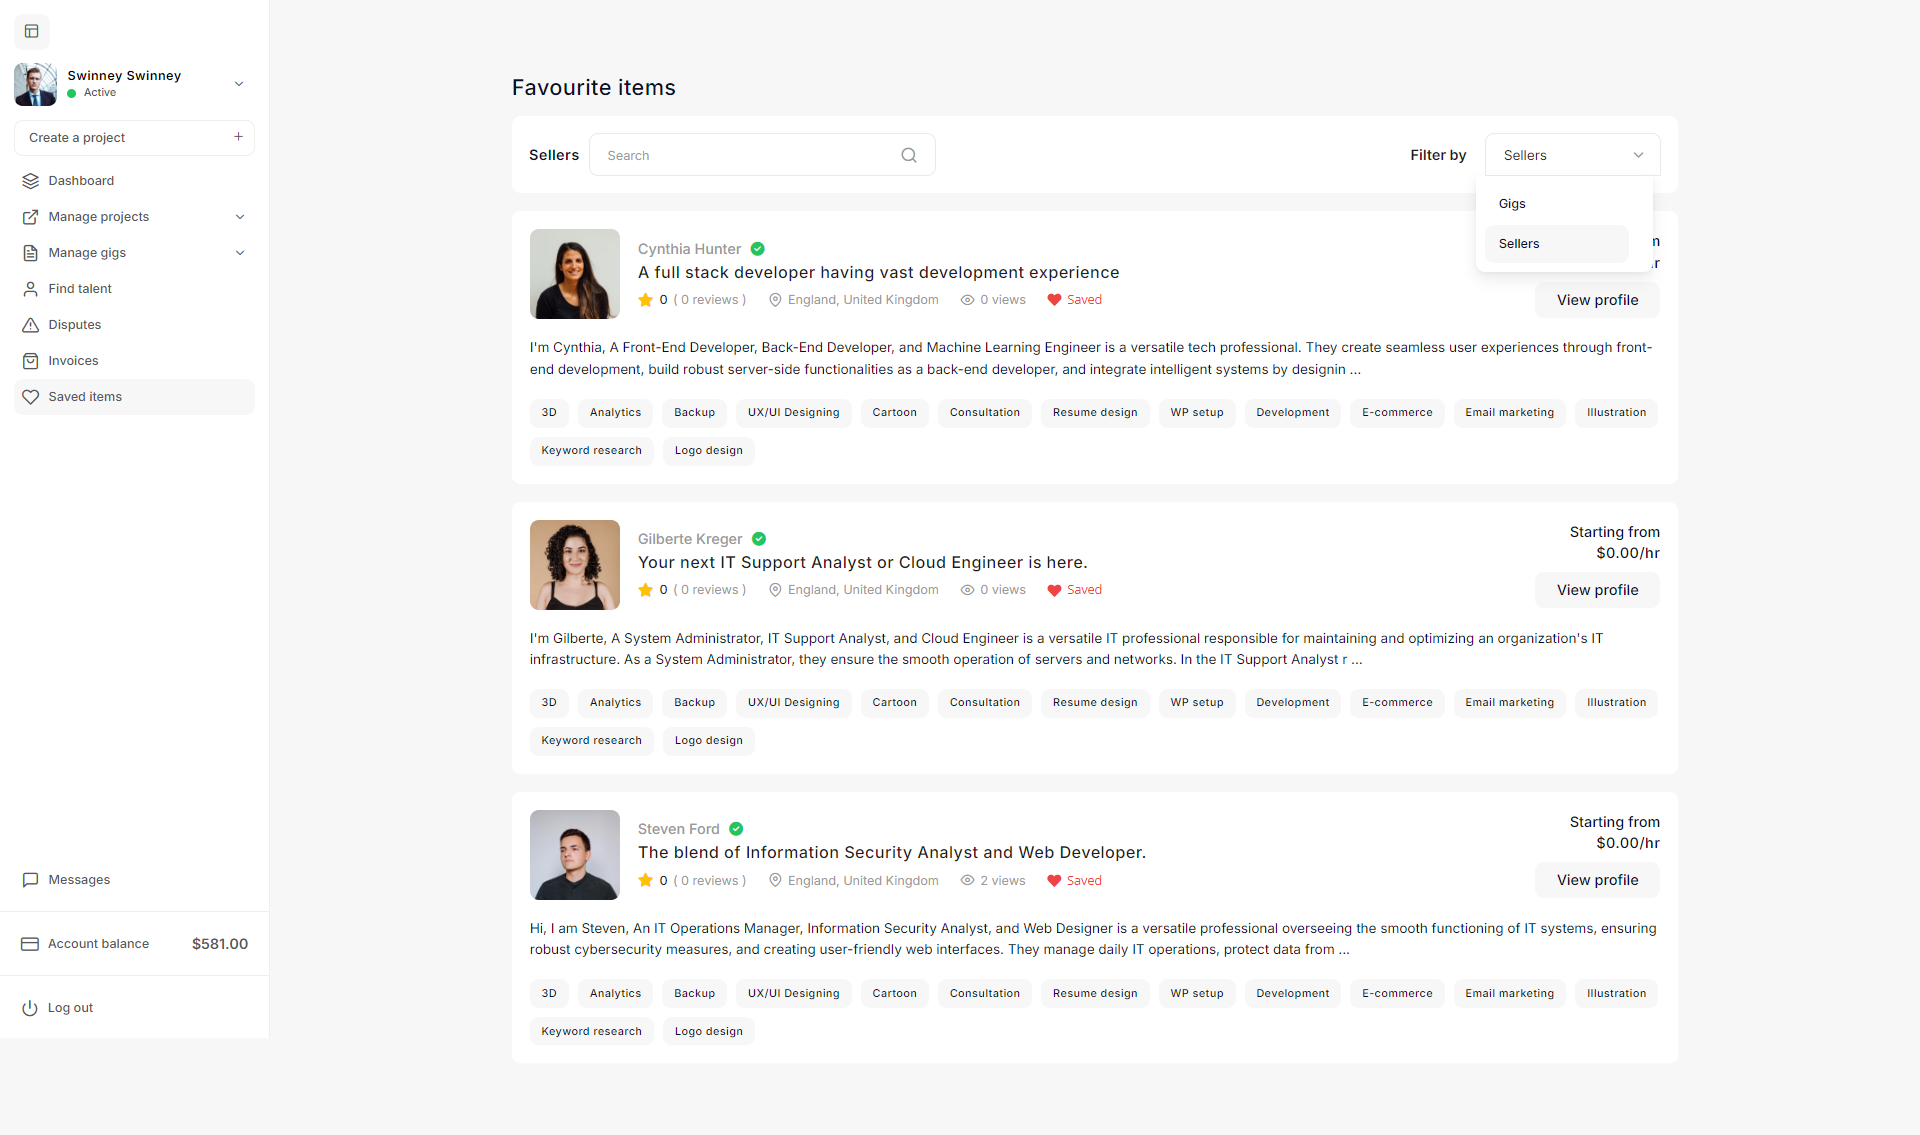
Finding & Hiring a Gig
Taskup allows you to easily search for and find gigs that match your project needs. Here’s a quick guide on how to find and select a gig.
Search for a Gig
- At the top of the page, you’ll see a Search Bar. Enter keywords related to the type of service you are looking for (e.g., “Shopify Website Setup”).
- You can refine your search further by using filters such as Category or sorting options like Recent Listings.
Selecting a Gig
Click on the gig title or thumbnail to view more details about the service, including the full description, reviews, and pricing options.
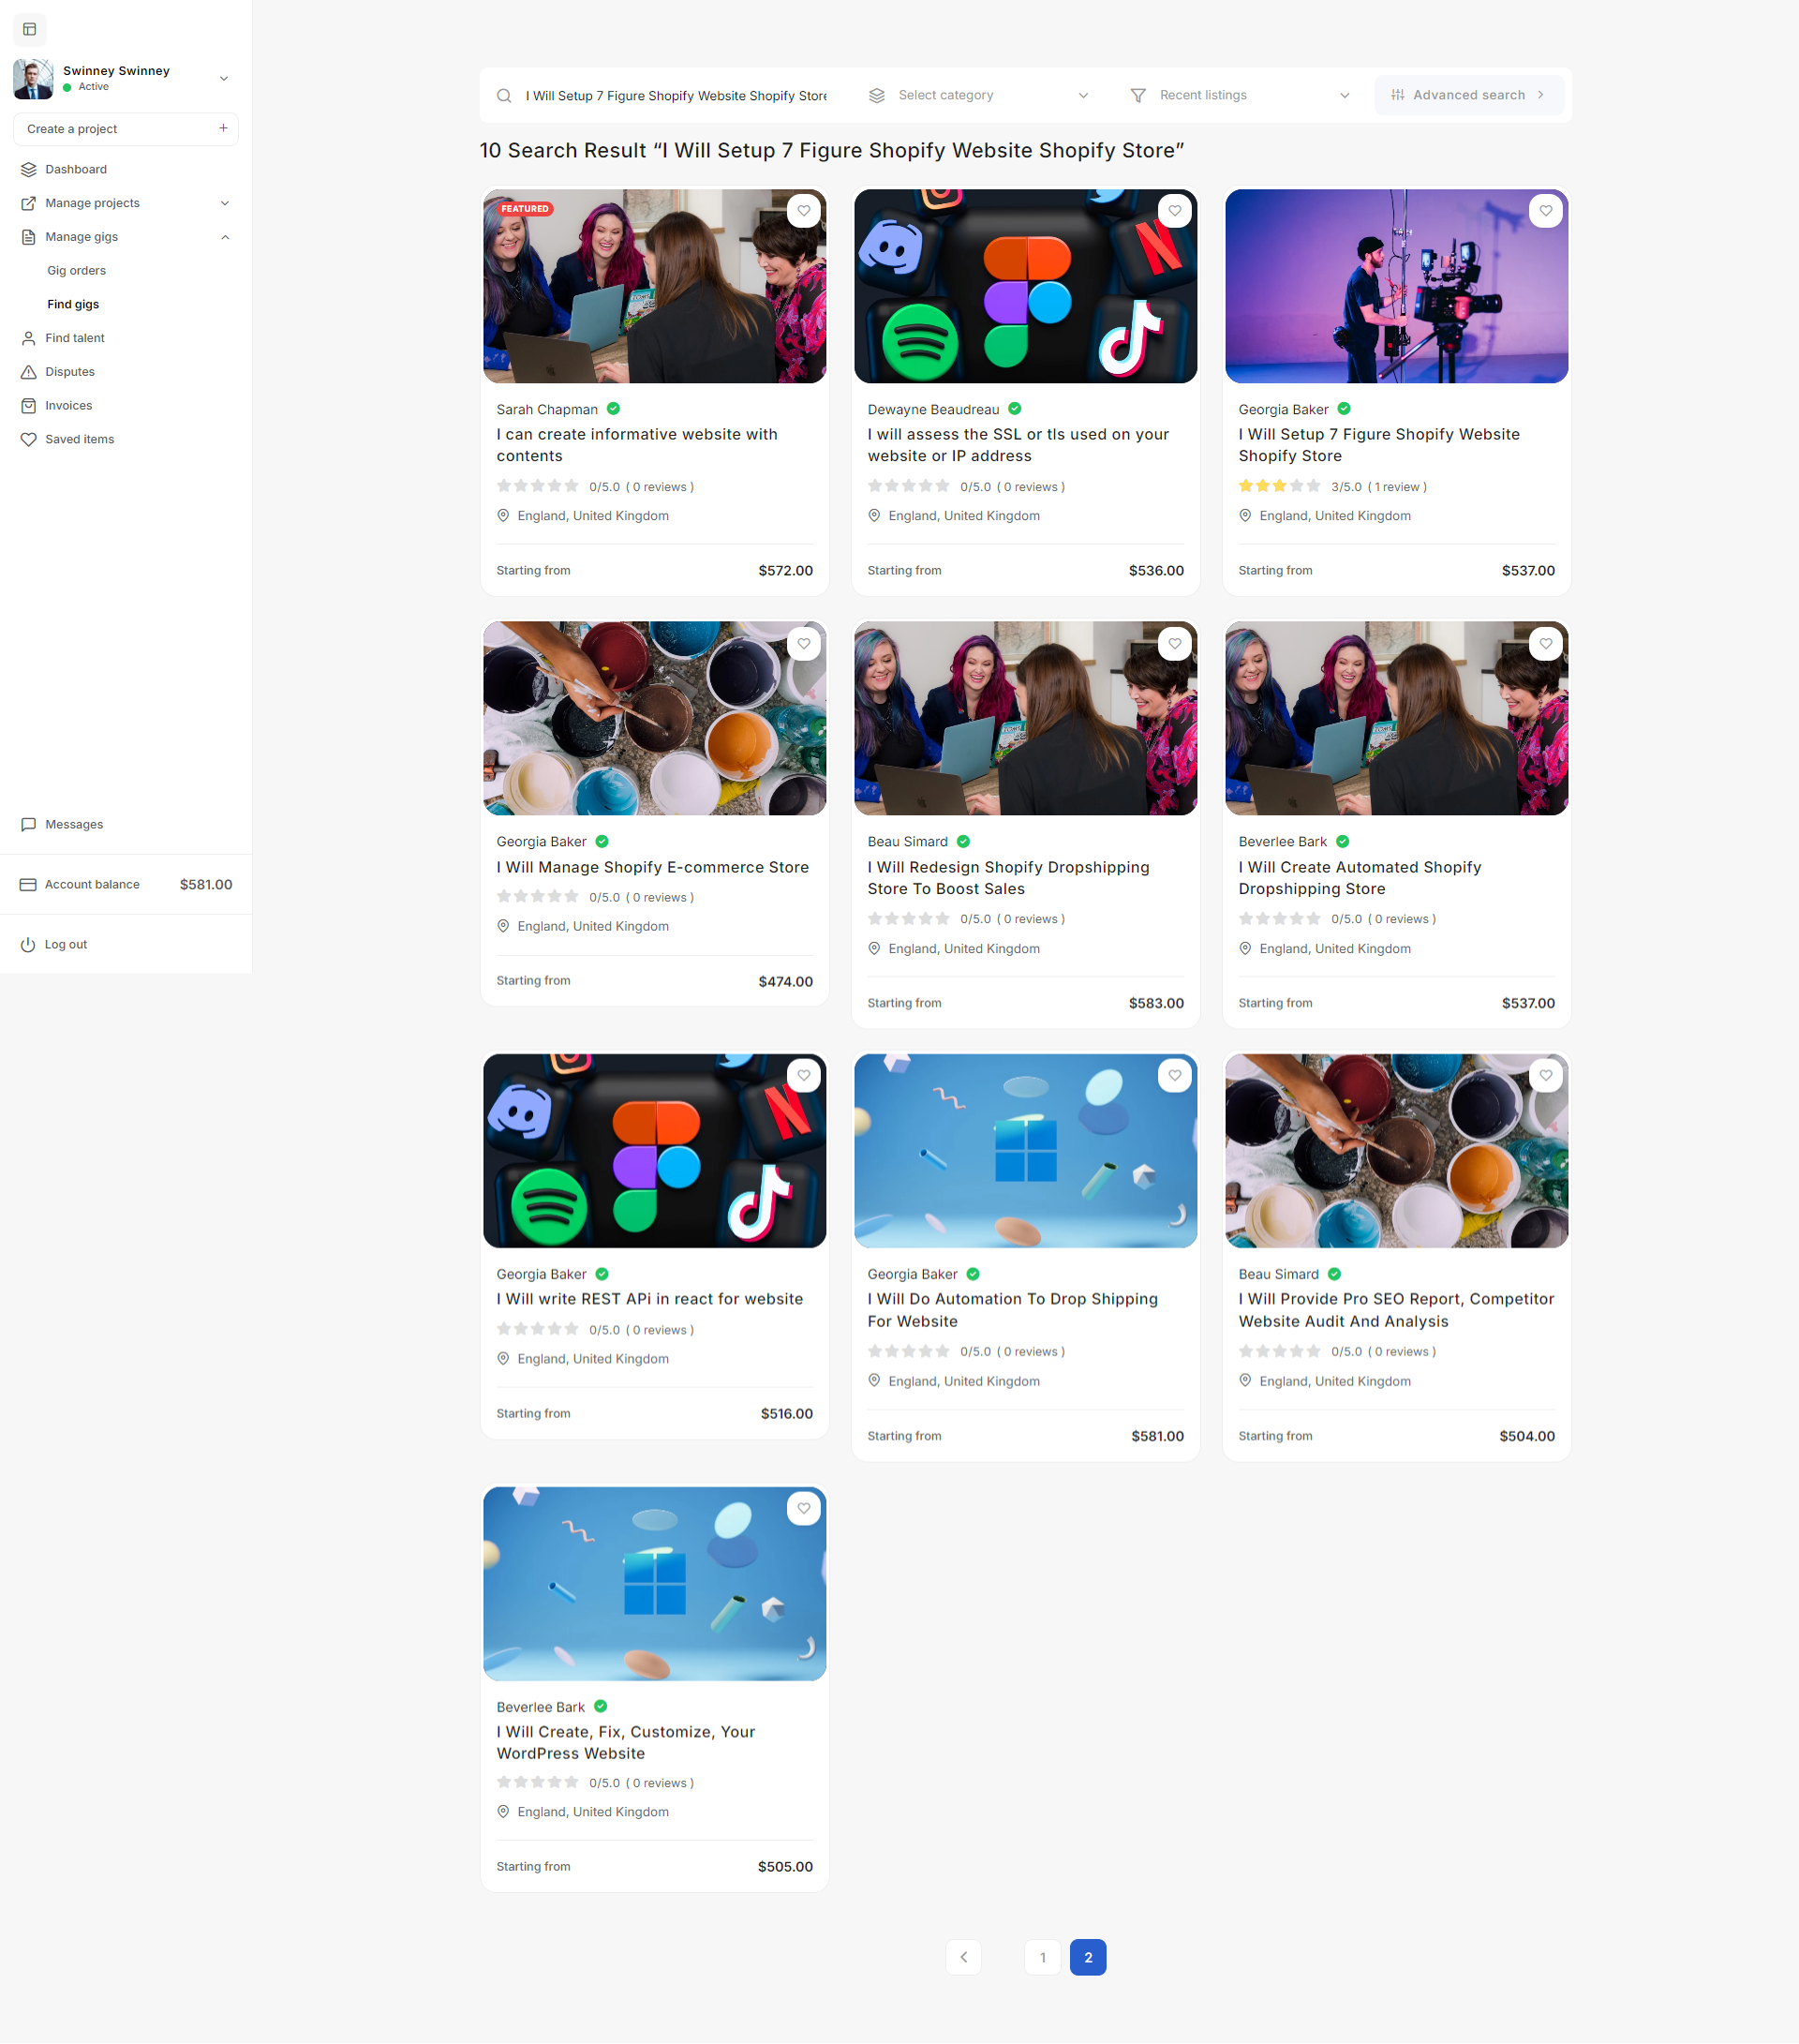
Hiring a Gig
- To proceed, click the Hire Me For a Gig button. This will guide you through the steps to confirm your order and payment.
- Once the gig is confirmed, the freelancer will begin work, and you can track the progress through Taskup’s messaging and project management tools.
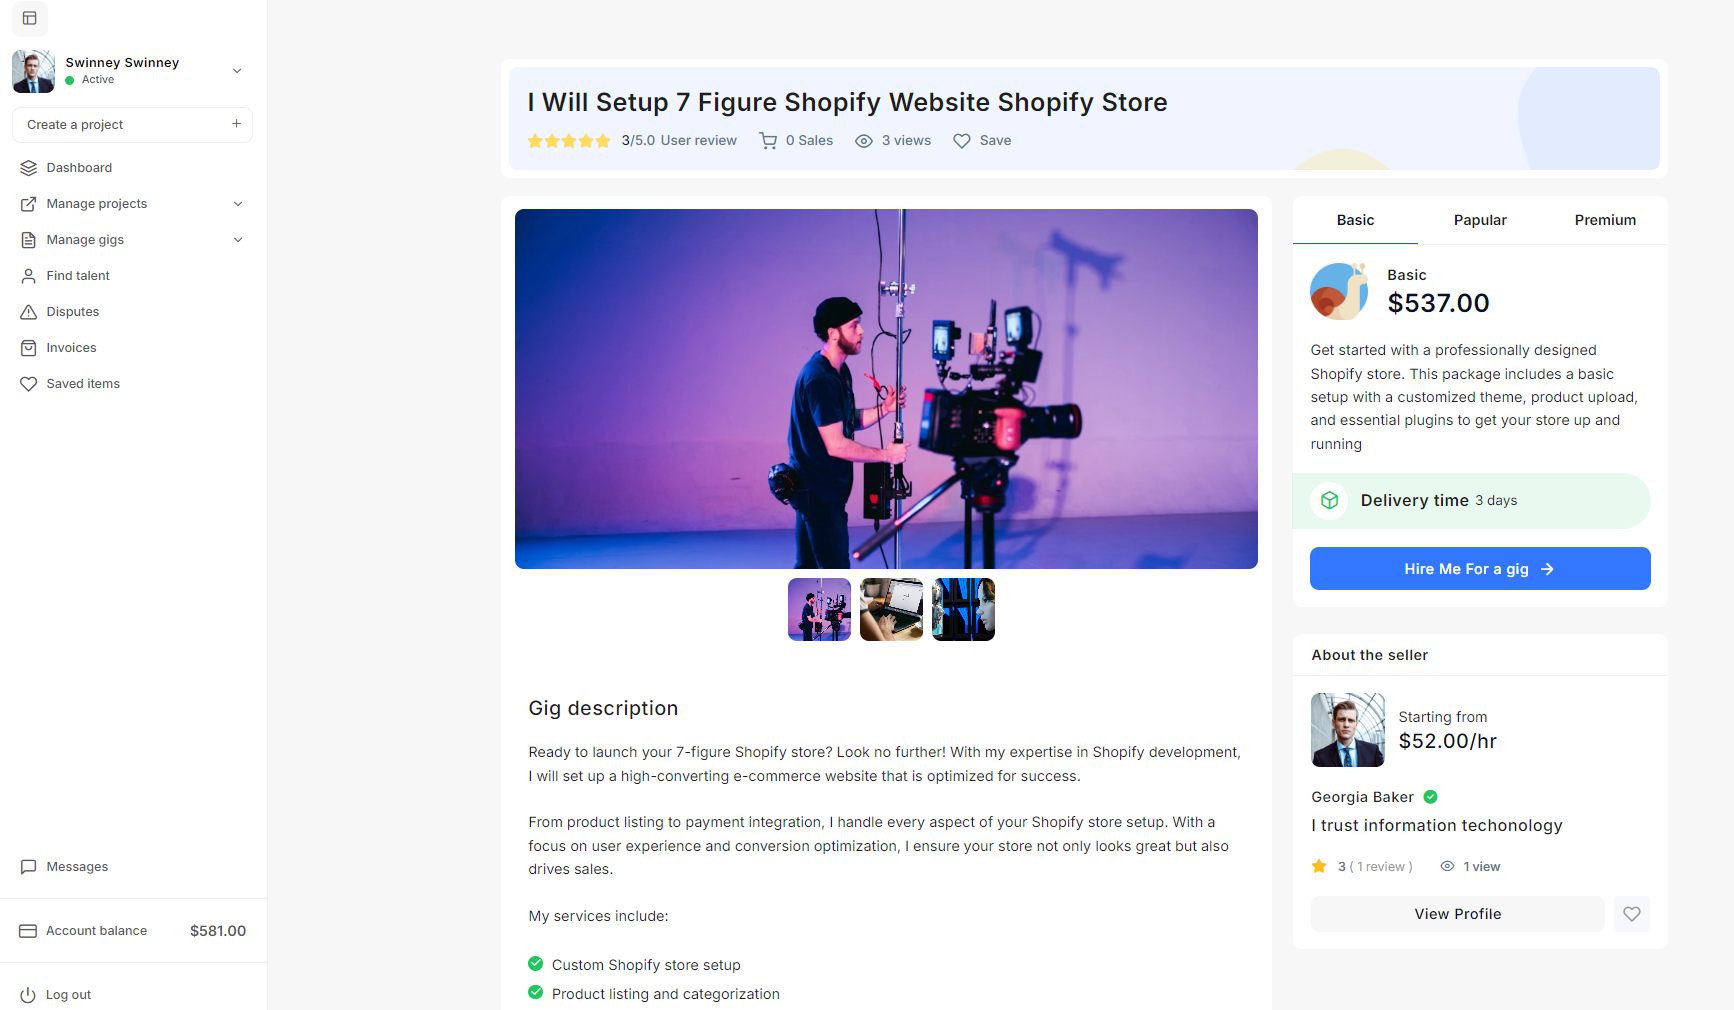
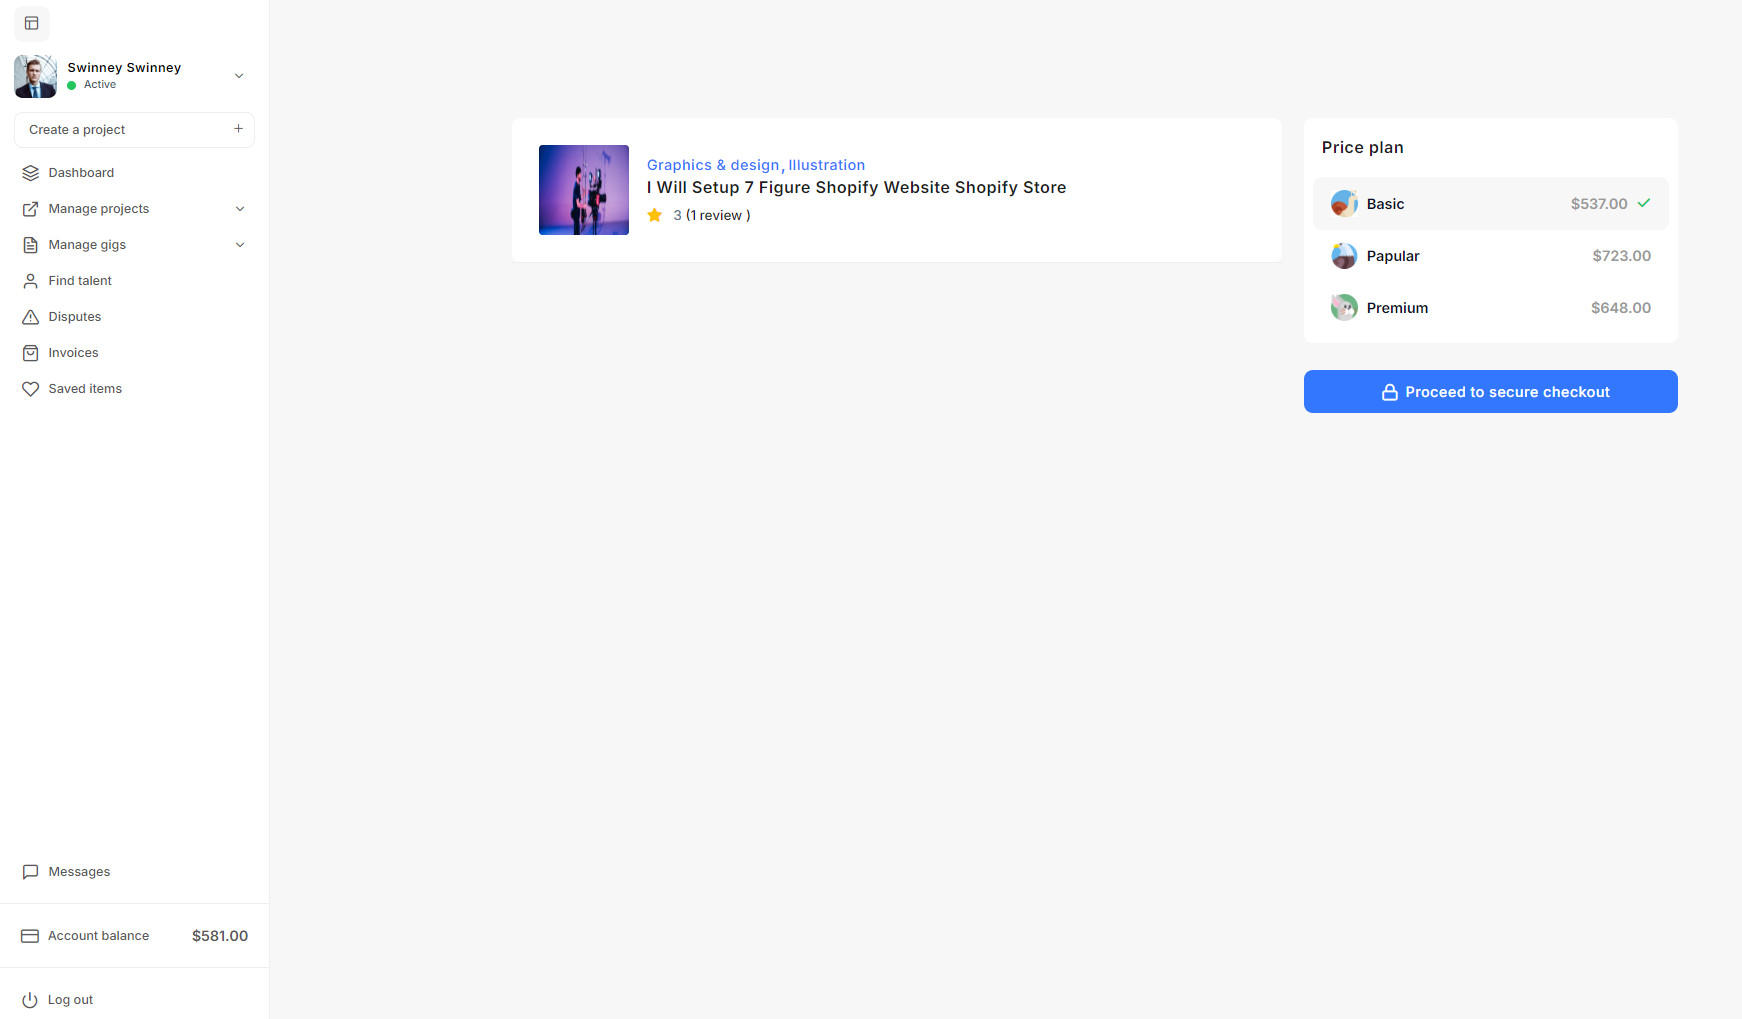
Gig Orders
The Gig Orders page on Taskup helps you manage and track the status of all your gig orders. Here’s a breakdown of the key features:
Order Status
Each gig is categorized by its status:
- Ongoing: These gigs are currently in progress.
- Completed: Gigs that have been finished and possibly reviewed.
- Refunded: Orders where the payment has been refunded to you.
Filtering and Searching
You can filter gig orders by status, such as Ongoing, Completed, Refunded, or view All Orders.
A search bar allows you to find specific orders by entering keywords.
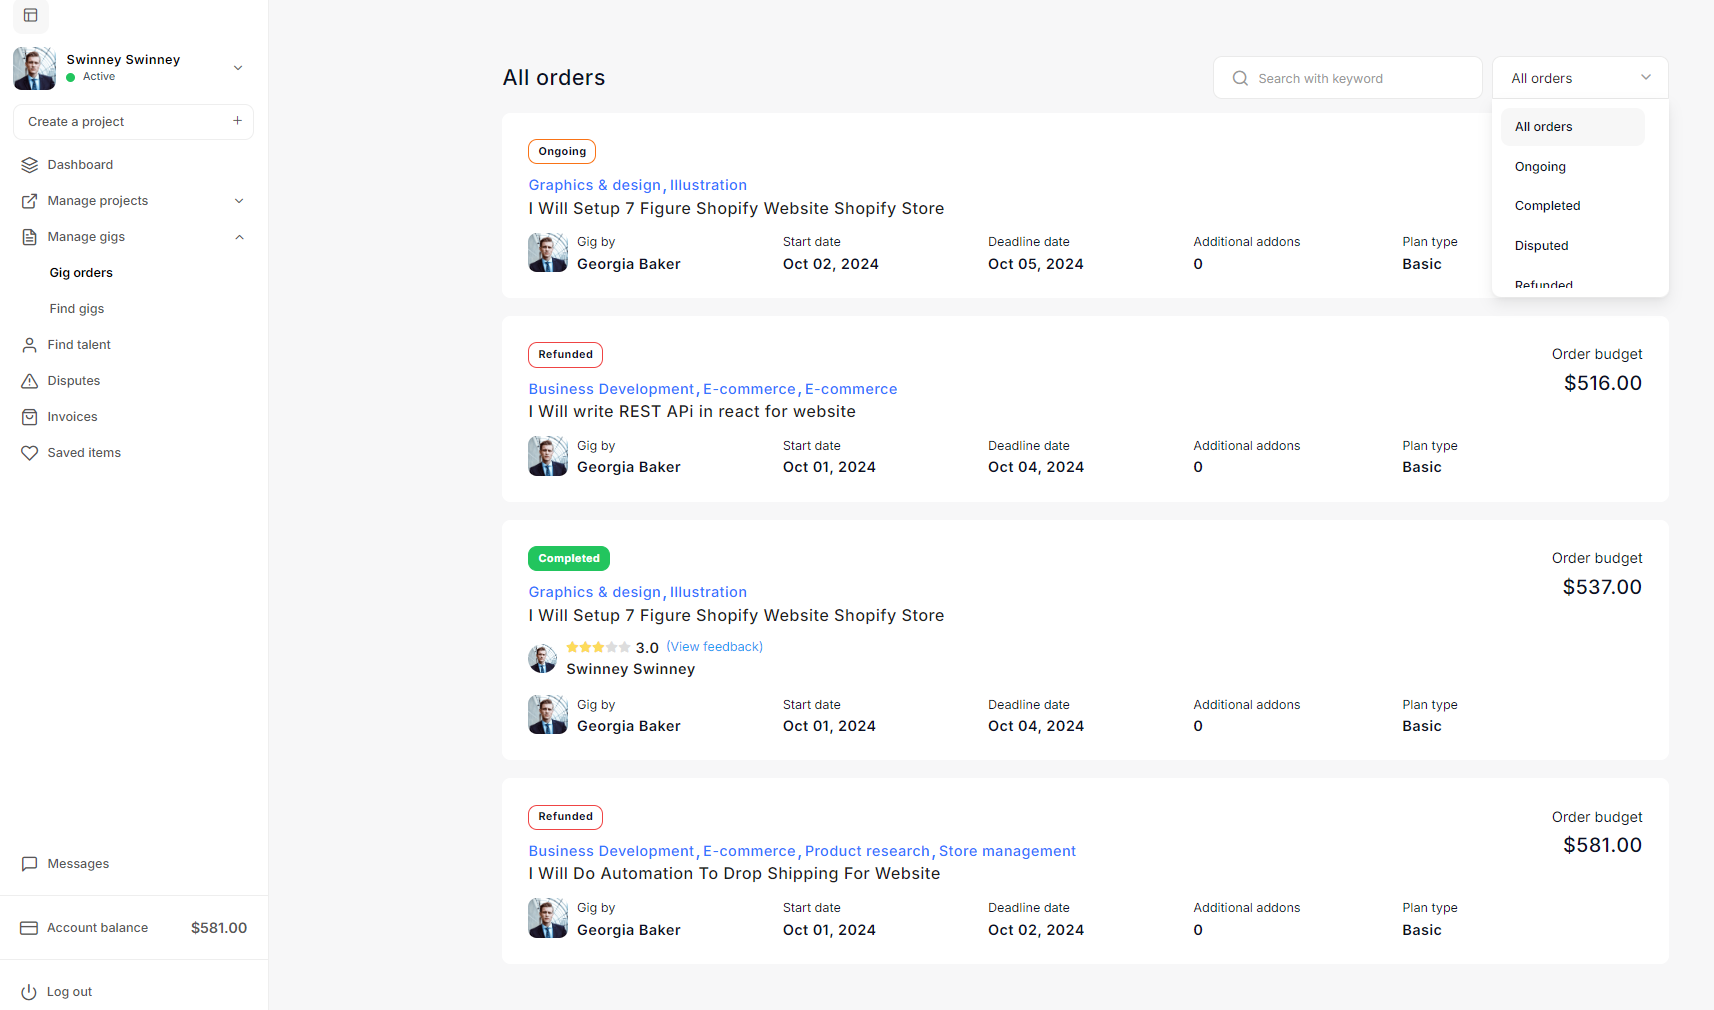
Messages Area
The Messages Area enables buyers to communicate with buyer using a variety of real-time messaging features, enhancing the overall learning experience.
Features of the Messages Area
-
User List and Search:
- On the left side, you will find a list of users with whom you have active conversations.
- Use the Search bar to find and initiate a chat with a specific buyer or contact.
-
Real-time Chat:
- Engage in instant messaging with buyers. The chat interface supports:
- One-to-One Chat: Send private messages to individual buyers.
- Audio and Video Calls: Send audio and video files directly from the chat window.
- Media Sharing: Share various types of media, such as images, documents, and locations.
- Voice Notes: Send voice messages to communicate effectively without typing.
- Engage in instant messaging with buyers. The chat interface supports:
-
Send Friend Requests:
- Before starting a conversation, buyers can send a friend request to buyers or other users to establish a connection.
-
View Message Notifications:
- Notifications for new messages or friend requests are displayed at the top left of the chat area, ensuring buyers stay updated on all communications.
-
Welcome Screen:
- The center of the messages area displays a welcome message, encouraging the buyer to start a conversation, share ideas, ask questions, or greet the buyers.
By utilizing these features, buyers can effectively manage their earnings and foster productive communication with their buyers on the Taskup platform.
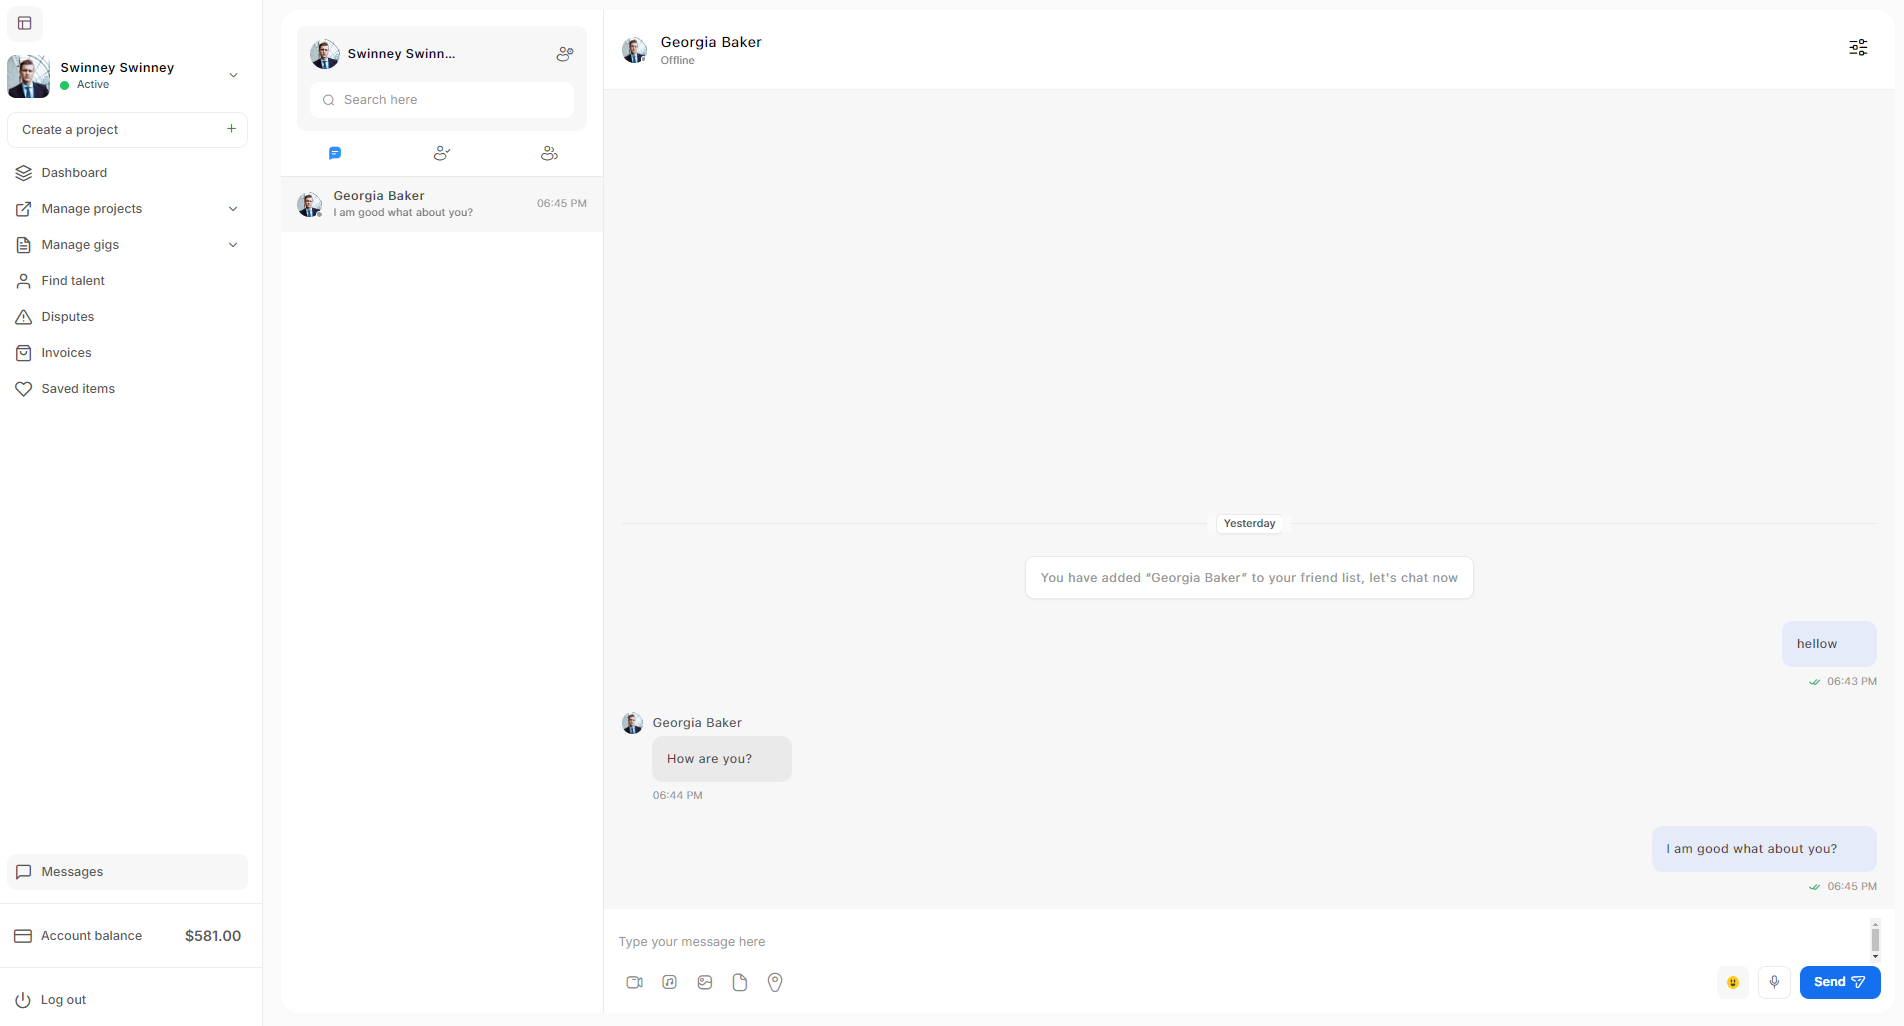
Admin Settings
The Admin Profile Settings page allows platform administrators to manage their profile information, including updating personal details, changing passwords, and uploading a profile picture. Below is a brief guide to using the Admin Profile Settings page.
Admin Demo Account
To access the Admin dashboard, use the following credentials:
- Email address: admin@amentotech.com
- Password: google
Profile Settings
Profile Photo
- Upload Profile Photo: Click the Upload profile photo button to select and upload a profile picture. Supported formats include JPG, JPEG, GIF, and PNG, with a maximum size of 5 MB.
- Remove Profile Photo: If you want to remove the current photo, click the trash icon next to the photo.
Personal Information
- First Name and Last Name: Enter your first and last names in the respective fields.
- Email: Update your email address, if necessary.
Changing Password
- Current Password: To update your password, enter your current password in the appropriate field.
- New Password: Enter a new password in the Password field.
- Confirm Password: Re-enter the new password in the Confirm password field to confirm the change.
Saving Changes
- Once all changes are made, click the Save & update settings button to save the updates.

Taxonomies
Manage taxonomies such as project categories, gig categories, tags, gig dilivery time, skills, languages, project duration, project location and expert levels
Project Categories
The Categories section in the Taskup Admin Panel allows administrators to manage project and gig categories efficiently. Below is a guide on how to update and manage categories.
Viewing Categories
- On the right side, a list of existing categories is displayed, showing the Name, Description, Status, and available Actions for each category.
- Use the Search category bar at the top right to quickly locate a category, or use the pagination to navigate through multiple pages.
Updating a Category
To update an existing category:
- Click on the Edit (pencil) icon next to the category you want to update.
- In the Update Category panel on the left side, you can modify:
- Name: The name of the category.
- Parent Category: Select the parent category from the dropdown if applicable.
- Description: Enter a brief description of the category.
- Status: Enable or disable the category using the toggle switch.
- Upload Photo (Optional): Upload an image for the category (JPG, JPEG, GIF, PNG) with a maximum size of 5 MB.
- Once all changes are made, click Update Category to save your updates.
Deleting a Category
- To remove a category, click on the Trash icon next to the category name. Be cautious when deleting a category, as it cannot be undone.
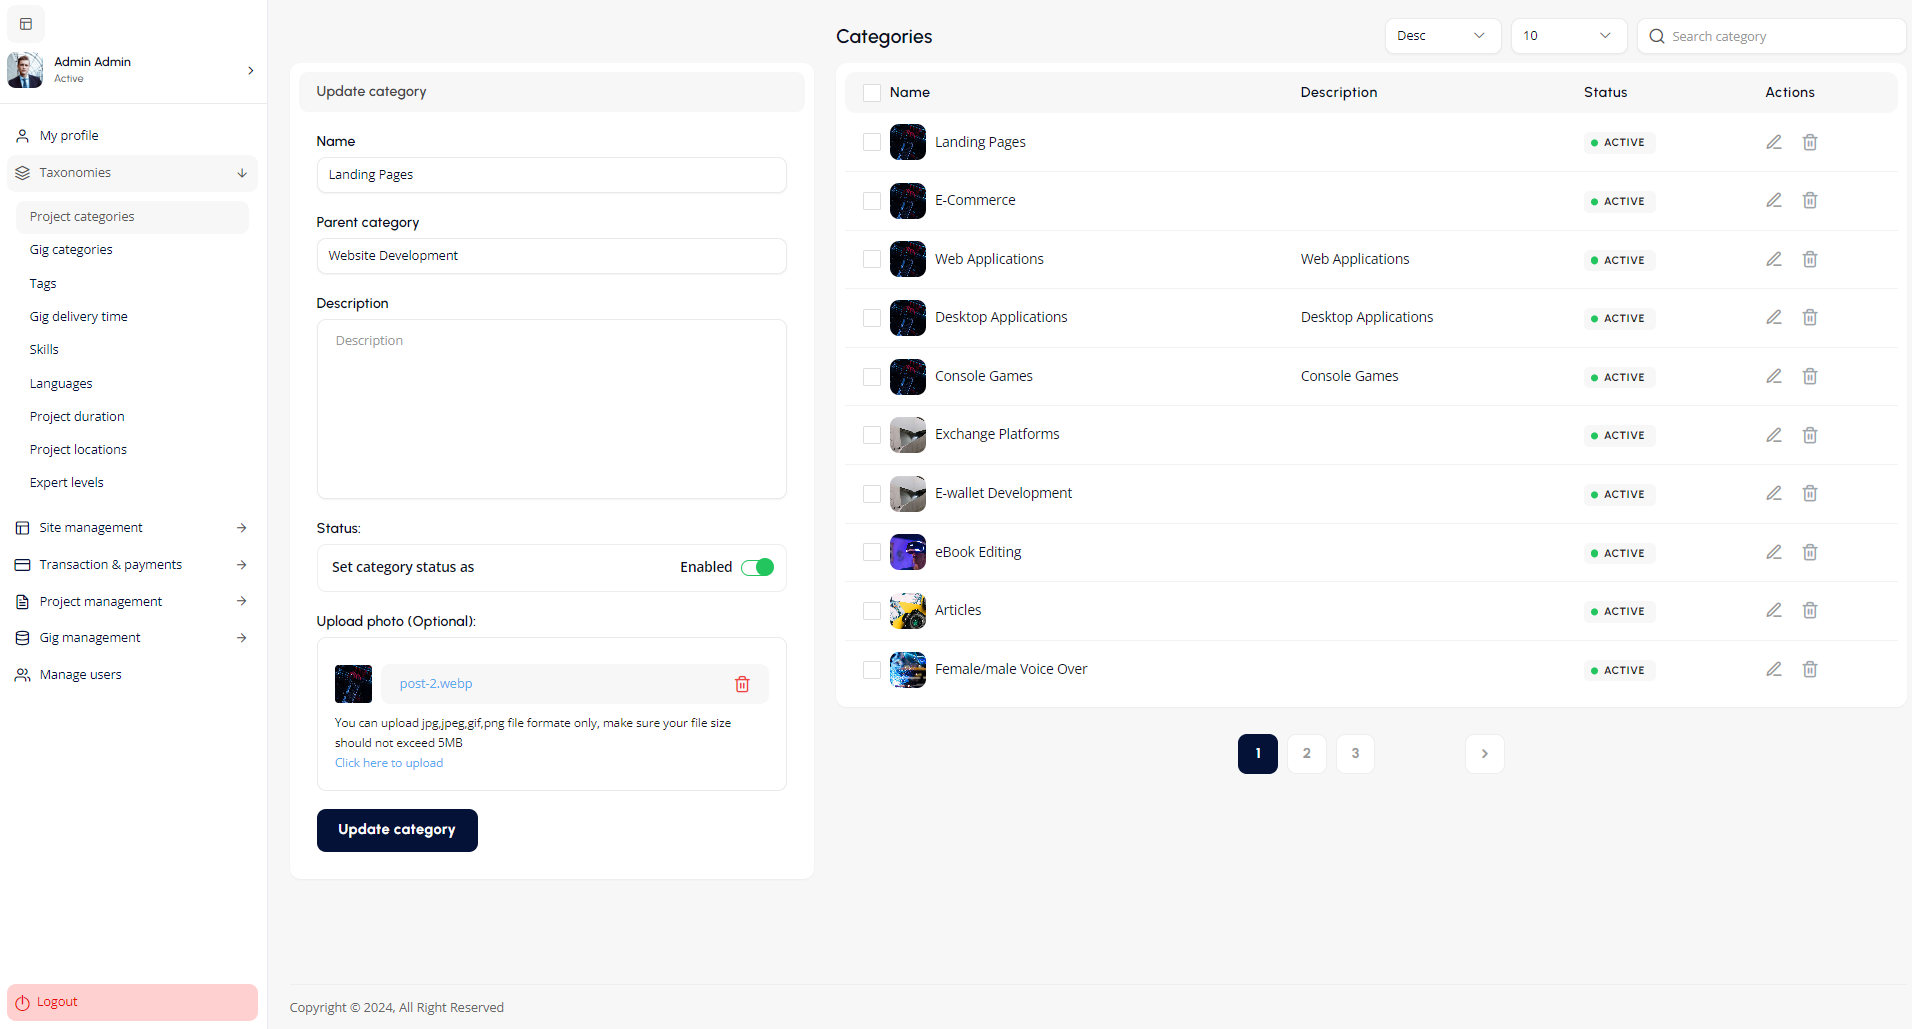
Gig Categories
The Gig Categories feature allows administrators to create, edit, and manage categories for gigs (projects) within the platform. Categories help in organizing the gigs into relevant sections for easier navigation for both clients and freelancers.
Key Features:
- Add a New Category:
- Name: Enter the name of the category (e.g., "Career Writing", "Video Editing").
- Parent Category: Select a parent category if the new category is a subcategory. This helps in creating a hierarchical structure.
- Description: Provide a brief description of the category to give users more context.
- Upload Photo (Optional): You can upload an image representing the category. The file formats supported are jpg, jpeg, png, and gif, with a maximum file size of 5MB.
- Category List:
- The right-hand side displays a list of existing categories.
- Status: Shows whether the category is active.
- Actions:
- Edit: Click the pencil icon to edit a category’s details.
- Delete: Click the trash icon to delete a category.
- Search and Filters:
- You can search for specific categories using the search bar.
- Use the filter options to sort categories based on name or status.
How to Add a New Category:
- In the "Gig Categories" section, fill out the required fields under "Add New Category."
- Optionally, upload an image to visually represent the category.
- Click Add New Category to save the changes.
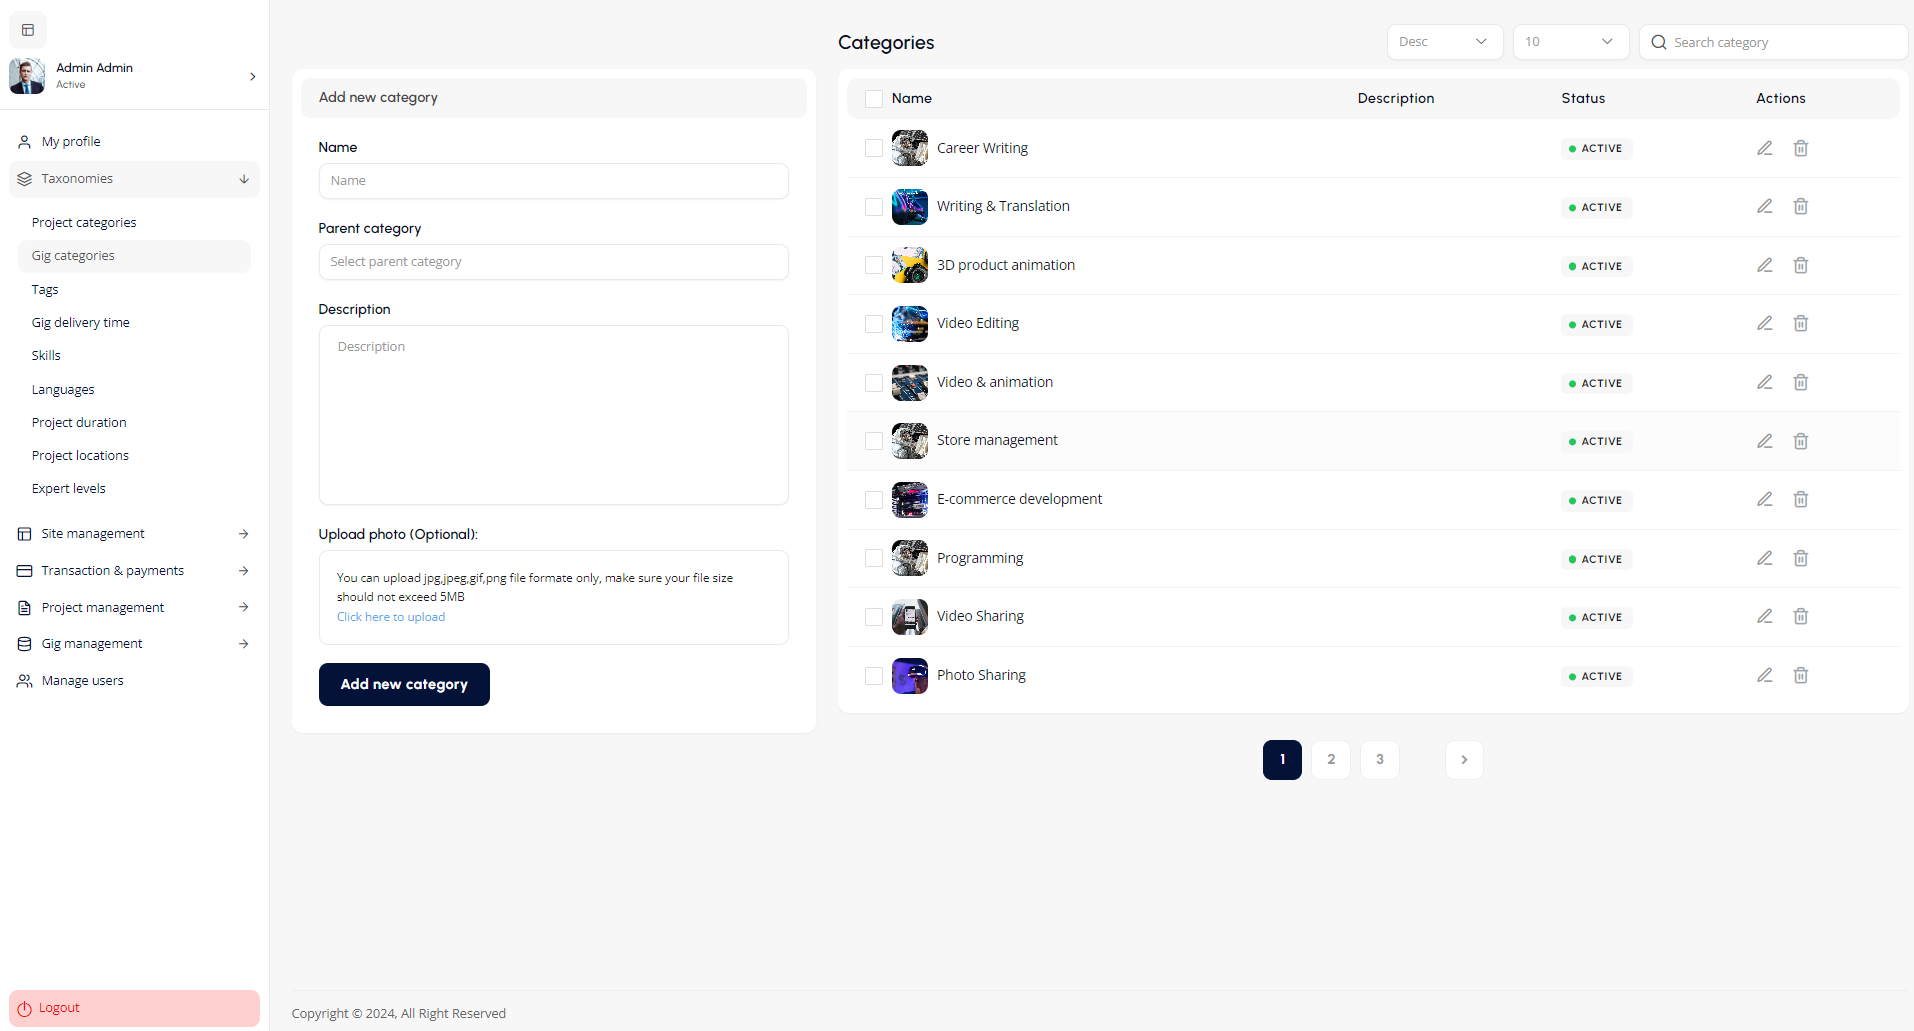
Gig Delivery Time
The Gig Delivery Time feature allows administrators to define and manage standard delivery times for gigs (freelance projects). This ensures that clients can select or request specific delivery timeframes when posting or reviewing gigs.
Key Features:
- Add a New Delivery Time:
- Name: Enter the name for the delivery time (e.g., "1 day", "7 days").
- Number of Days: Specify the number of days for the delivery period.
- Click the Add delivery time button to save the new delivery time.
- Delivery Time List:
- The list on the right side displays existing delivery times.
- Status: Shows whether the delivery time is active or inactive.
- Actions:
- Edit: Click the pencil icon to modify an existing delivery time.
- Delete: Click the trash icon to remove a delivery time from the list.
- Search and Filter:
- You can search for specific delivery times using the search bar.
- Use filters to sort the delivery times based on different criteria such as name or status.
How to Add a New Delivery Time:
- In the Gig Delivery Time section, enter the desired name and duration in days for the new delivery time.
- Click Add delivery time to make it available for gig postings.
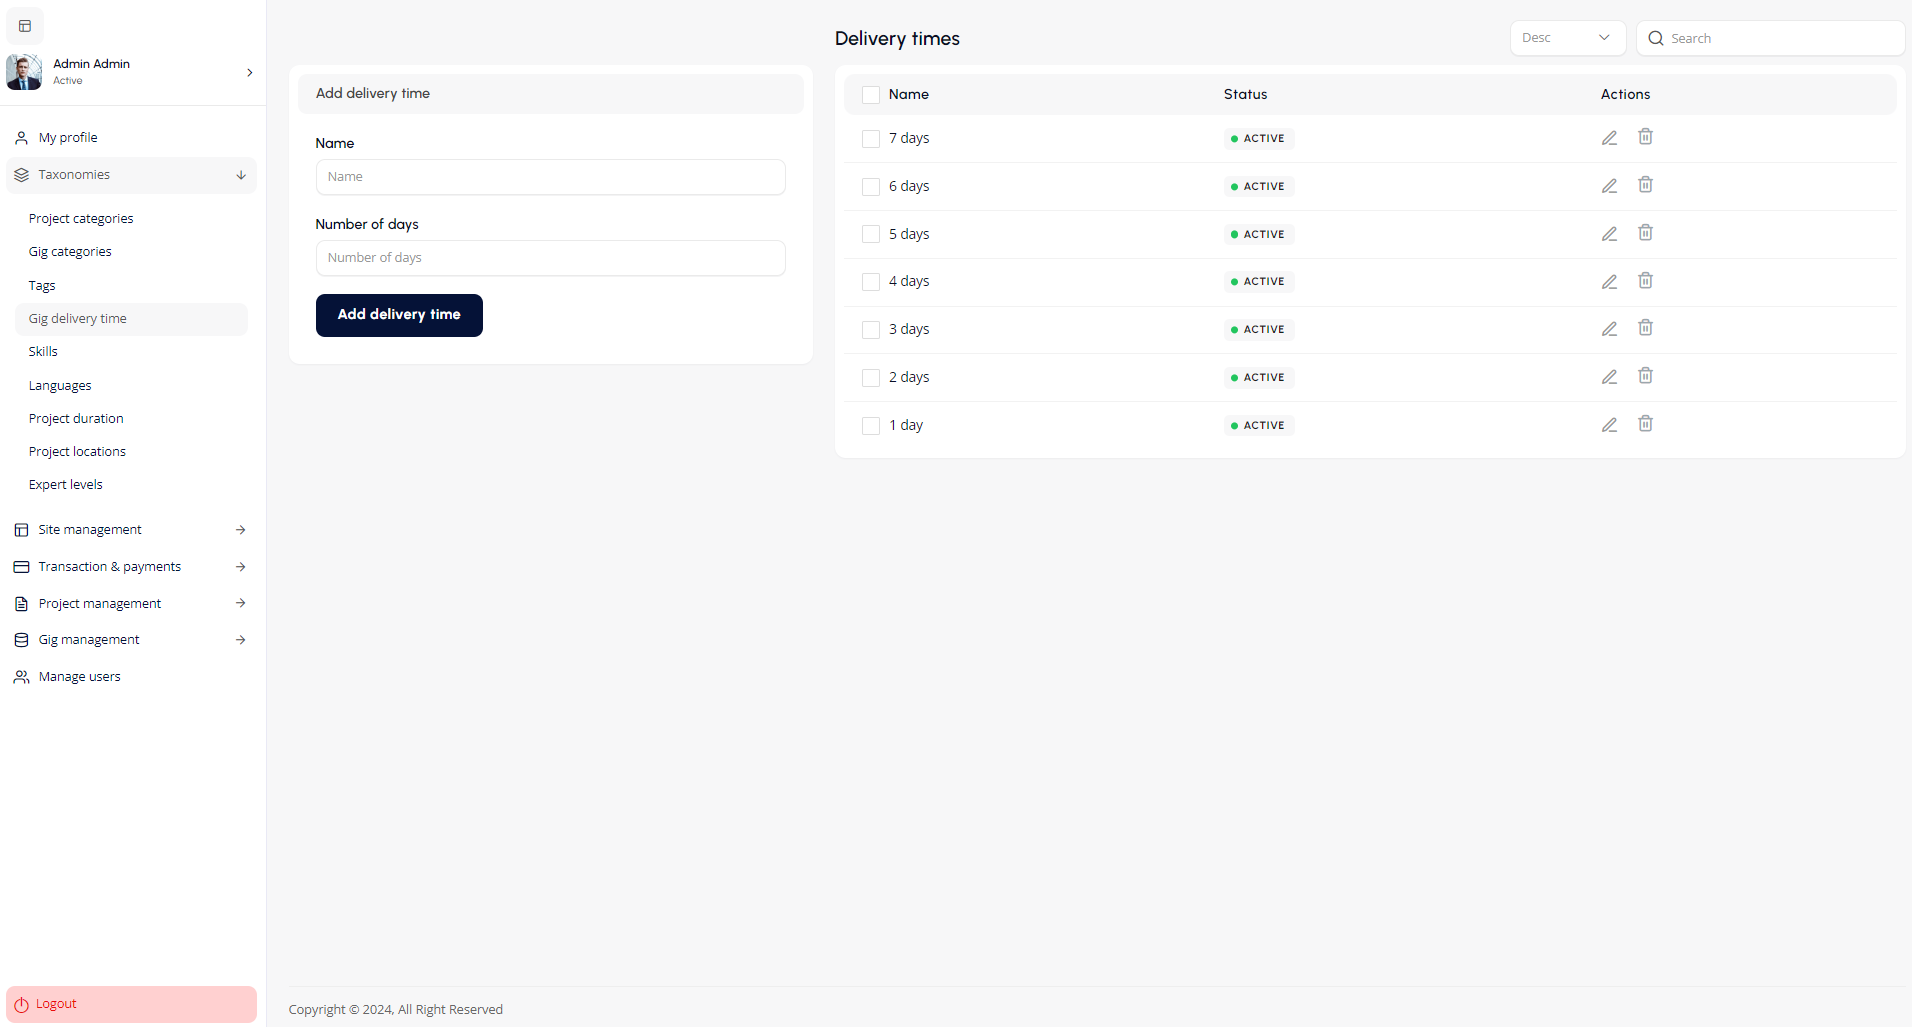
Skills
The Skills feature allows administrators to create and manage the various skills that freelancers can list on their profiles or clients can search for when posting gigs. Organizing skills helps improve the platform's navigation and ensures users can easily find specific expertise.
Key Features:
- Add a New Skill:
- Name: Enter the name of the skill (e.g., "Logo Design", "Email Marketing").
- Parent Skill: If applicable, select a parent skill to organize skills in a hierarchical structure (e.g., "Design" as a parent skill for "Logo Design").
- Description: Add a brief description of the skill, explaining what it entails.
- Upload Photo (Optional): Upload an image that represents the skill. The supported formats are jpg, jpeg, png, and gif, with a maximum file size of 5MB.
- Click the Add new skill button to save the skill.
- Skill List:
- The right-hand side displays a list of all existing skills.
- Status: Indicates whether the skill is currently active.
- Actions:
- Edit: Click the pencil icon to modify an existing skill.
- Delete: Click the trash icon to remove a skill from the list.
- Search and Filters:
- Use the search bar to find specific skills quickly.
- Filter the skill list based on different criteria, such as status or name, for easier management.
How to Add a New Skill:
- In the Skills section, fill in the fields for the new skill, including name, parent skill, description, and optionally upload an image.
- Click Add new skill to make it available for users to select or search.
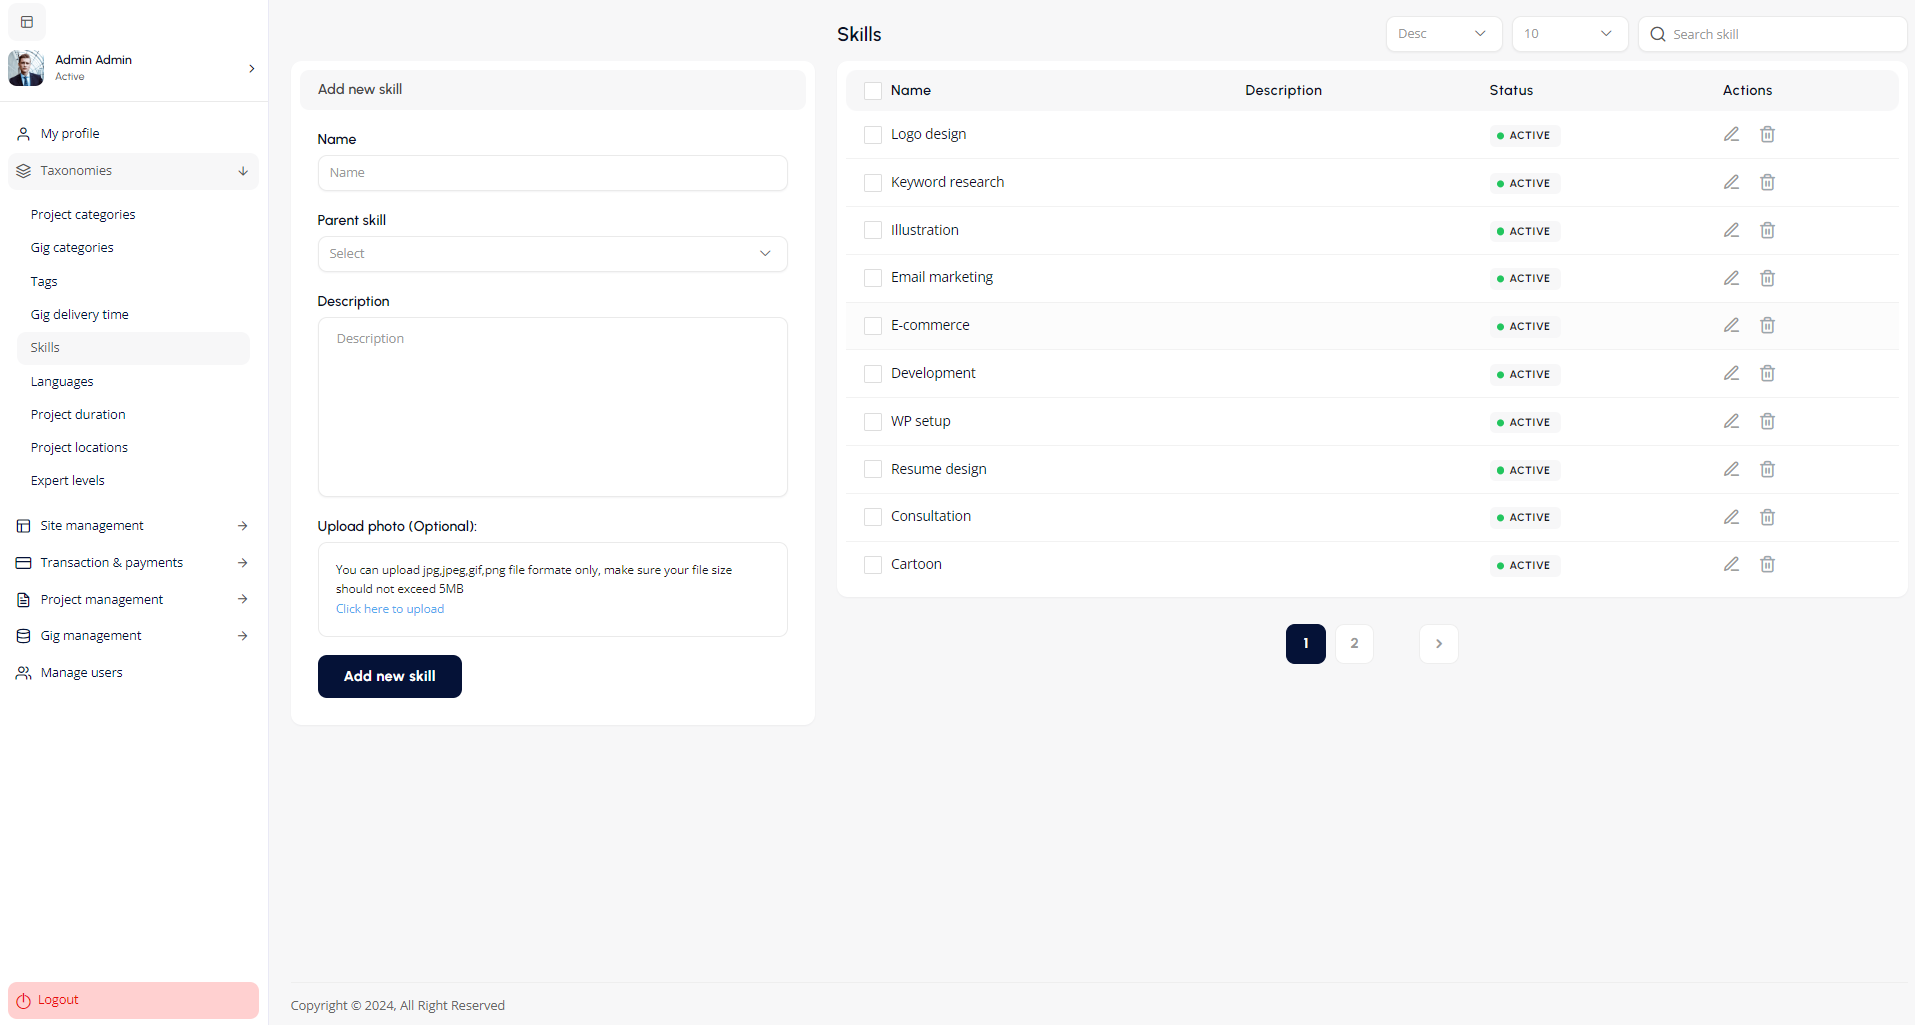
Languages
The Languages feature allows administrators to create and manage the list of languages that freelancers can specify in their profiles. This enables clients to find freelancers who speak a particular language or allows freelancers to showcase their language proficiency.
Key Features:
- Add a New Language:
- Name: Enter the name of the language (e.g., "Afrikaans", "Arabic").
- Description: Optionally, provide a description for the language if necessary.
- Click the Add now button to save the new language.
- Language List:
- The right-hand side displays a list of all available languages.
- Status: Indicates whether the language is currently active or inactive.
- Actions:
- Edit: Click the pencil icon to modify an existing language.
- Delete: Click the trash icon to remove a language from the list.
- Search and Filter:
- Use the search bar to find specific languages quickly.
- Filter the list of languages based on name or status for easier management.
How to Add a New Language:
- In the Languages section, enter the name and description (optional) of the language.
- Click Add now to include the language in the available options for users.
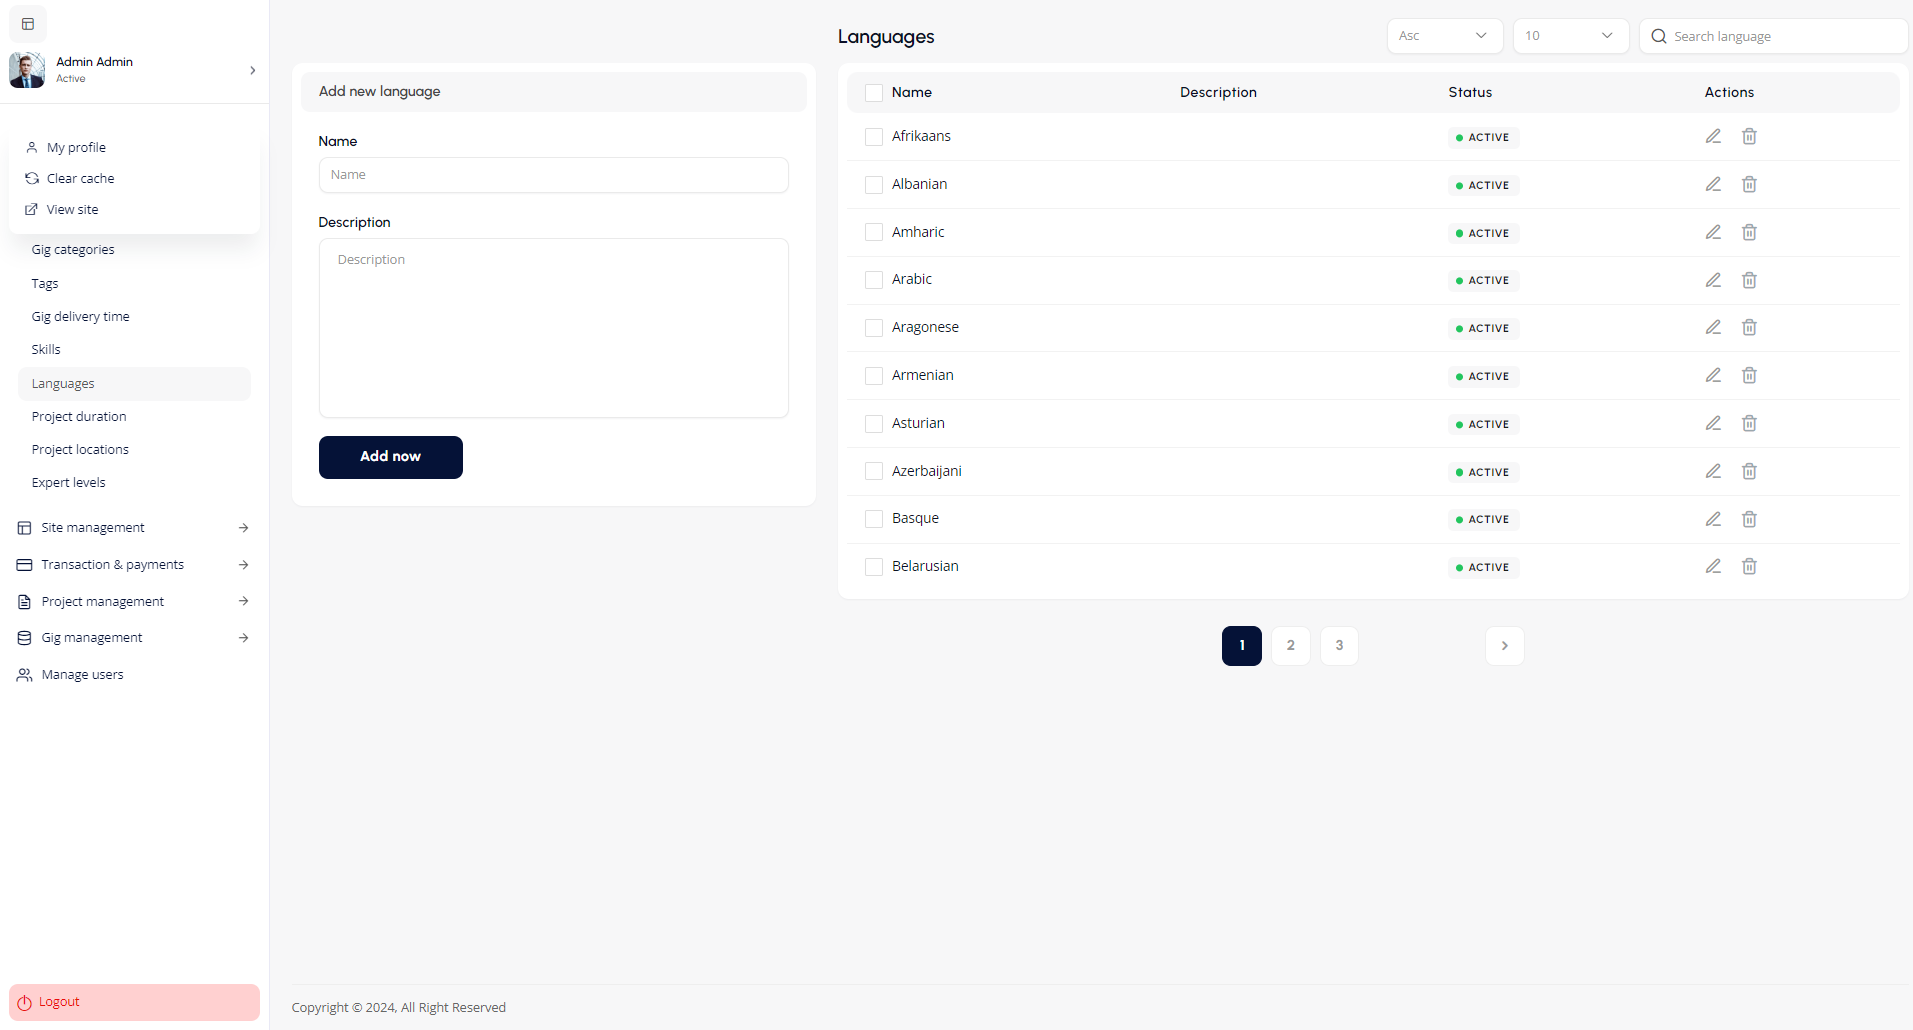
Project Duration
The Project Duration feature allows administrators to define and manage standard timeframes for projects. This enables clients and freelancers to set expectations for how long a project will take to complete.
Key Features:
- Add a New Project Duration:
- Name: Enter the name of the project duration (e.g., "One day", "Six months").
- Click the Add now button to save the new project duration.
- Project Duration List:
- The right-hand side displays a list of all existing project durations.
- Status: Indicates whether the project duration is active or inactive.
- Actions:
- Edit: Click the pencil icon to modify an existing project duration.
- Delete: Click the trash icon to remove a project duration from the list.
- Search and Filters:
- Use the search bar to find specific project durations quickly.
- Filter the list of project durations based on different criteria, such as name or status, for easier management.
How to Add a New Project Duration:
- In the Project Duration section, enter the desired name for the new project duration.
- Click Add now to make it available for users to select when creating or managing gigs.
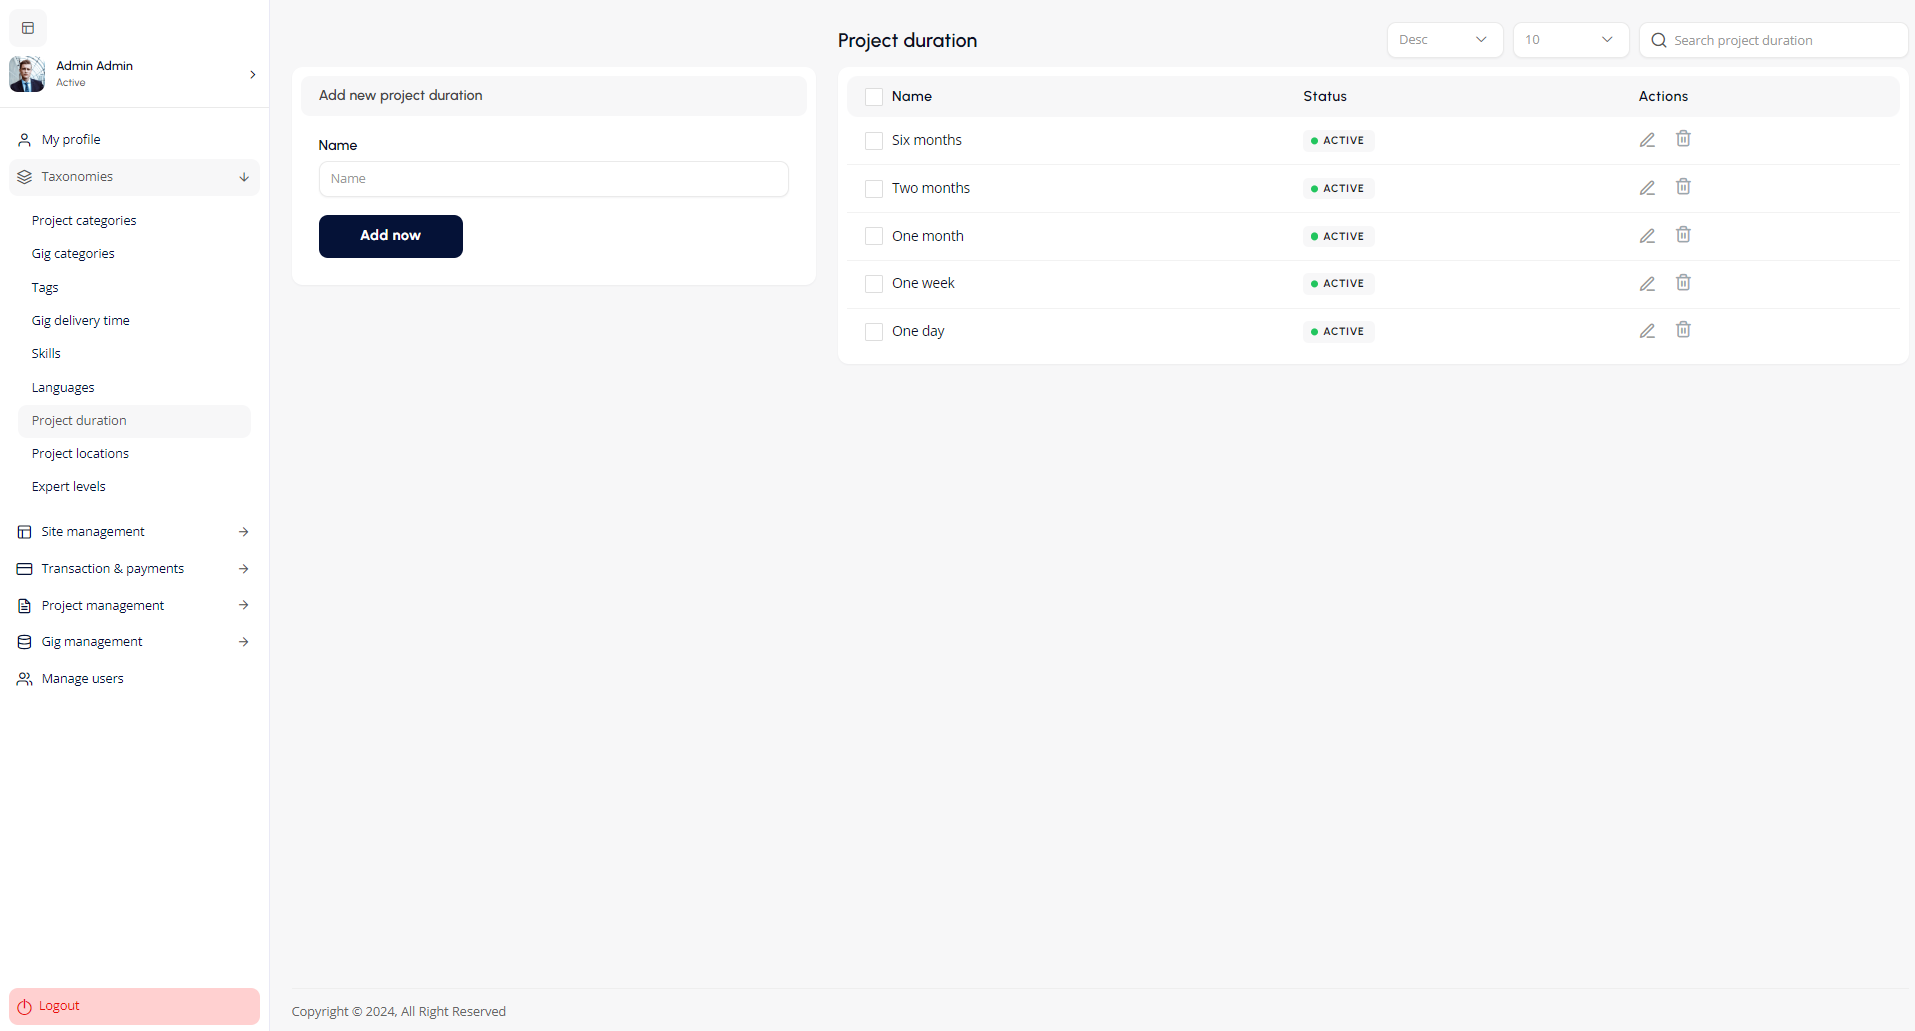
Project Location
The Project Location feature allows administrators to define and manage various work location options for projects. This feature is important for clients and freelancers to specify whether a project is onsite, remote, or a combination of both.
Key Features:
- Add a New Project Location:
- Project Location: Enter the name of the project location (e.g., "Remote", "Onsite", "Partially Remote").
- Click the Add now button to save the new project location.
- Project Location List:
- The right-hand side displays a list of all existing project locations.
- Status: Indicates whether the project location is active.
- Actions:
- Edit: Click the pencil icon to modify an existing project location.
- Search and Filter:
- Use the search bar to find specific project locations quickly.
- Filter the list of project locations based on different criteria, such as name or status, for easier management.
How to Add a New Project Location:
- In the Project Location section, enter the desired project location name (e.g., "Onsite", "Remote").
- Click Add now to make it available for users when creating or managing gigs.
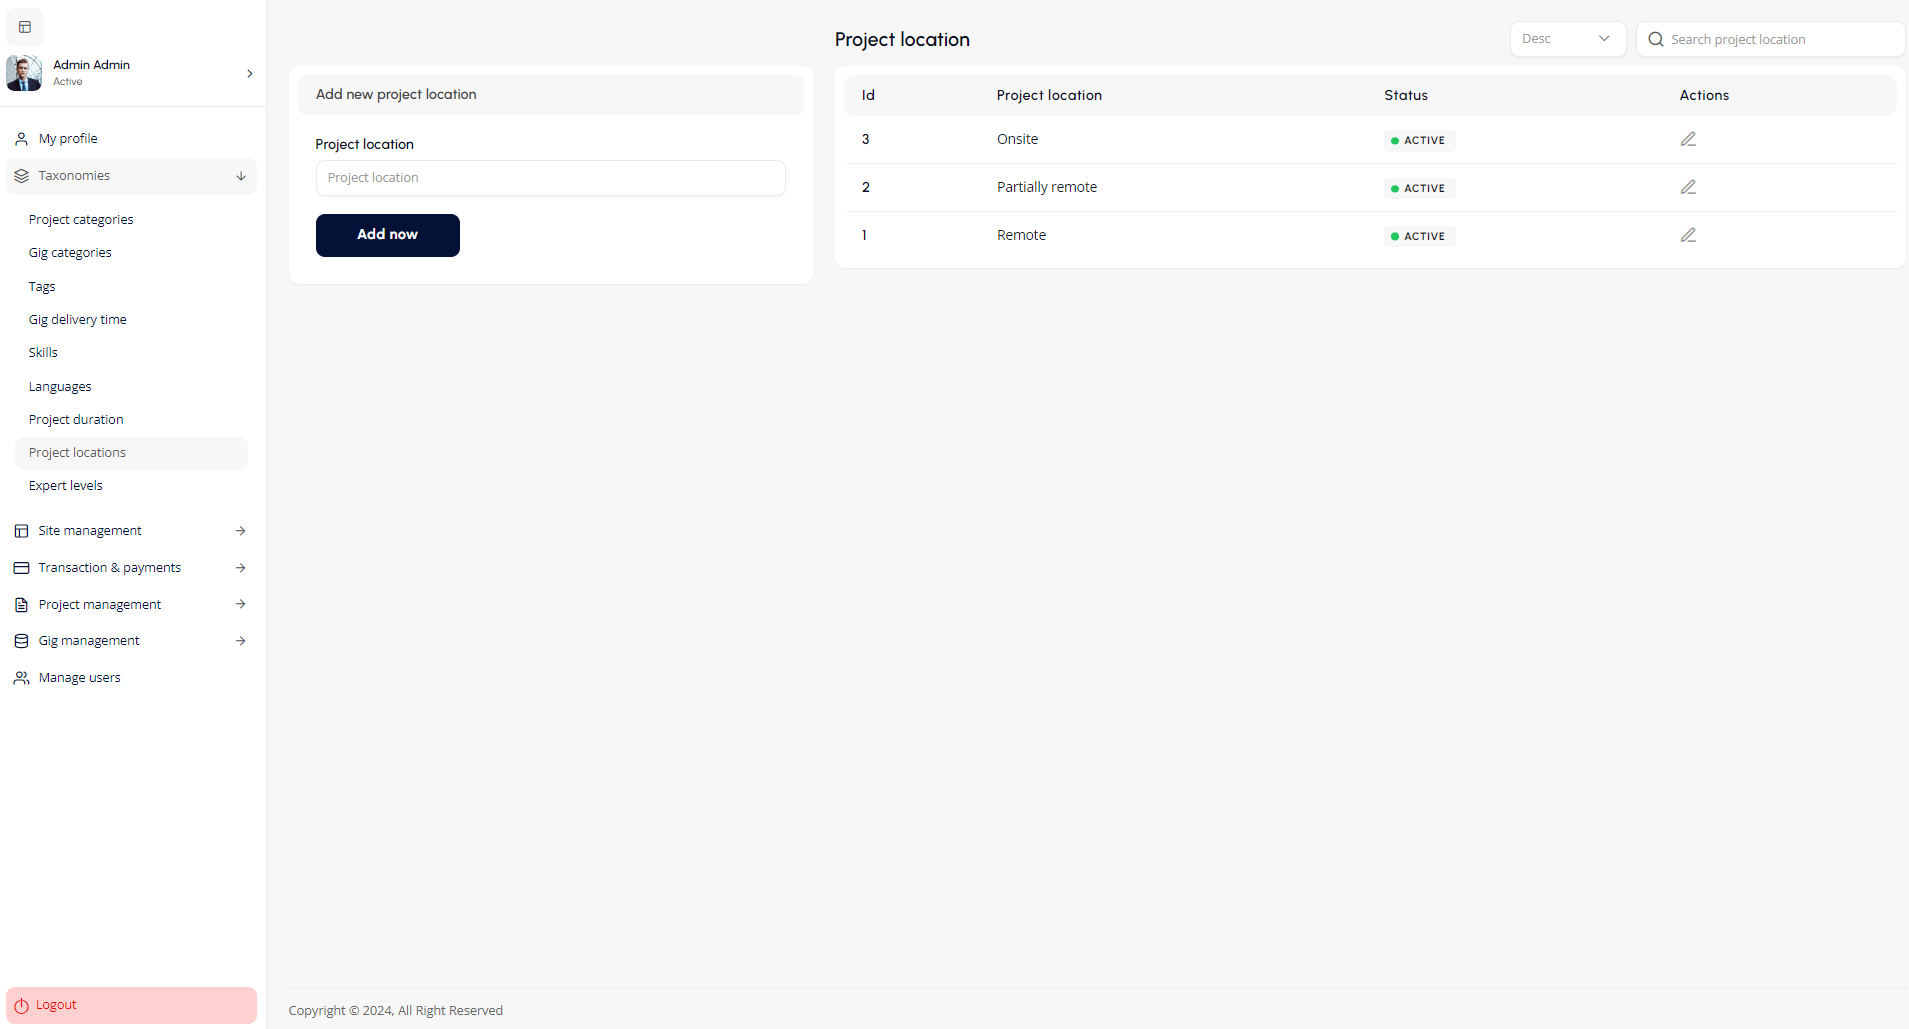
Expertise Level
The Expertise Level feature allows administrators to define and manage various levels of expertise that freelancers can associate with their profiles. These levels help clients understand the experience level of a freelancer when selecting candidates for their projects.
Key Features:
- Add a New Expertise Level:
- Name: Enter the name of the expertise level (e.g., "Junior level", "Expert level").
- Click the Add now button to save the new expertise level.
- Expertise Level List:
- The right-hand side displays a list of all available expertise levels.
- Status: Indicates whether the expertise level is currently active.
- Actions:
- Edit: Click the pencil icon to modify an existing expertise level.
- Delete: Click the trash icon to remove an expertise level from the list.
- Search and Filter:
- Use the search bar to quickly find specific expertise levels.
- Filter the list of expertise levels based on different criteria such as name or status for easier management.
How to Add a New Expertise Level:
- In the Expertise Level section, enter the desired name for the new expertise level (e.g., "Senior level", "Mid level").
- Click Add now to make it available for freelancers to select when creating or updating their profiles.
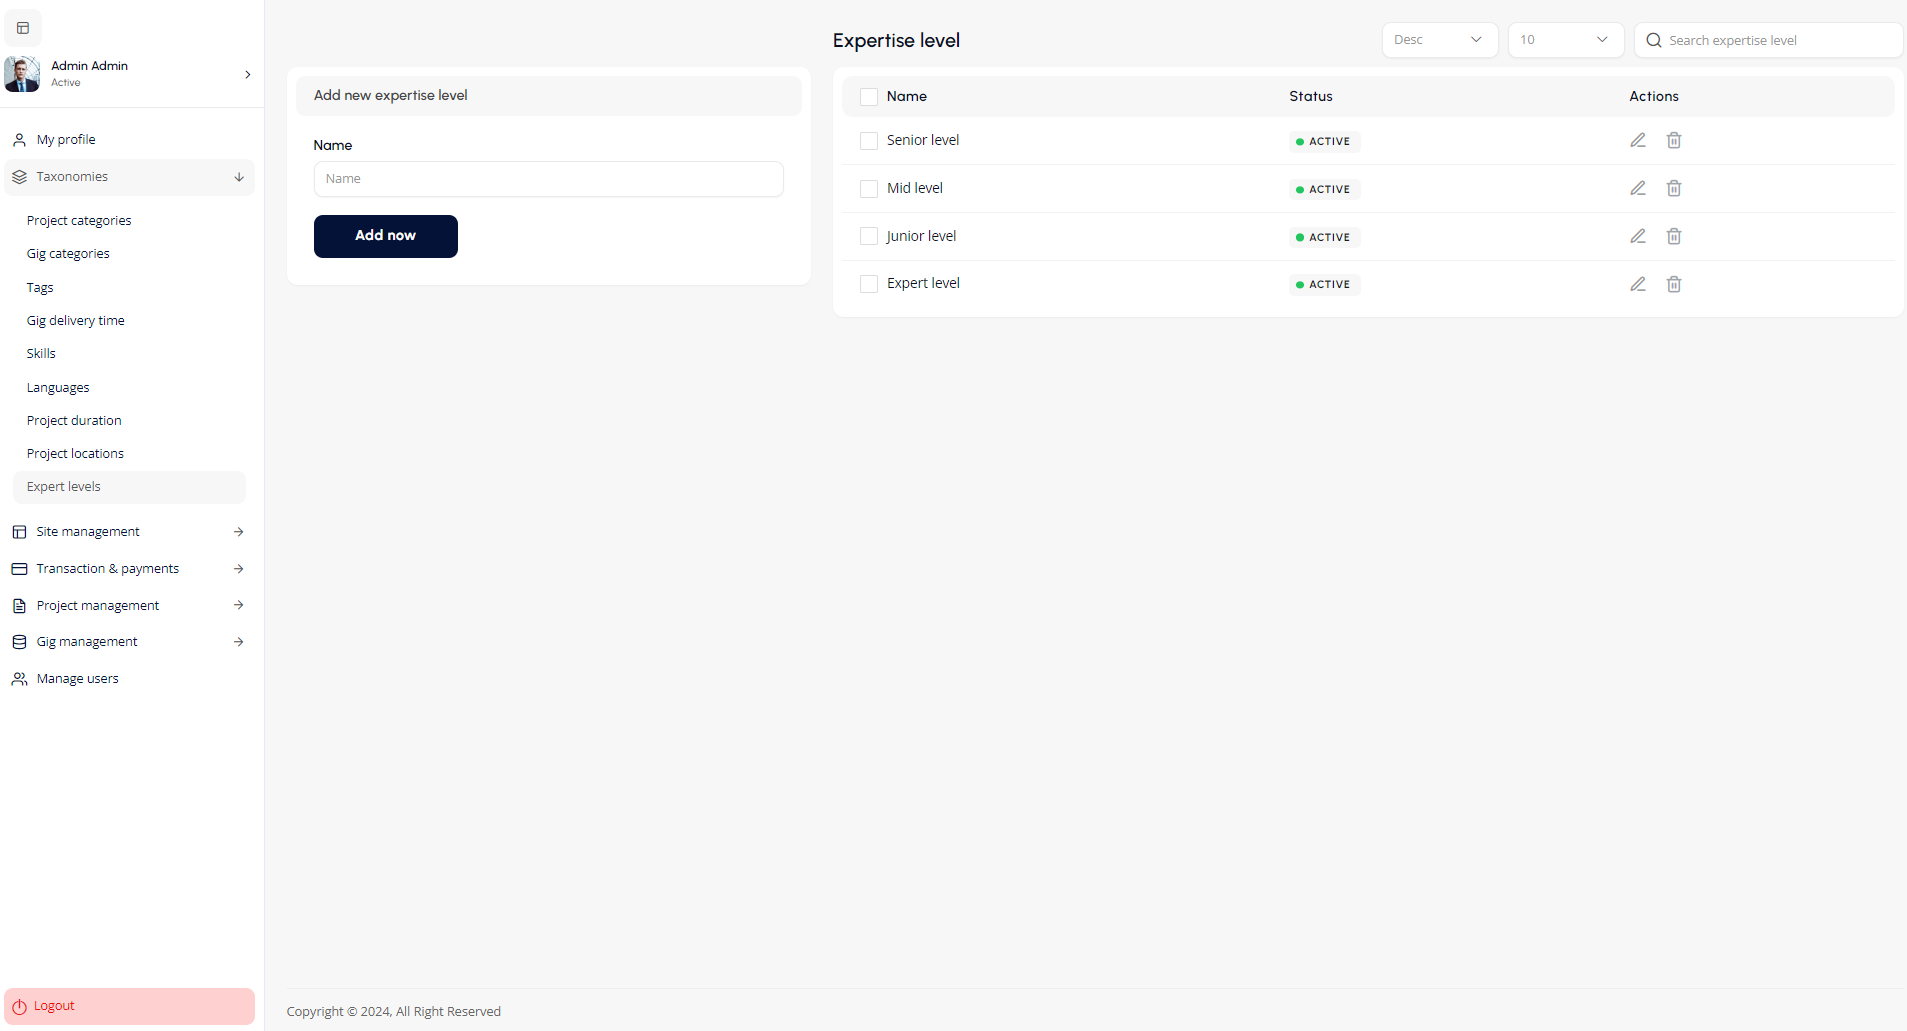
Site Management
This module allows the admin to manage site pages, menus, global settings, and email settings.
Manage Pages
- Add New Page: Enter page name, title, description, and slug, and click "Add new page".
- Edit/Delete Existing Pages: Use the respective icons under the "Actions" column to edit or delete a page.
Menus
- Add New Menu: Click on the "Add new menu" button, enter the menu title, and select the position (Header or Footer).
- Manage Existing Menus: Select a menu from the dropdown to edit or remove.
- Save Menu: After making changes, click on the "Save menu" button.
Global Settings
Configure global settings for AdSense, API, emails, general site settings, and more.
- Adsense Settings: Configure AdSense settings panel allows admins to configure and integrate AdSense ads on various platform pages, such as dashboards, profiles, projects, and gigs. It includes fields for entering the AdSense Client ID and ad scripts for targeted ad placement.
- API Settings: Configure API keys and settings for integrations such as Zipcode settings and Google Maps.
- Contact Us Settings: Configure Contact Us settings allow admins to configure support channels, including phone, email, WhatsApp, and fax, along with their availability schedules. It ensures clear and accessible communication for users during specified hours.
- Dispute Settings: Configure Dispute settings allow admins to define common dispute issues for buyers and sellers, such as lack of response or incomplete work, and set the minimum number of days for raising disputes. This ensures streamlined resolution processes for platform conflicts.
- Email Settings: Configure the email logo, sender name, email, and signature, as well as footer copyright text.
- Front Page Settings: Configure Front Pages settings allow admins to configure the top menu bar for dynamic and fixed pages, manage header content, and set custom header styles for individual pages. This provides flexibility in designing and customizing the website's user interface.
- General Settings: The General Settings allow admins to configure key platform preferences, such as supported file extensions, file size limits, date formats, currency, and default payment methods. It also includes layout settings, profile address formatting, and reasons for account deactivation.
- Multi-Language Settings: The Multi-Language settings allow admins to enable multilingual support on the platform and select specific languages for users. This enhances accessibility and caters to a global audience.
- Project Settings: The Project settings allow admins to define project budgets, default statuses, creation validation criteria, and freelancer recommendation parameters to streamline project management on the platform.
- Proposal Settings: The Proposal settings allow admins to set the default status of proposals, such as auto-approved or pending, to streamline the proposal review process on the platform.
- Seller Settings: The Seller settings allow admins to configure seller-related options, including hourly price range, business types, social link visibility, withdrawal amount limits, and default profile banner images. These settings help manage seller profiles and activities effectively.
- Site Settings: The Site settings section allows administrators to manage essential configurations for the platform, such as enabling RTL (Right-to-Left) layout, customizing logos, site name, and site icons. It also includes options for setting authentication page backgrounds, footer headings and content, popular categories, and app logos/URLs for mobile platforms. These settings enhance the platform's branding and user experience.
- Social Media Settings: The Social Media settings allow admins to link the platform to various social media profiles, such as Facebook, Twitter, LinkedIn, and Dribbble. These settings enhance connectivity and provide users with easy access to the platform's social media presence.
- Color Settings: The Color settings section allows admins to customize the platform's color scheme, including primary and secondary theme colors, text colors, button background colors, link colors, and header text colors. These options ensure a cohesive and visually appealing design that aligns with the platform's branding.
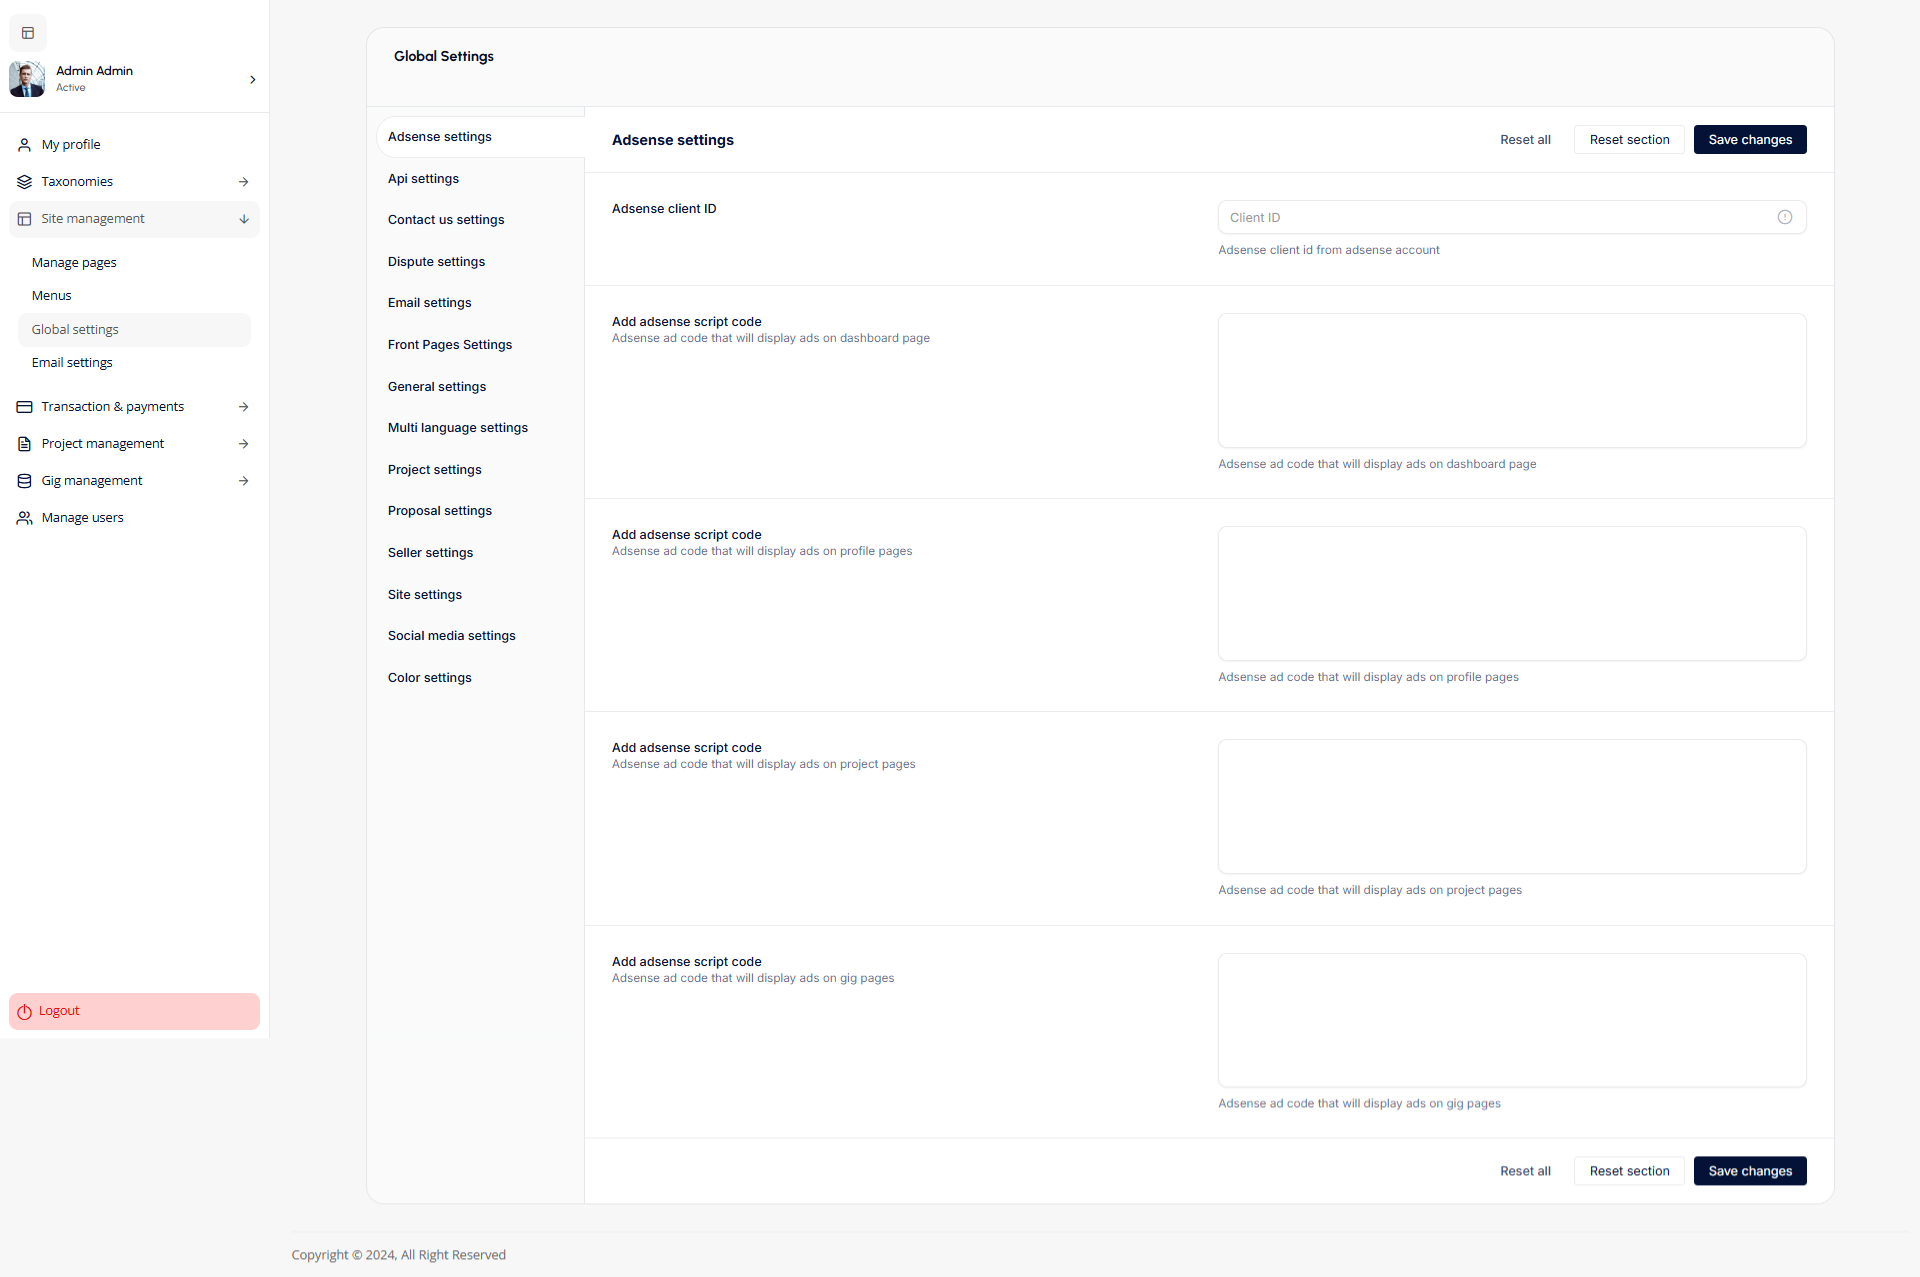
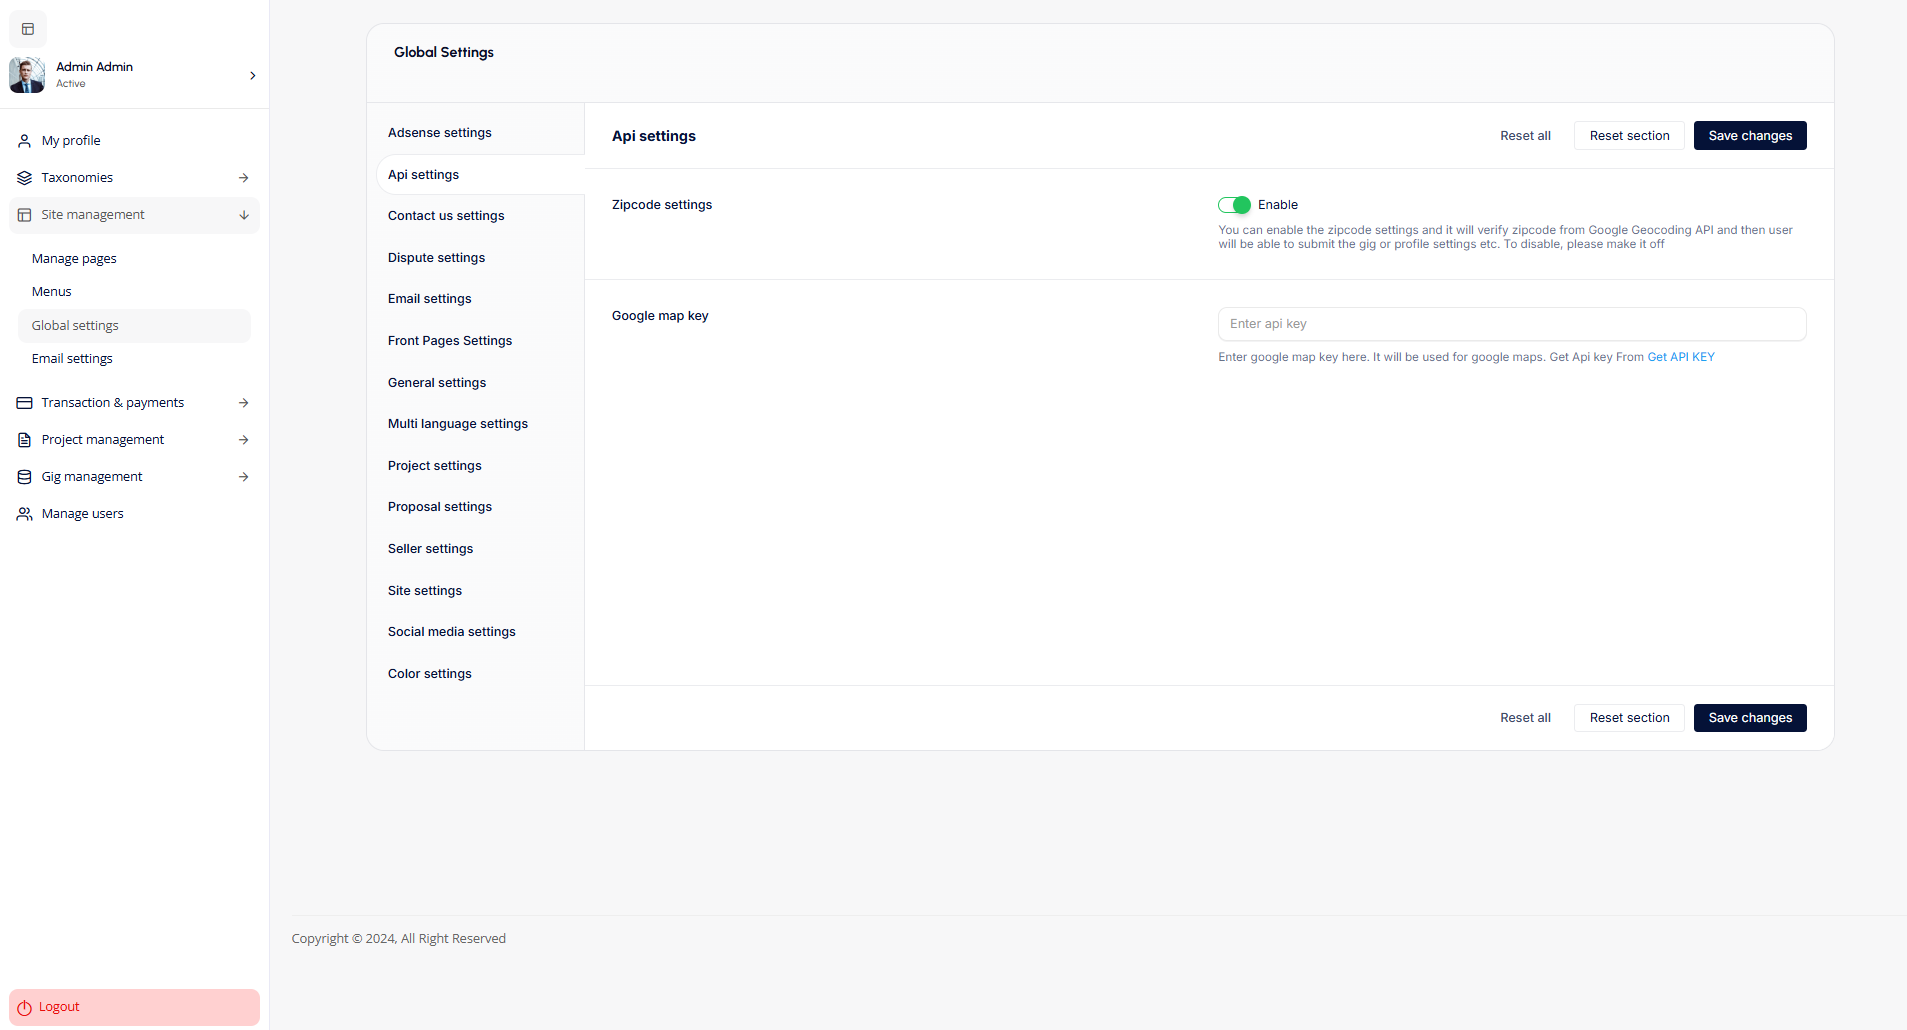
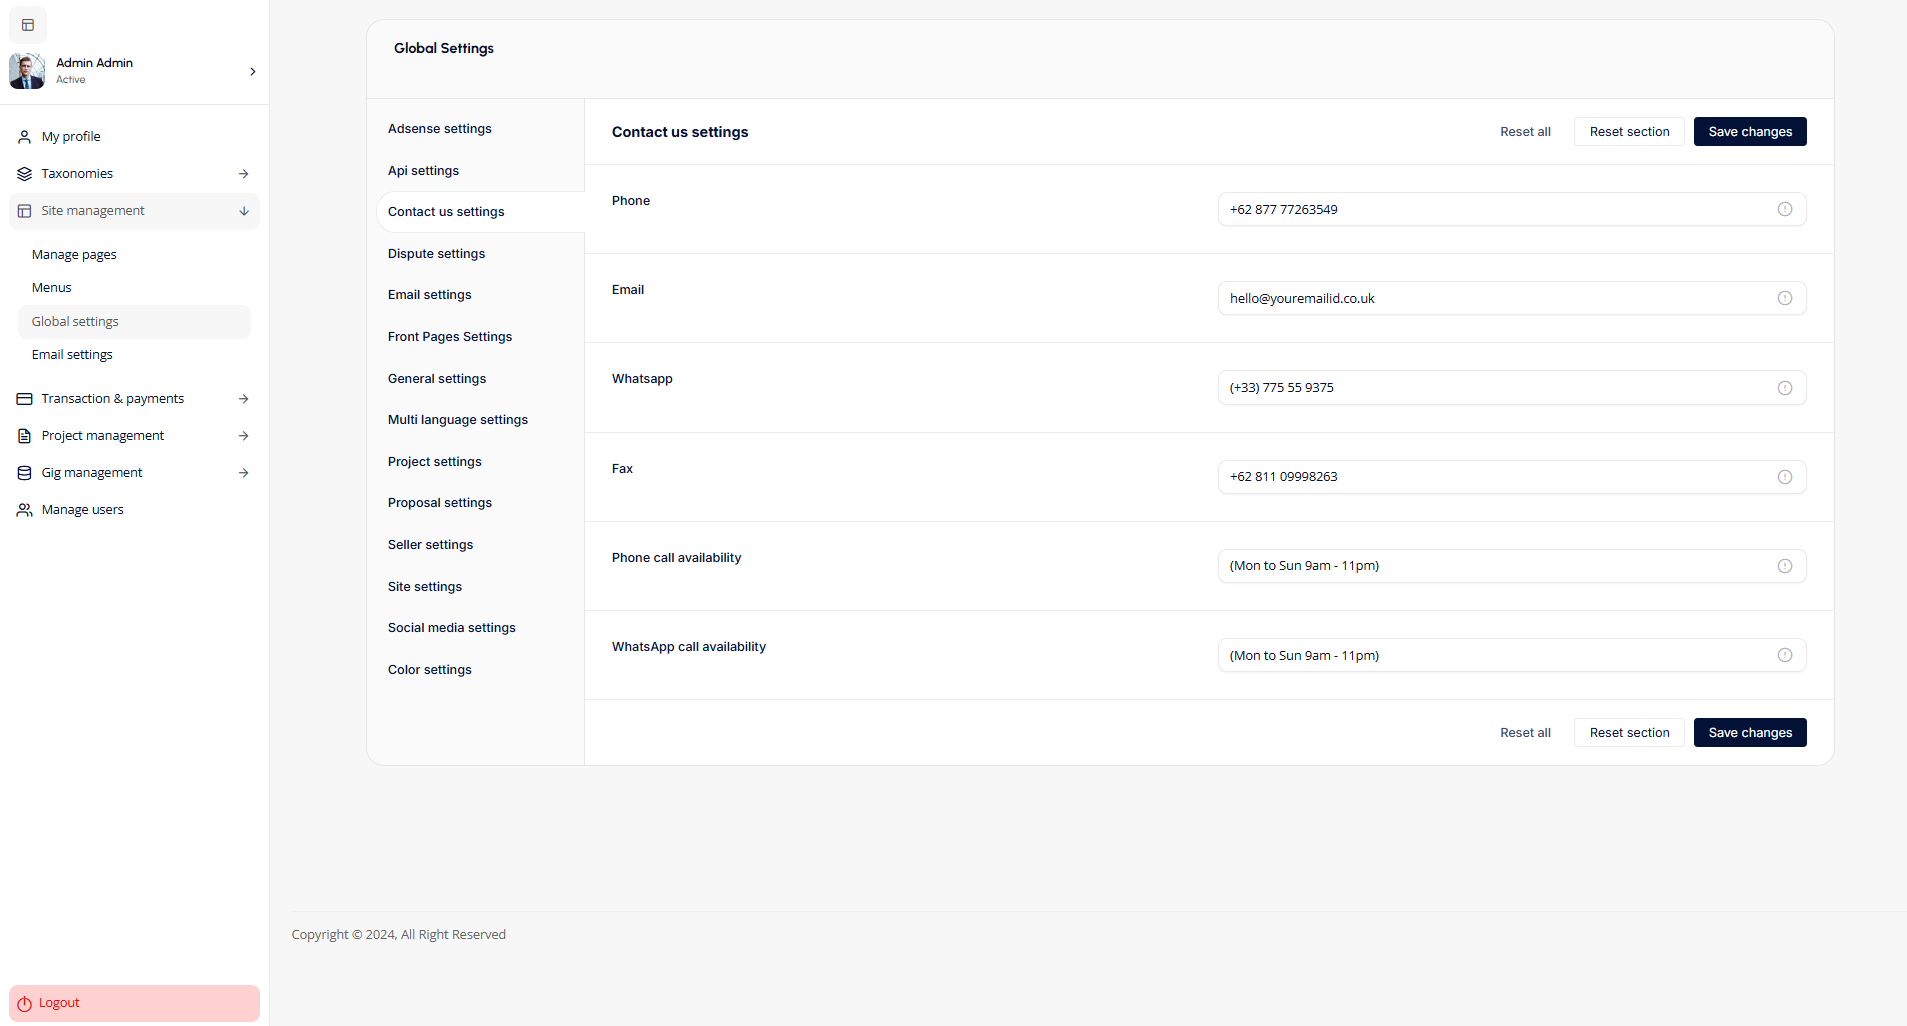
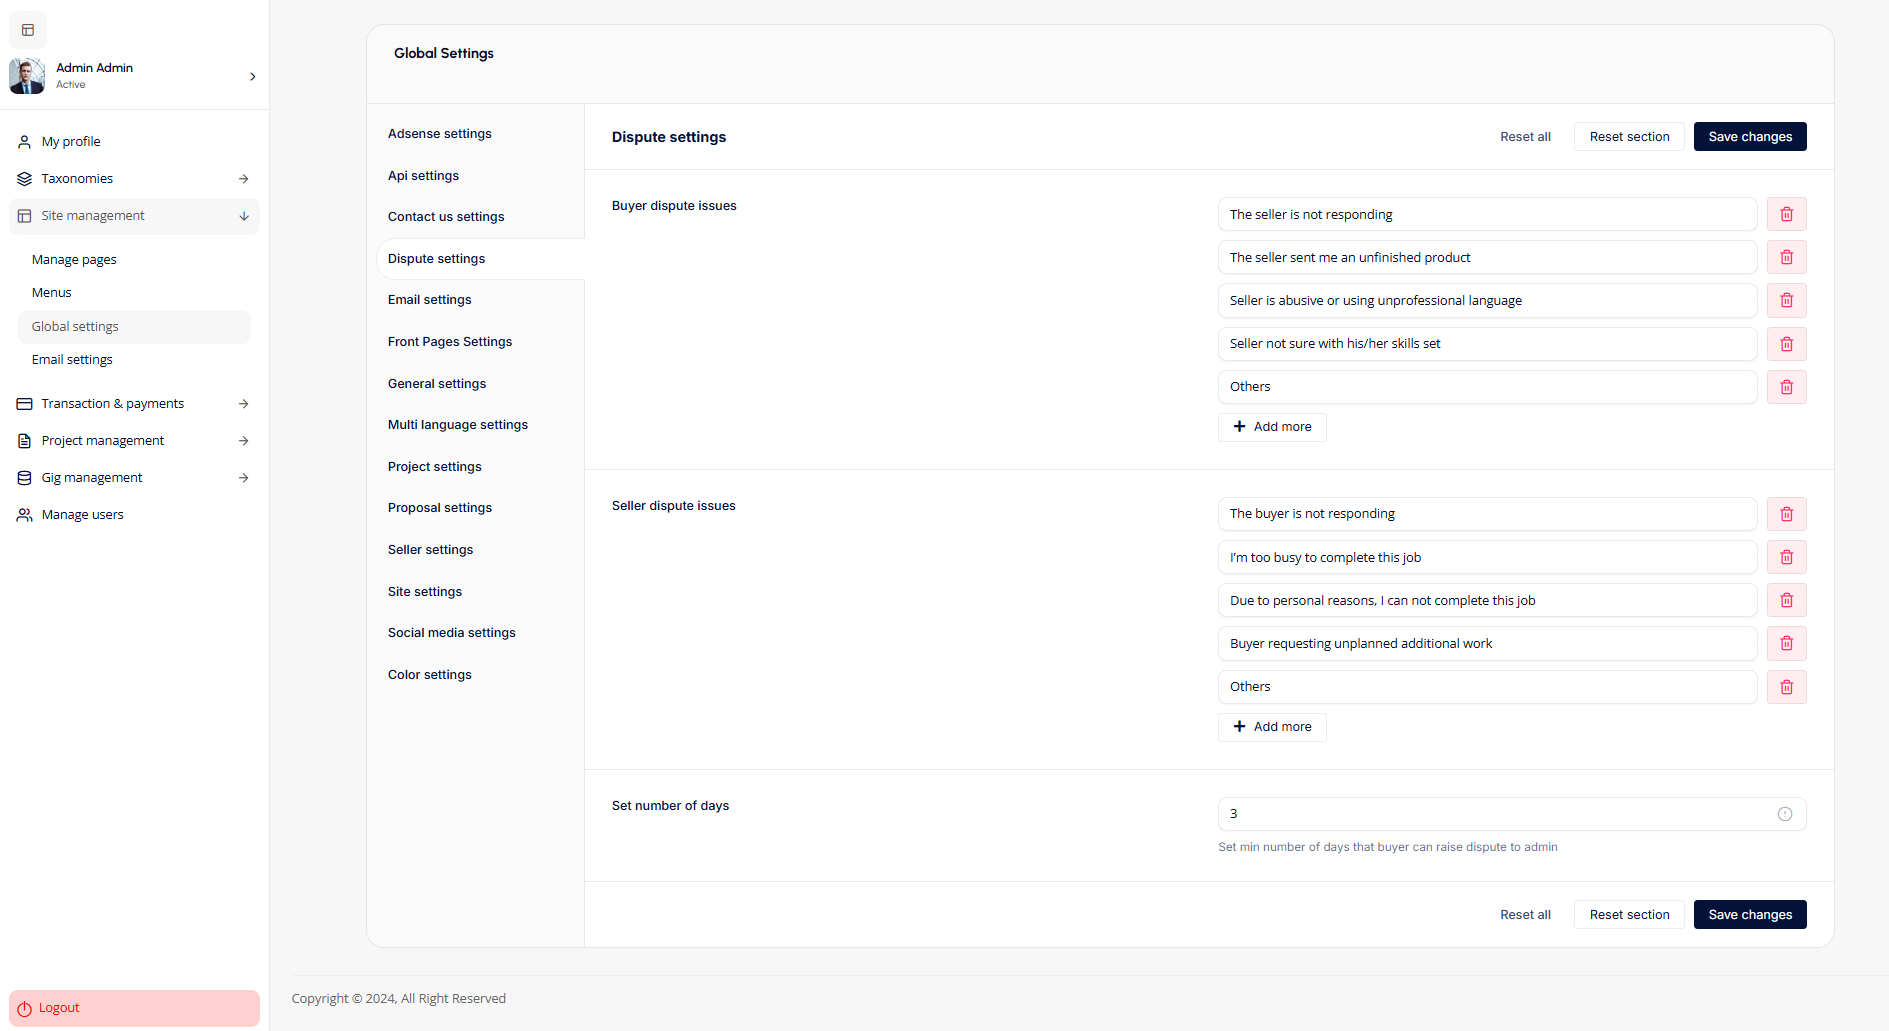
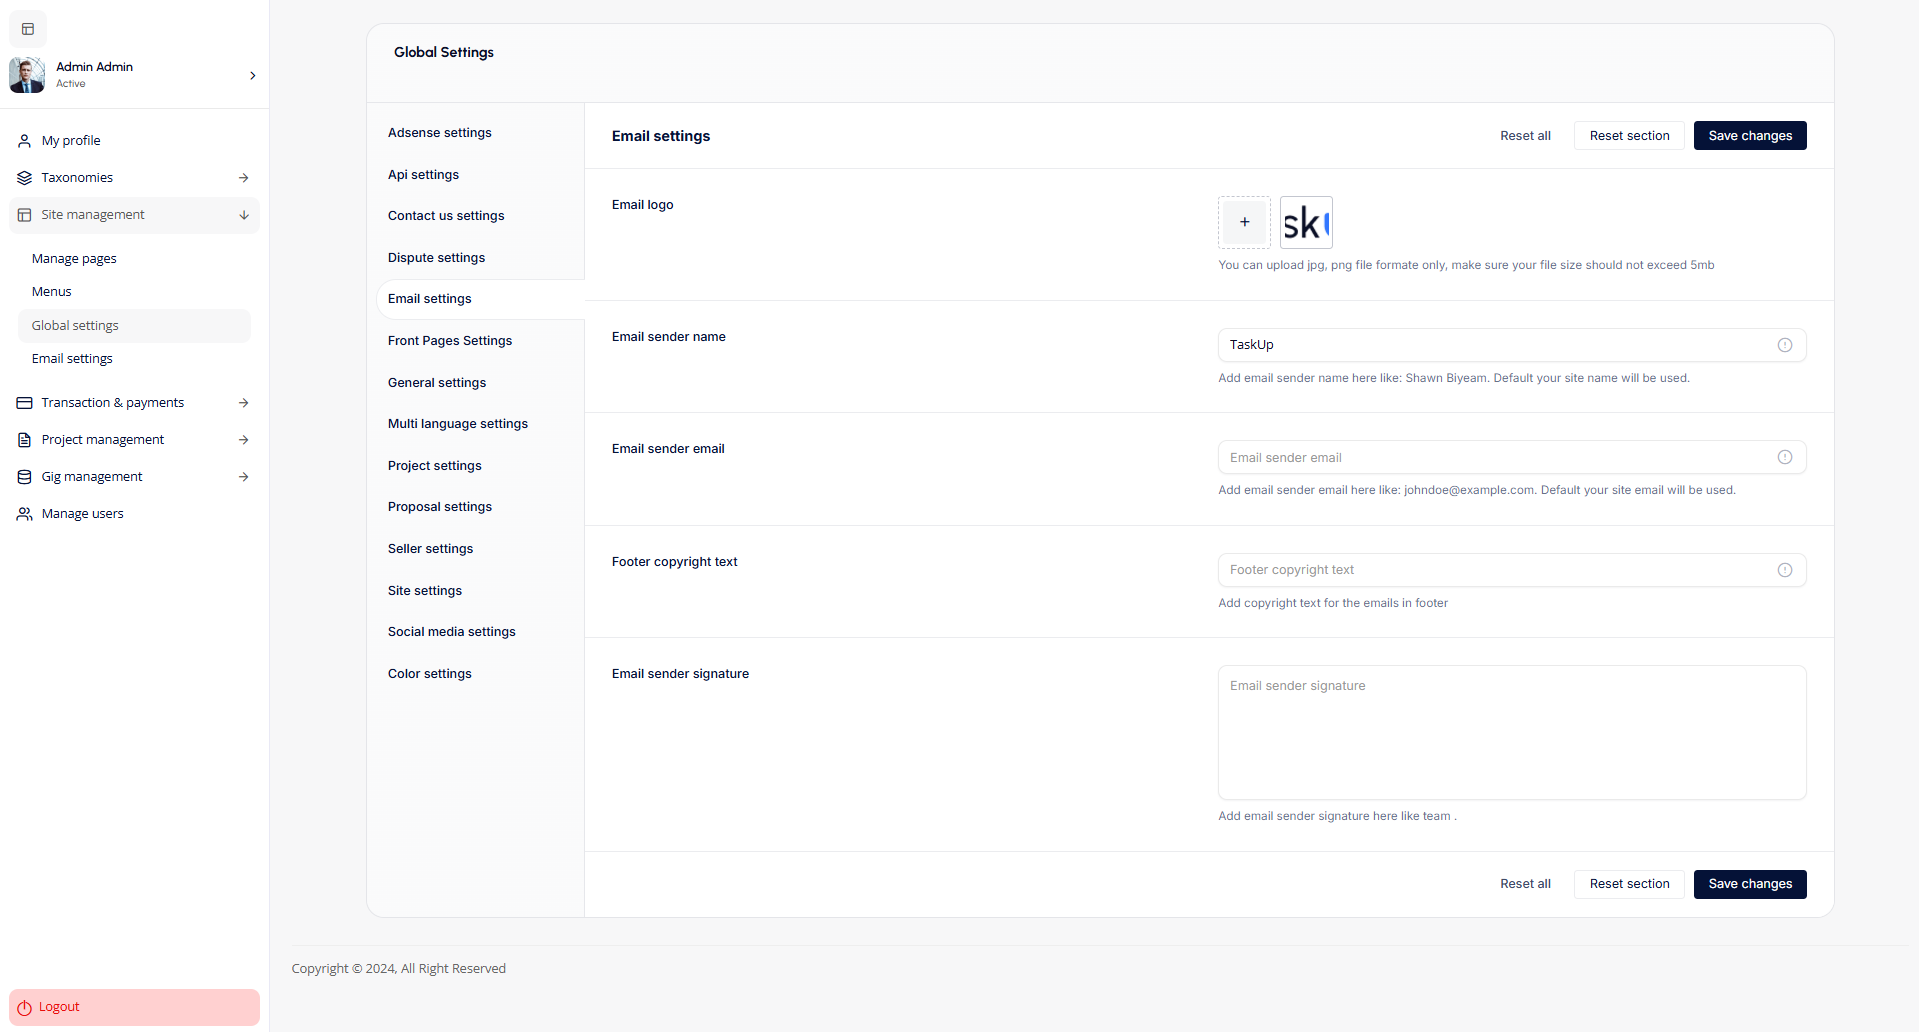


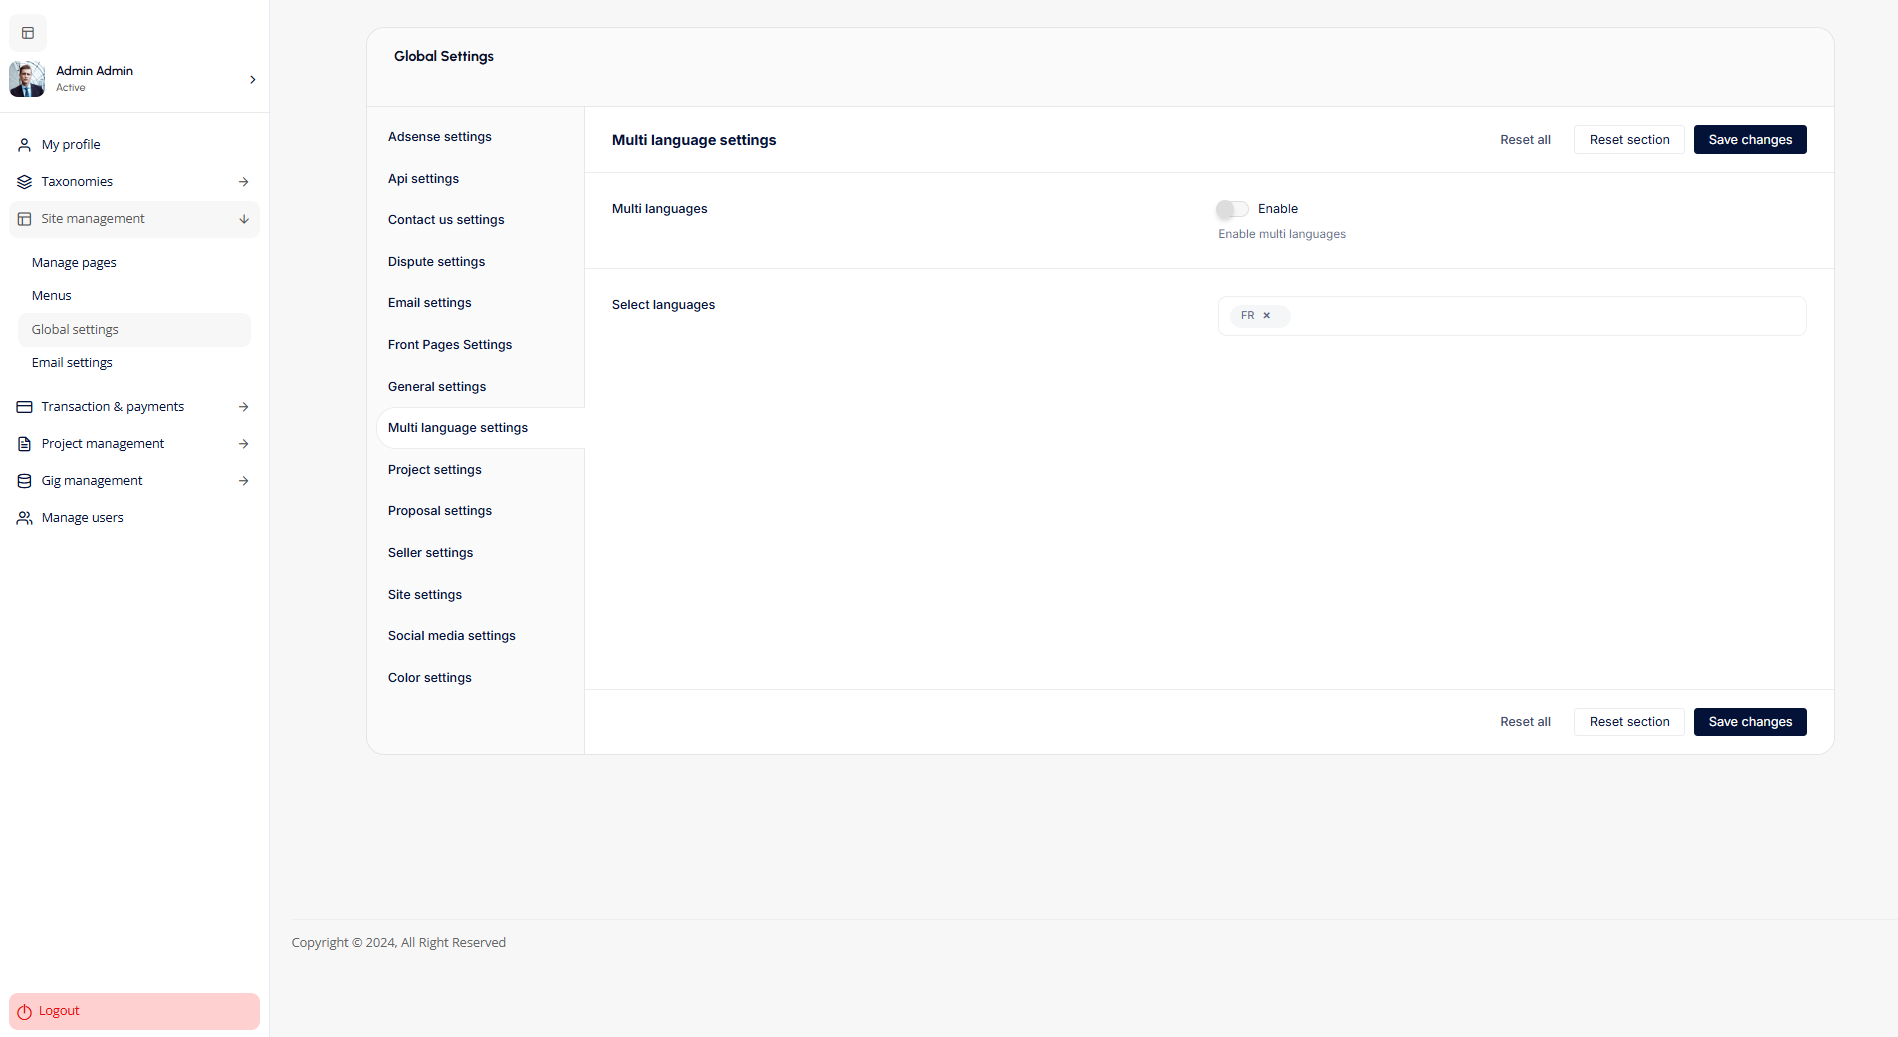
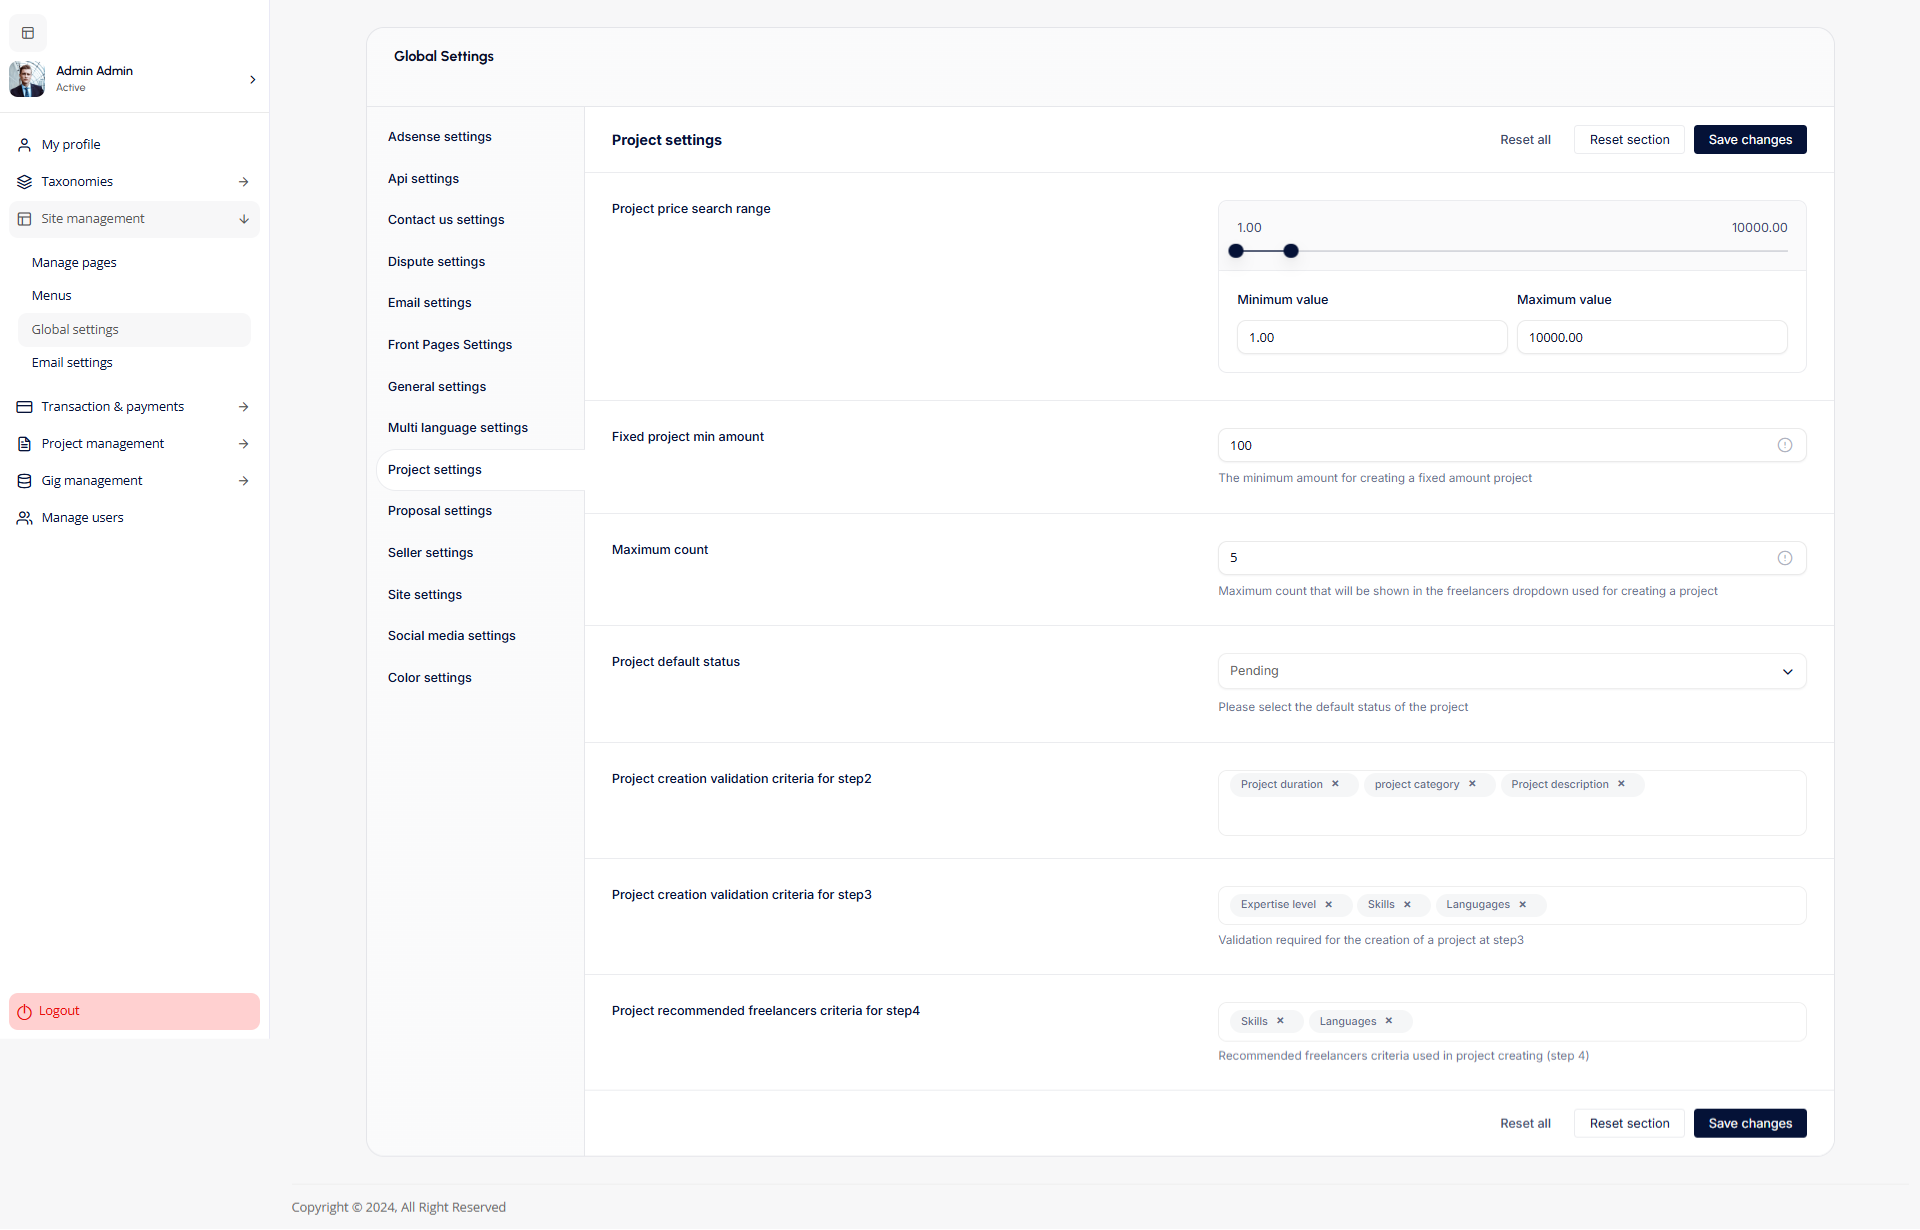
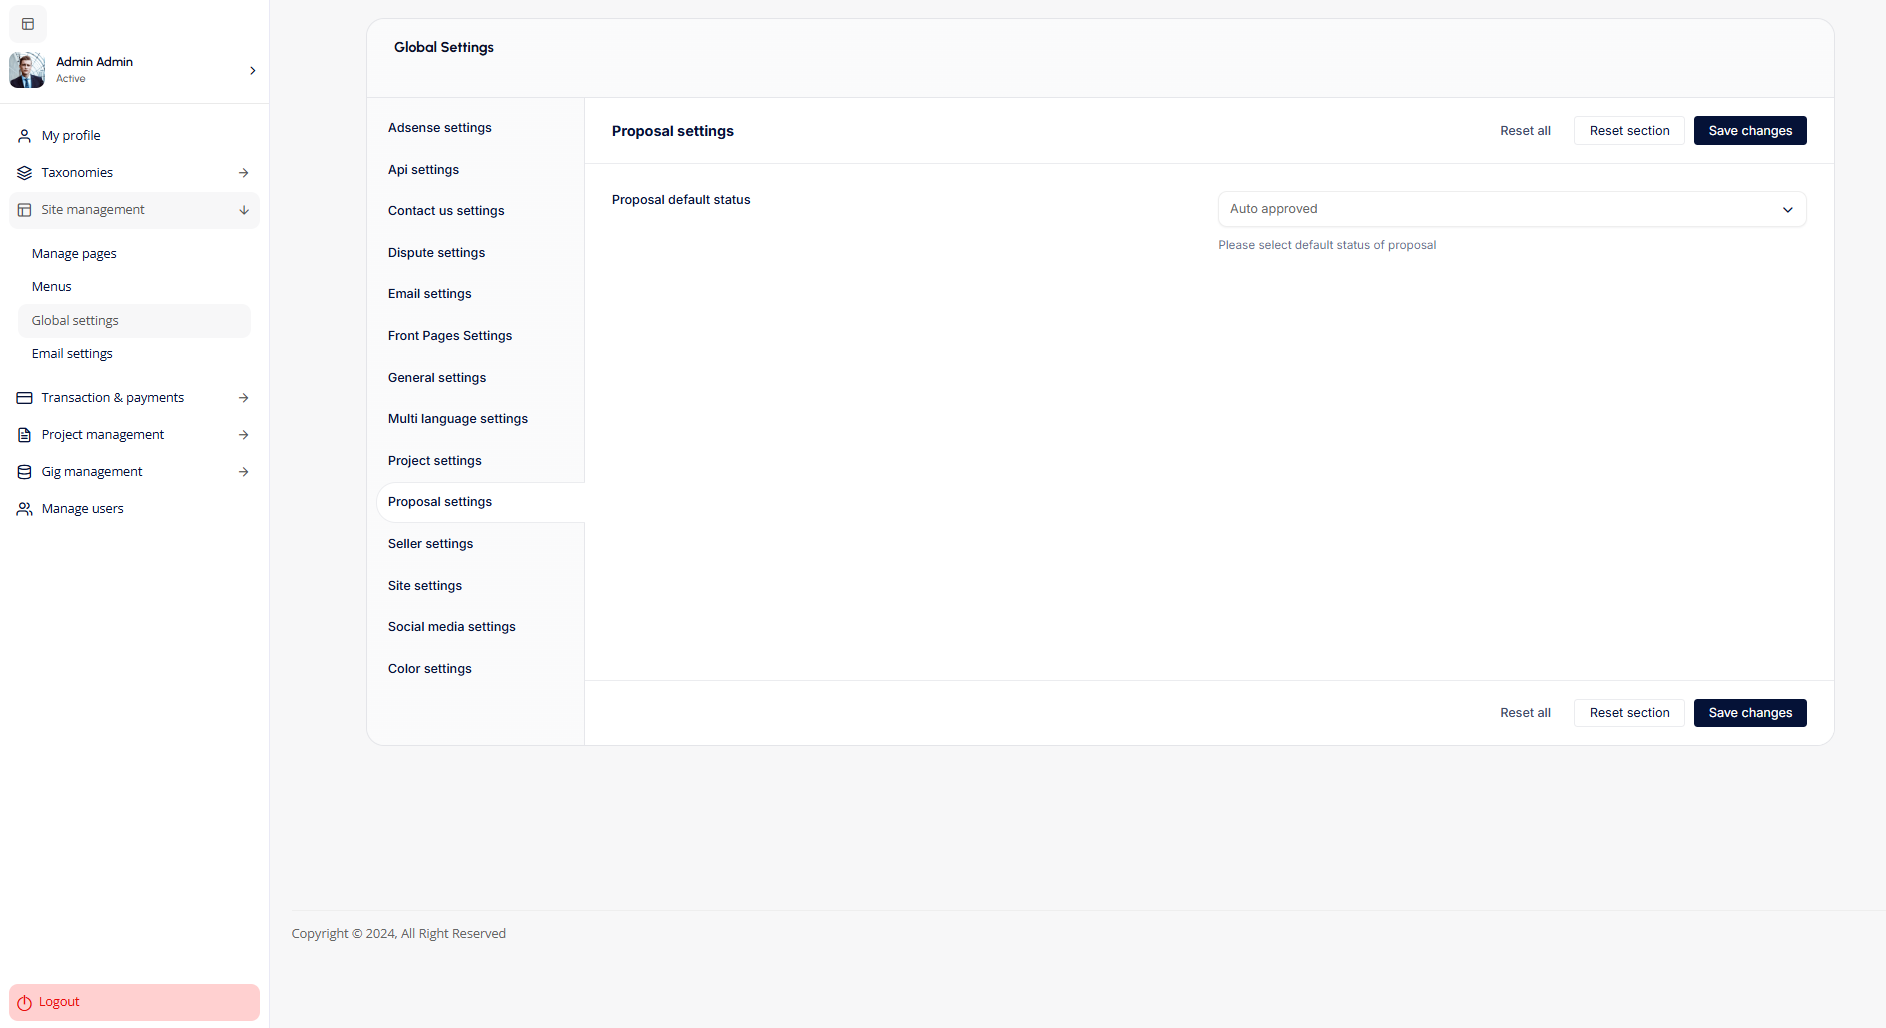
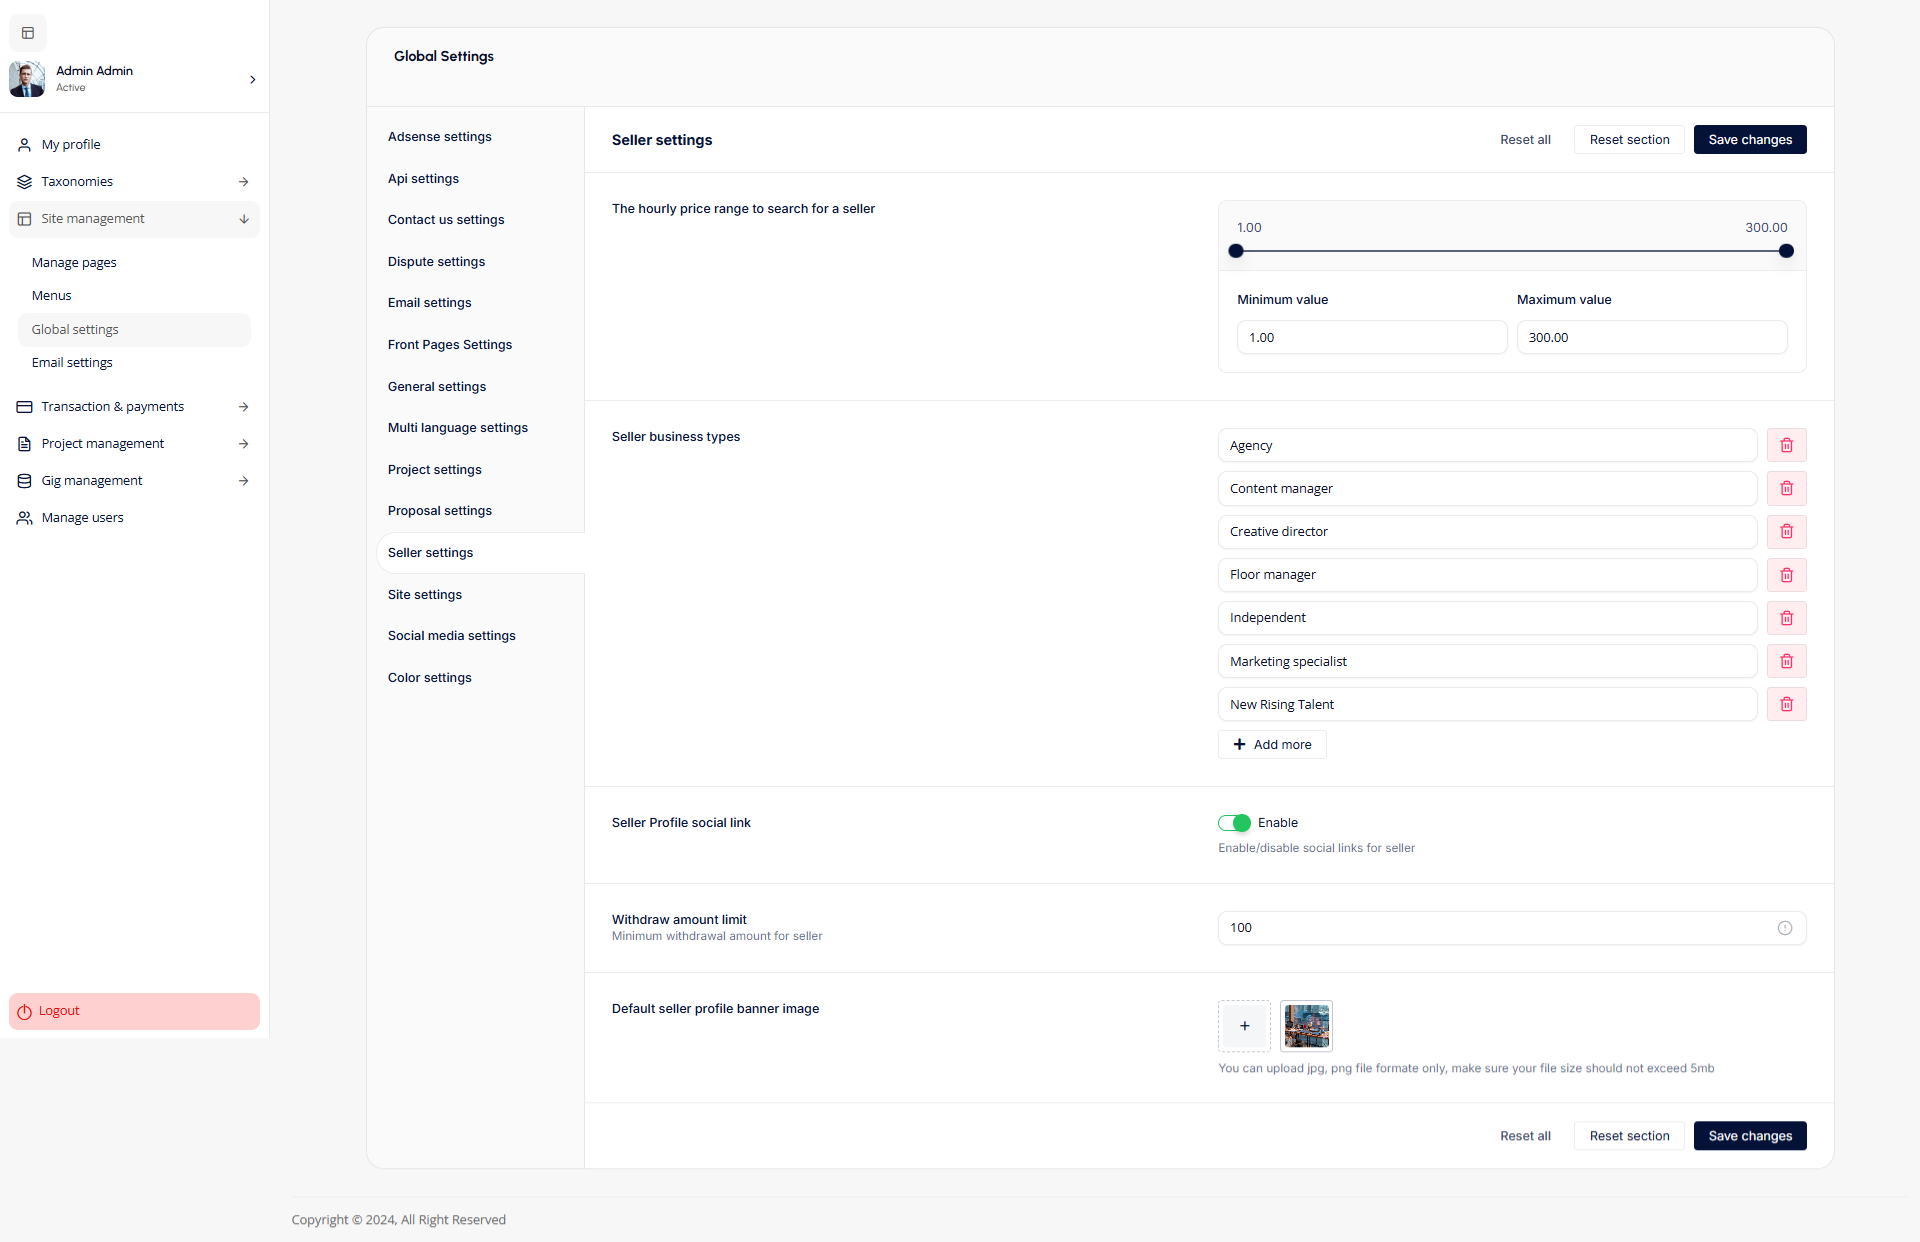
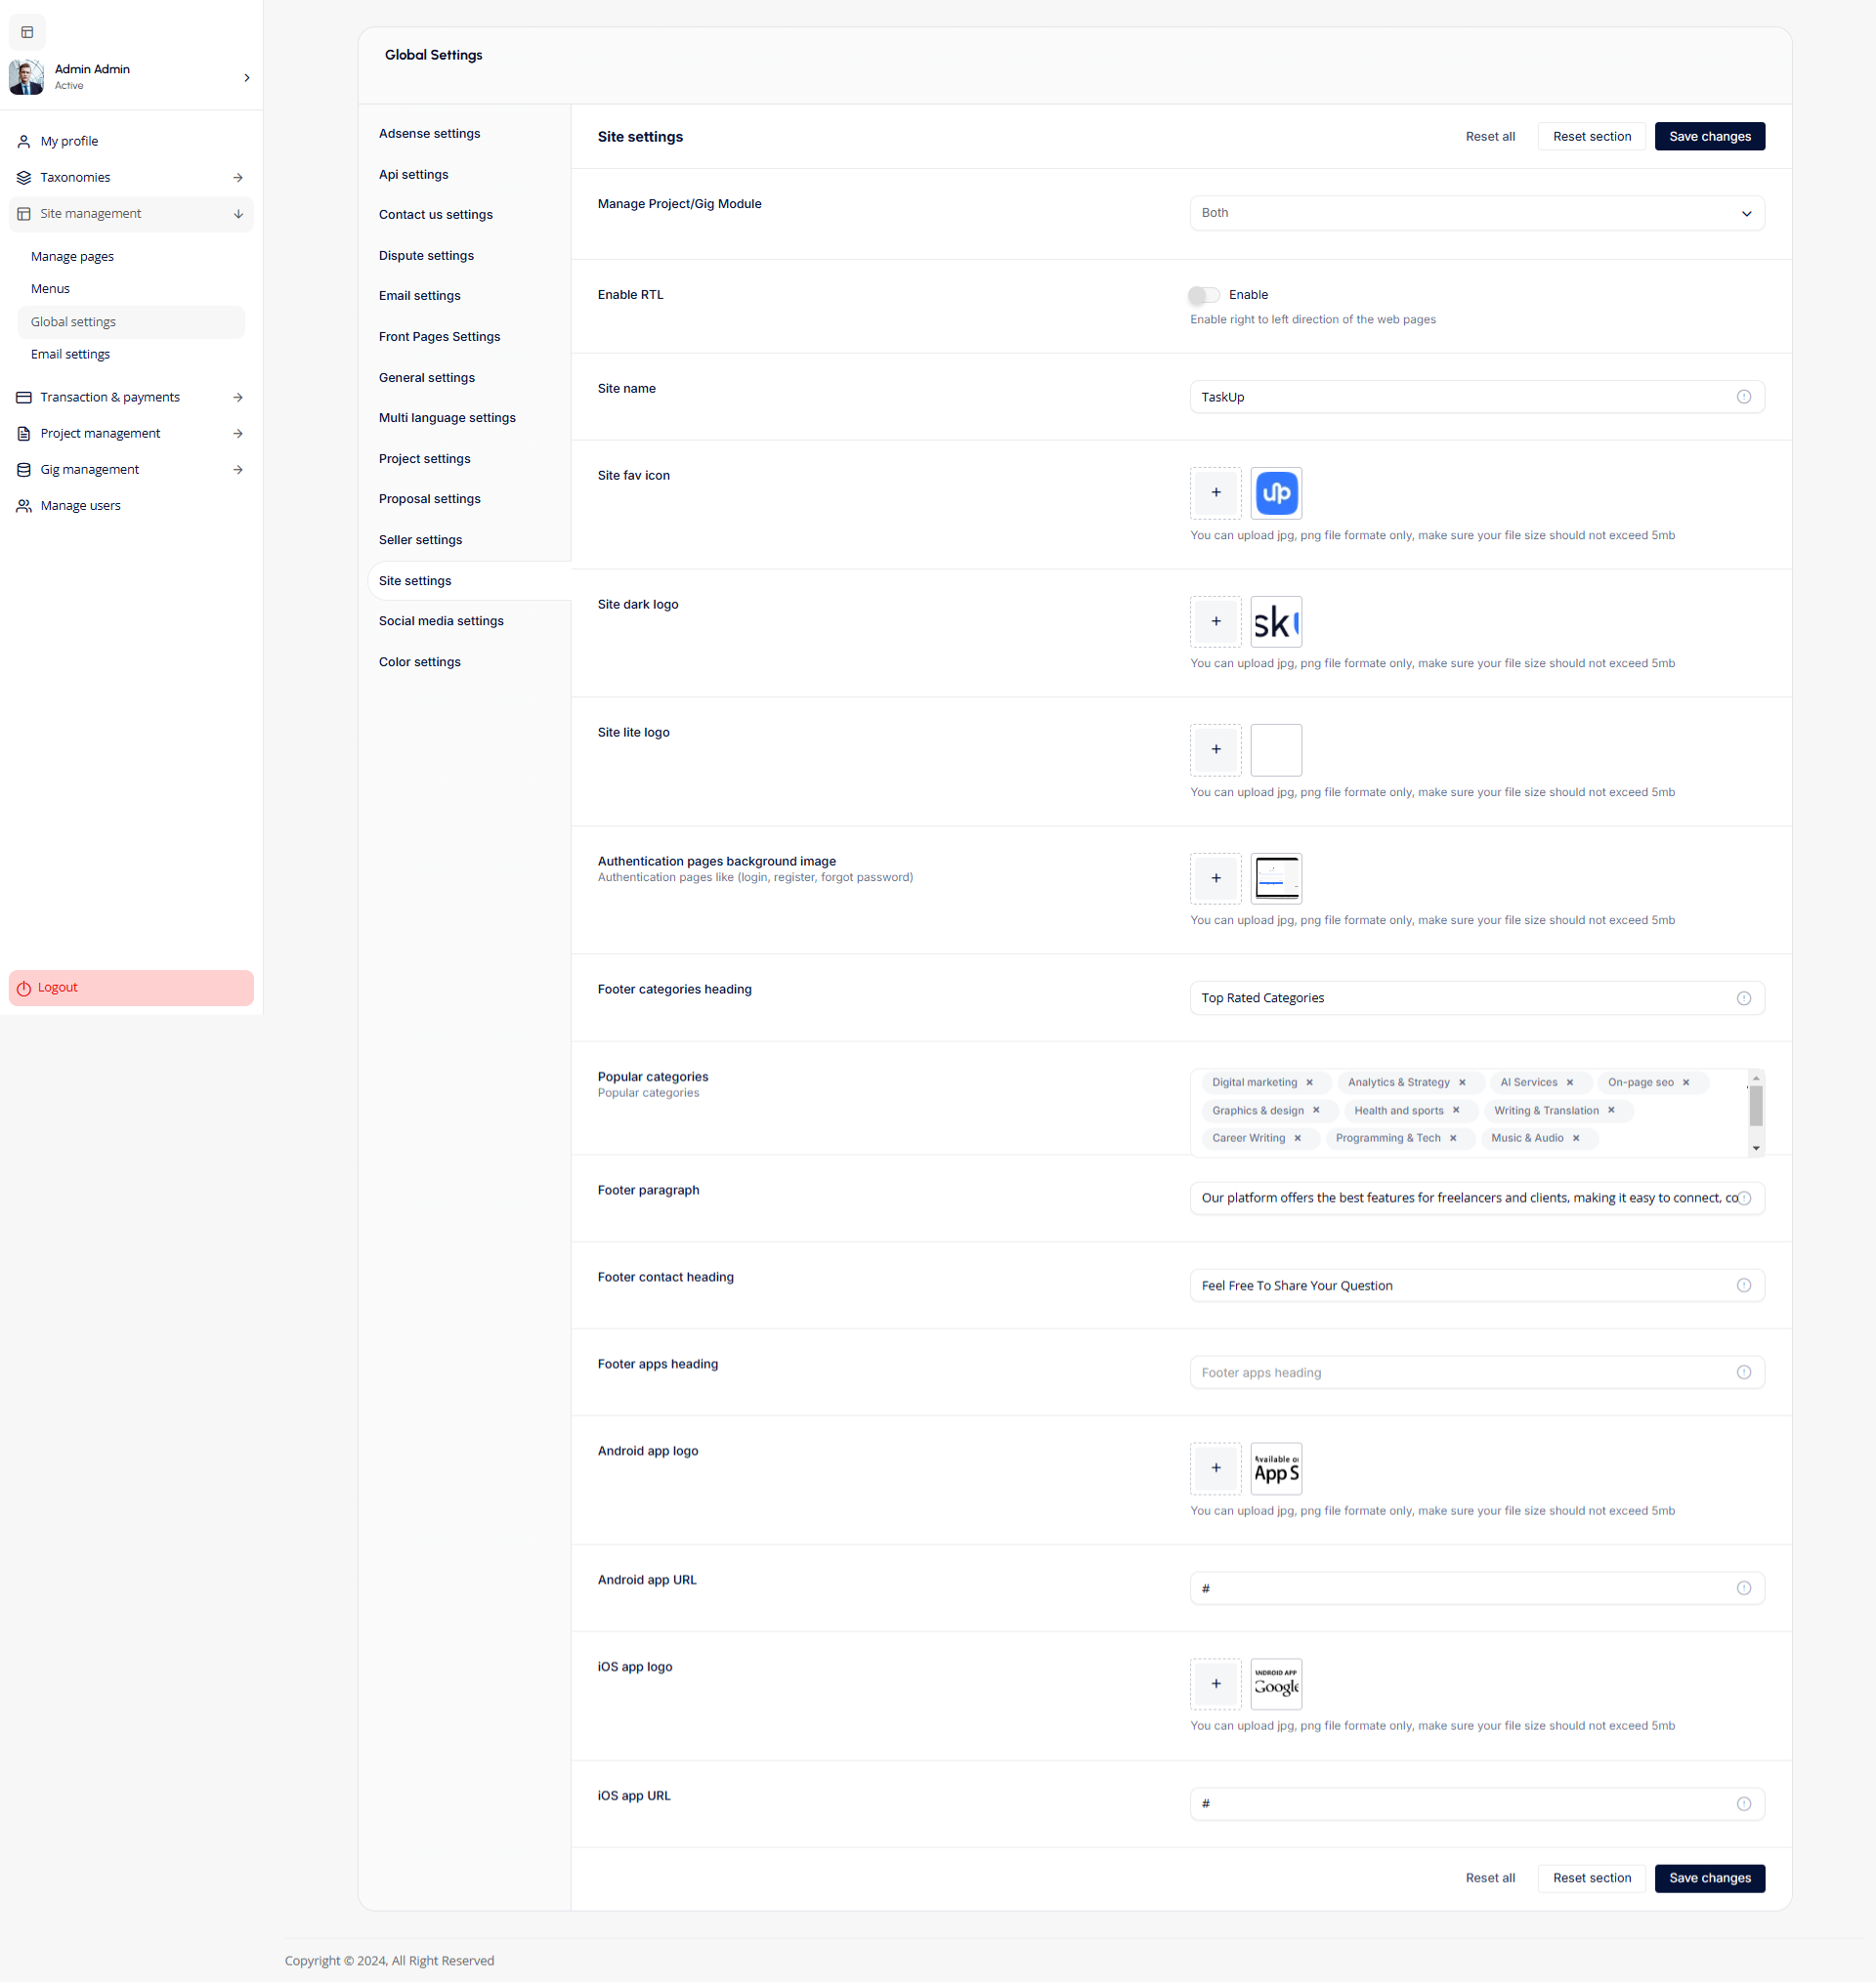
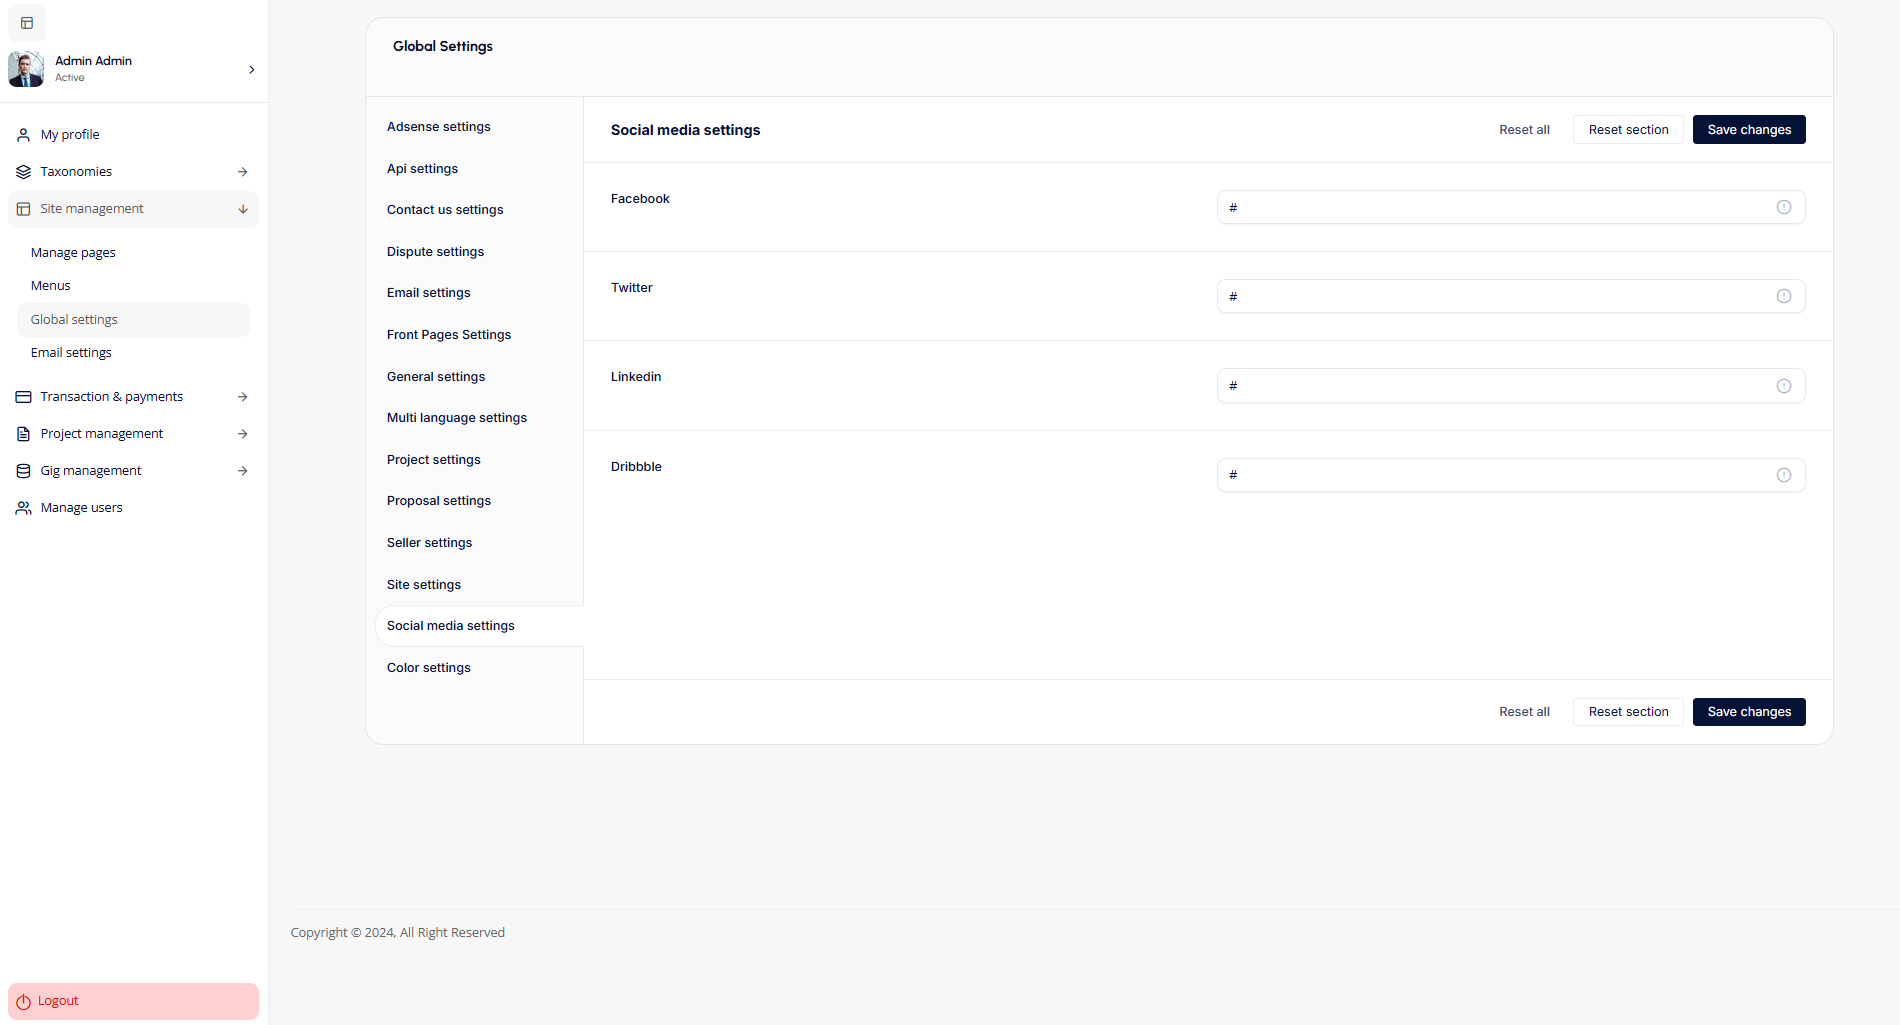
Email Settings
- Add New Template: Select the email template type and click "Add new template".
- Manage Email Templates: Edit or delete templates as needed using the icons under the "Actions" column.
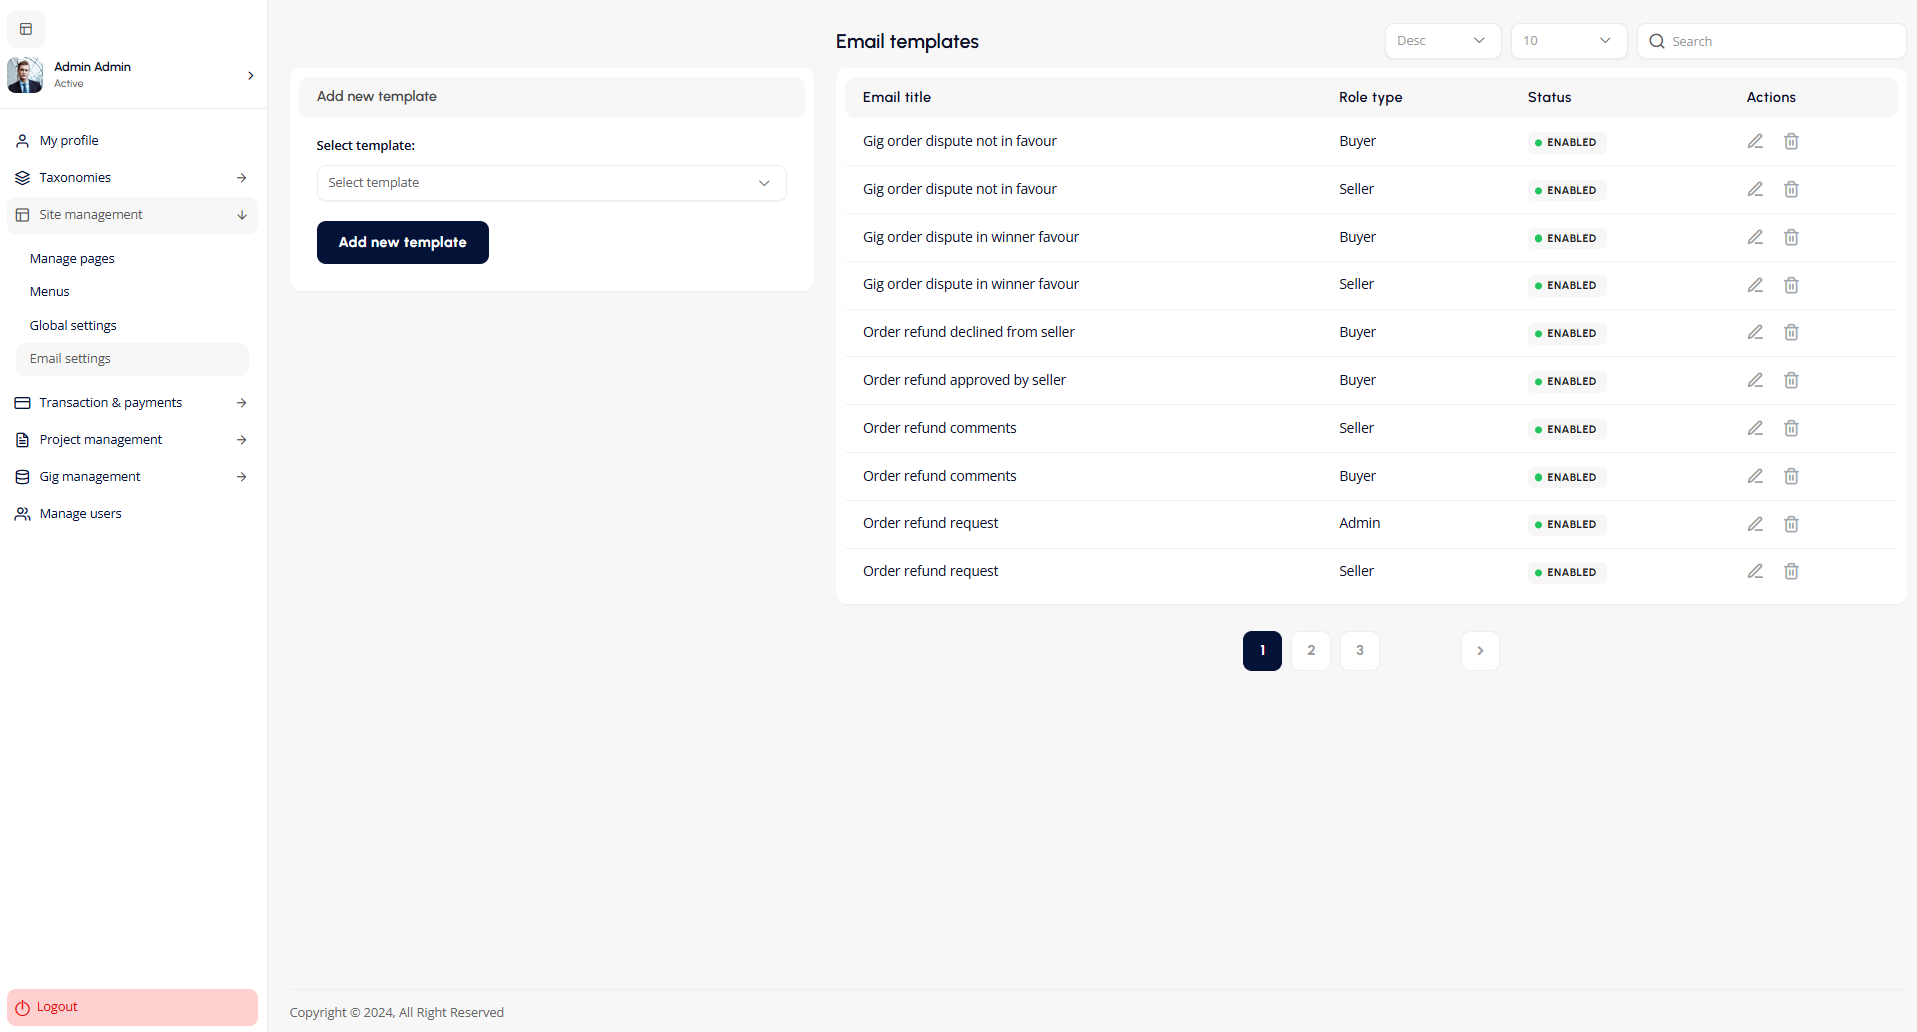
Transaction & Payments
The Transaction & Payments section enables the admin to manage all financial transactions and settings on the platform.
Withdraw Requests
- View Withdraw Requests: Displays all pending withdrawal requests submitted by sellers. This includes details like the request date, amount, and seller details.
- Approve or Reject Withdrawals: Review each withdrawal request and either approve or reject it.
- No Requests: If there are no withdrawal requests, a message "No record added yet!" will be displayed.
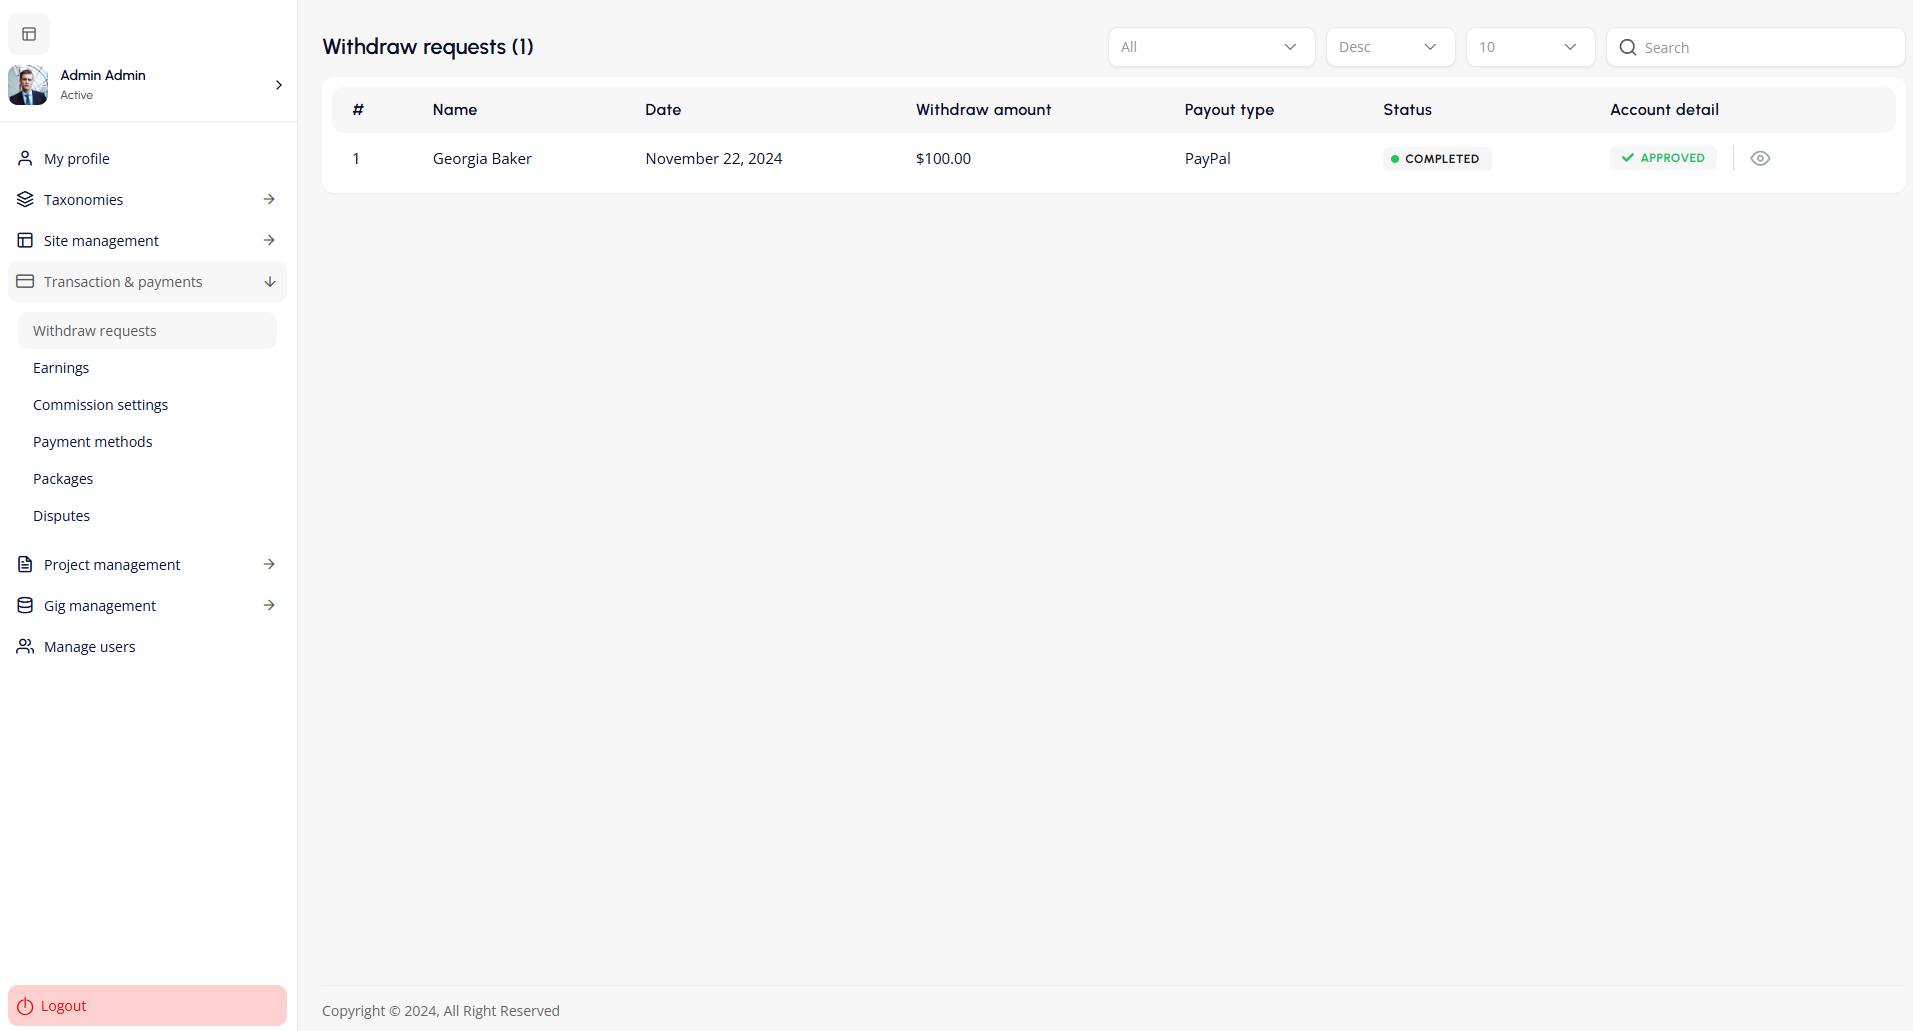
Commission settings
The Commission Settings page allows administrators to configure how commission fees are applied to projects on the platform.
- No Commission The platform charges zero fees on all transactions, making it ideal for attracting freelancers and clients by removing financial barriers. This model maximizes participation but eliminates platform revenue from commissions.
- Fixed Commission A set flat fee (e.g., $5) is deducted per transaction, regardless of project size. This ensures predictable income for the platform while keeping costs transparent for users. Best suited for marketplaces with consistent project values.
- Percentage Commission A fixed percentage (e.g., 10%) of each transaction’s value is charged. This automatically scales with project size, balancing fairness for users with proportional earnings for the platform. Works well for diverse project types and budgets.
- Commission Tiers This setting lets you set graduated commission rates based on project value ranges. Administrators can define multiple price brackets (e.g., under 100,100-500,over500) and assign decreasing commission percentages to each (e.g., 5%, 3%, 1%). The interface includes an "Add more +" option to create unlimited tiers, with separate configuration for fixed-price and hourly projects.
Payment Methods
- Select Default Payment Method: Choose the default payment method for processing payments on the platform from the dropdown menu and click "Save method."
- Manage Available Payment Methods: Enable, disable, or edit payment methods such as Stripe, PayPal, Razorpay, Paystack, Paytm, Flutterwave, and Payfast.
- Edit Payment Methods: Click the "Edit" icon next to a payment method to configure or update its settings.
Package Settings
The Package Settings screen allows an administrator to manage and configure the packages offered to users within a platform. Here's a detailed breakdown of its functionality:
1. Package Options Settings
- Dropdown Selector for Package Options: Admins can select specific package options (e.g., Platinum, Gold, Basic).
- Credits Allocation: The admin can assign credits to be applied on a single project for the selected package.
- Save Settings Button: Allows admins to save the updated settings for the selected package.
2. Add Package Section
Admins can create new packages for either Buyers or Sellers by configuring the following:
- Package for: Toggle between "Buyer" or "Seller" to define the target audience for the package.
- Package Name: Input a name for the new package.
- Package Type: Choose the package type from predefined options (e.g., Premium tiers like Platinum, Gold, or Basic).
- Package Duration: Specify the duration of the package (e.g., 30 days, 6 months).
- Package Price: Define the price for the package.
- Number of Projects to Post: Specify how many projects can be posted under the package.
- Featured Projects: Indicate the number of featured projects included in the package.
- Featured Project Duration: Define how long projects will be featured.
- Upload Image: Add an image to represent the package. Accepted formats are JPG, PNG, and GIF with a size limit of 5 MB.
Admins can finalize their changes by clicking the Update & Save button.
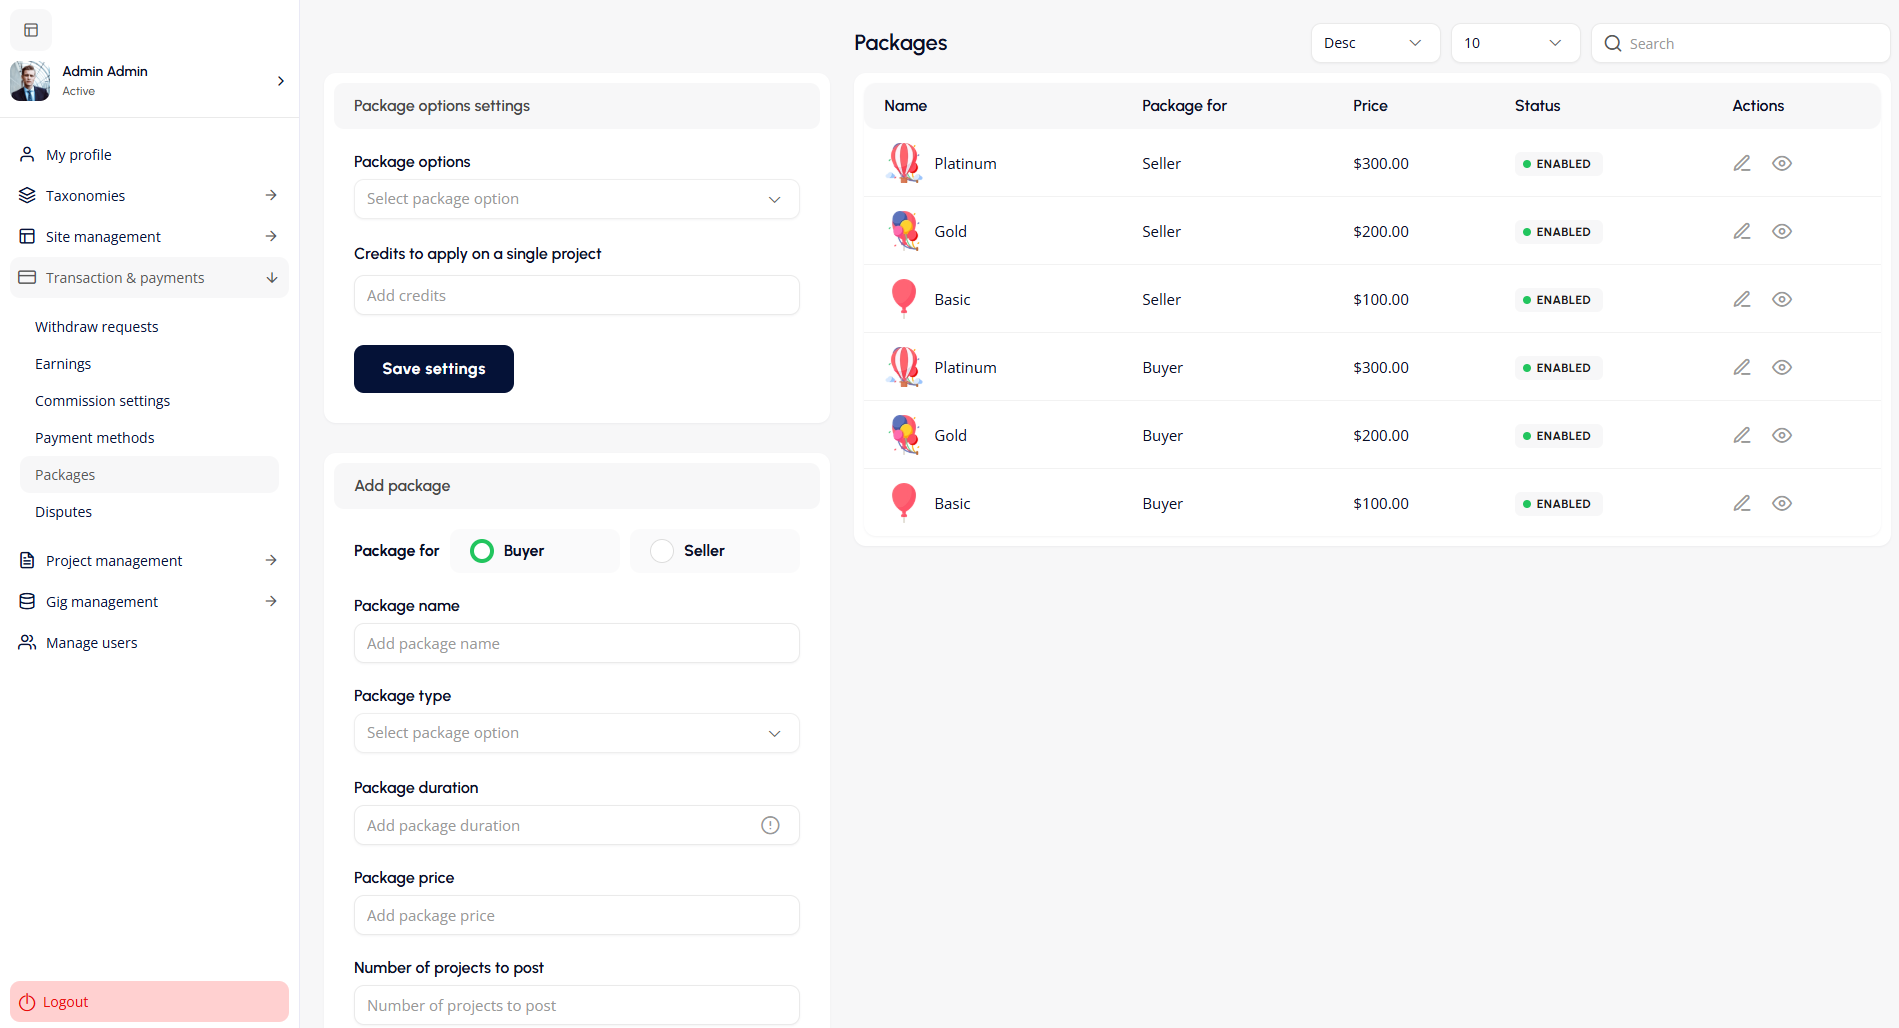
Dispute Listings
The Dispute Listings screen allows administrators to manage buyer-seller disputes effectively. It features a table displaying dispute details like reference number, buyer/seller names, date, and status. A detailed panel provides tabs for viewing dispute details, conversations, and resolutions. Admins can reply, upload supporting documents (up to 20MB), and resolve disputes by toggling between buyer and seller interactions. Filtering and search options make navigation simple, while the side menu offers access to related transaction, project, and user management tools. The interface is streamlined for efficient dispute resolution.
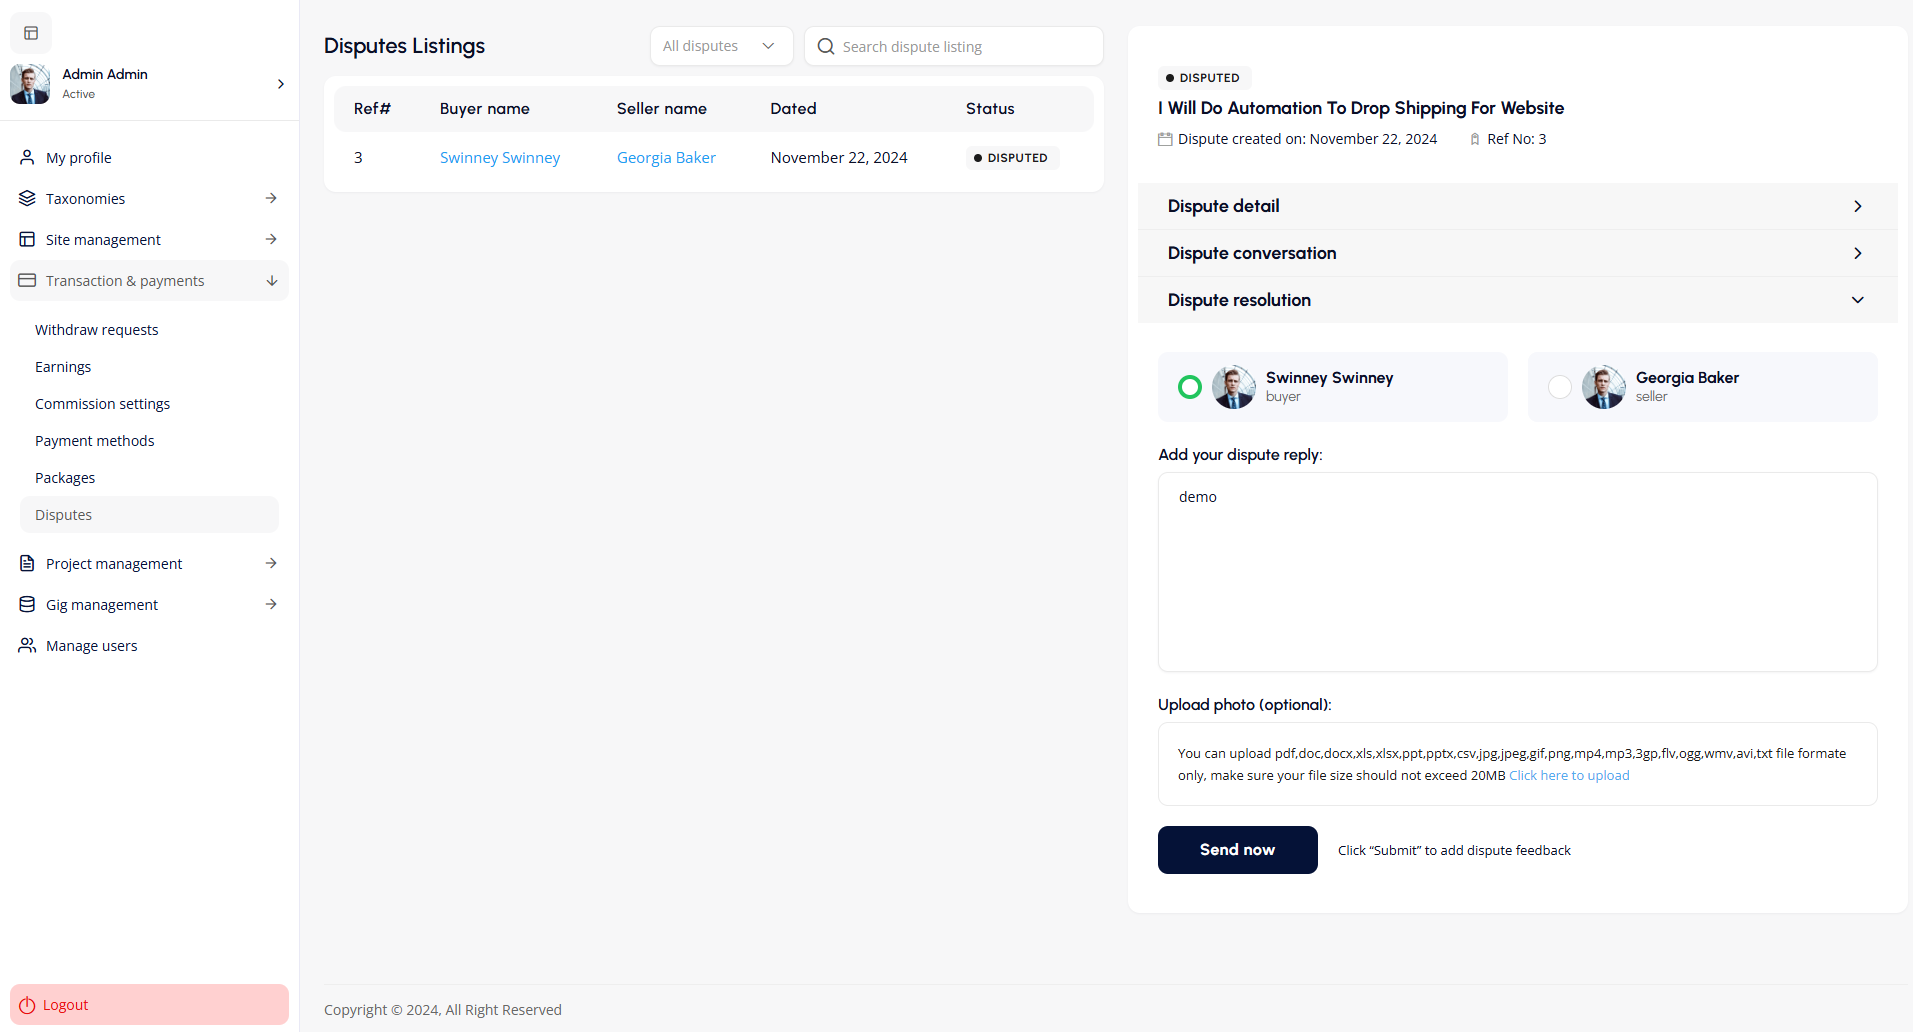
Project Management
The Project Management section enables the admin to manage all project related activities on the platform.
Project Listings
The All Projects screen provides an organized overview of projects, displaying details like project title, author, budget, type (hourly/fixed), status, and creation date. Admins can view, approve, or delete projects using action icons. Filtering, sorting, and search options enable quick navigation, while pagination helps manage large project lists. The sidebar offers access to related tools, including proposal and gig management.
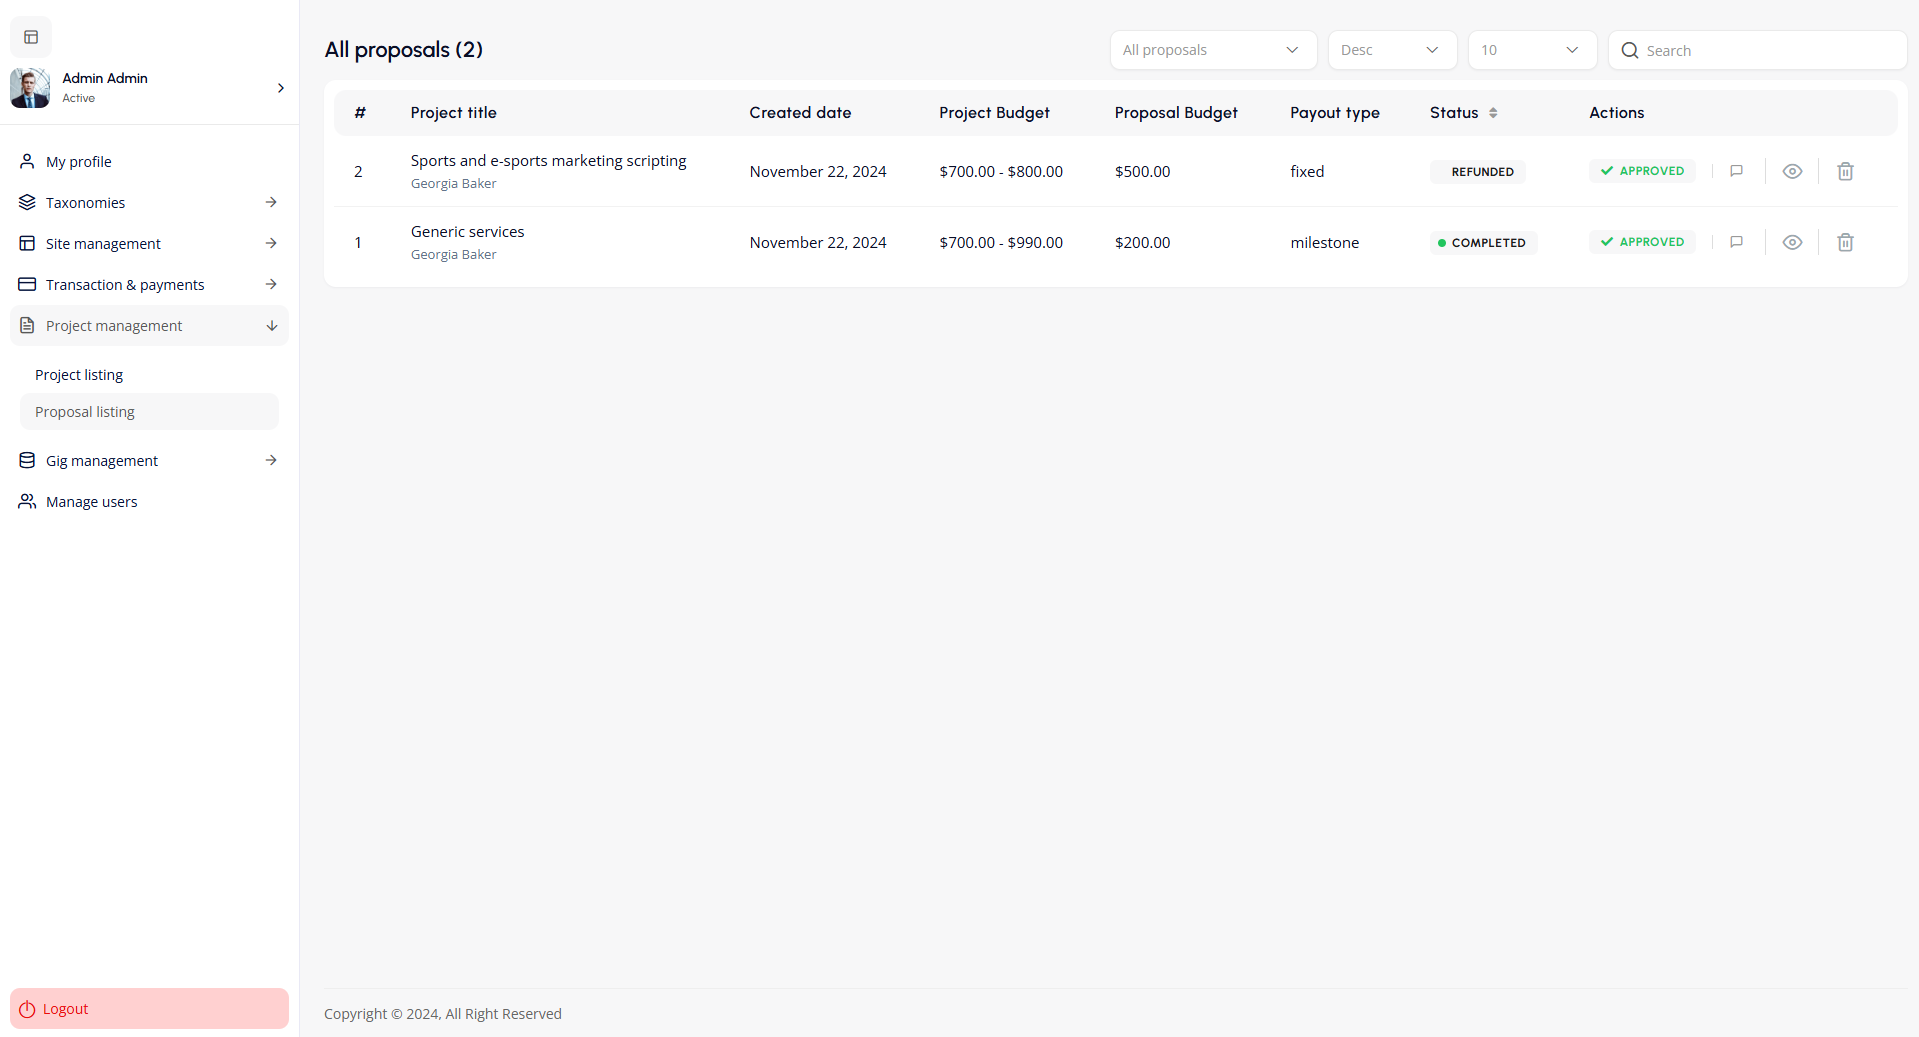
Proposal Listings
The All Proposals screen provides an overview of proposals submitted for projects. It displays key details, including proposal title, creation date, project budget, proposal budget, payout type (e.g., fixed or milestone), and current status (e.g., refunded or completed). Admins can take actions such as approving, viewing, commenting, or deleting proposals. Filtering, sorting, and search options make it easy to navigate and manage proposals effectively. The sidebar links to other project and user management tools.
Gig Management
The Gig Management section enables the admin to manage all gig related activities on the platform.
Gig Listings
The All Gigs screen provides an overview of gig listings with details like title, category, author, creation date, and status. Admins can view or delete gigs using action icons. Filtering, sorting, and search options ensure easy navigation, while pagination supports large gig volumes. The sidebar links to gig and platform management tools.
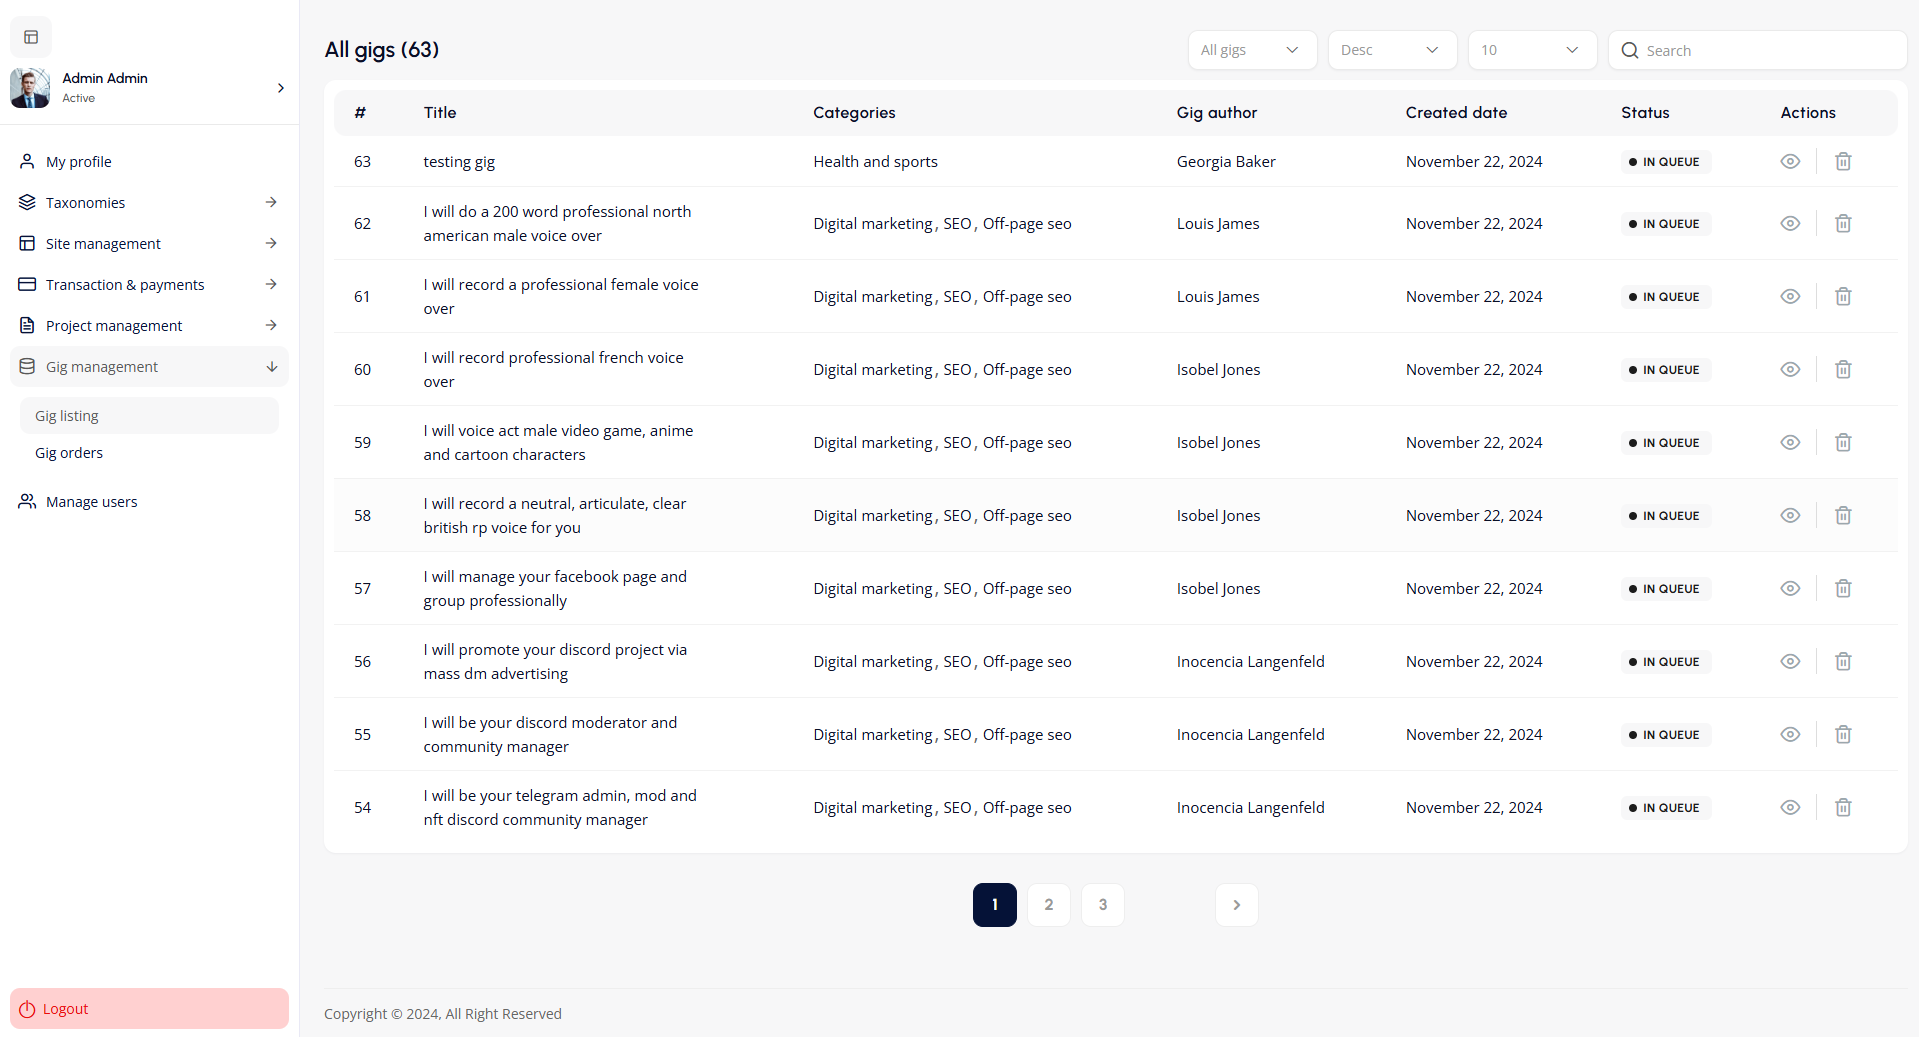
Gig Orders
The All Orders screen provides a summary of gig orders, displaying details like gig title, buyer, plan type, order amount, delivery days, start and deadline dates, and status (e.g., DISPUTED). Admins can filter, search, and delete orders using available tools for efficient management.
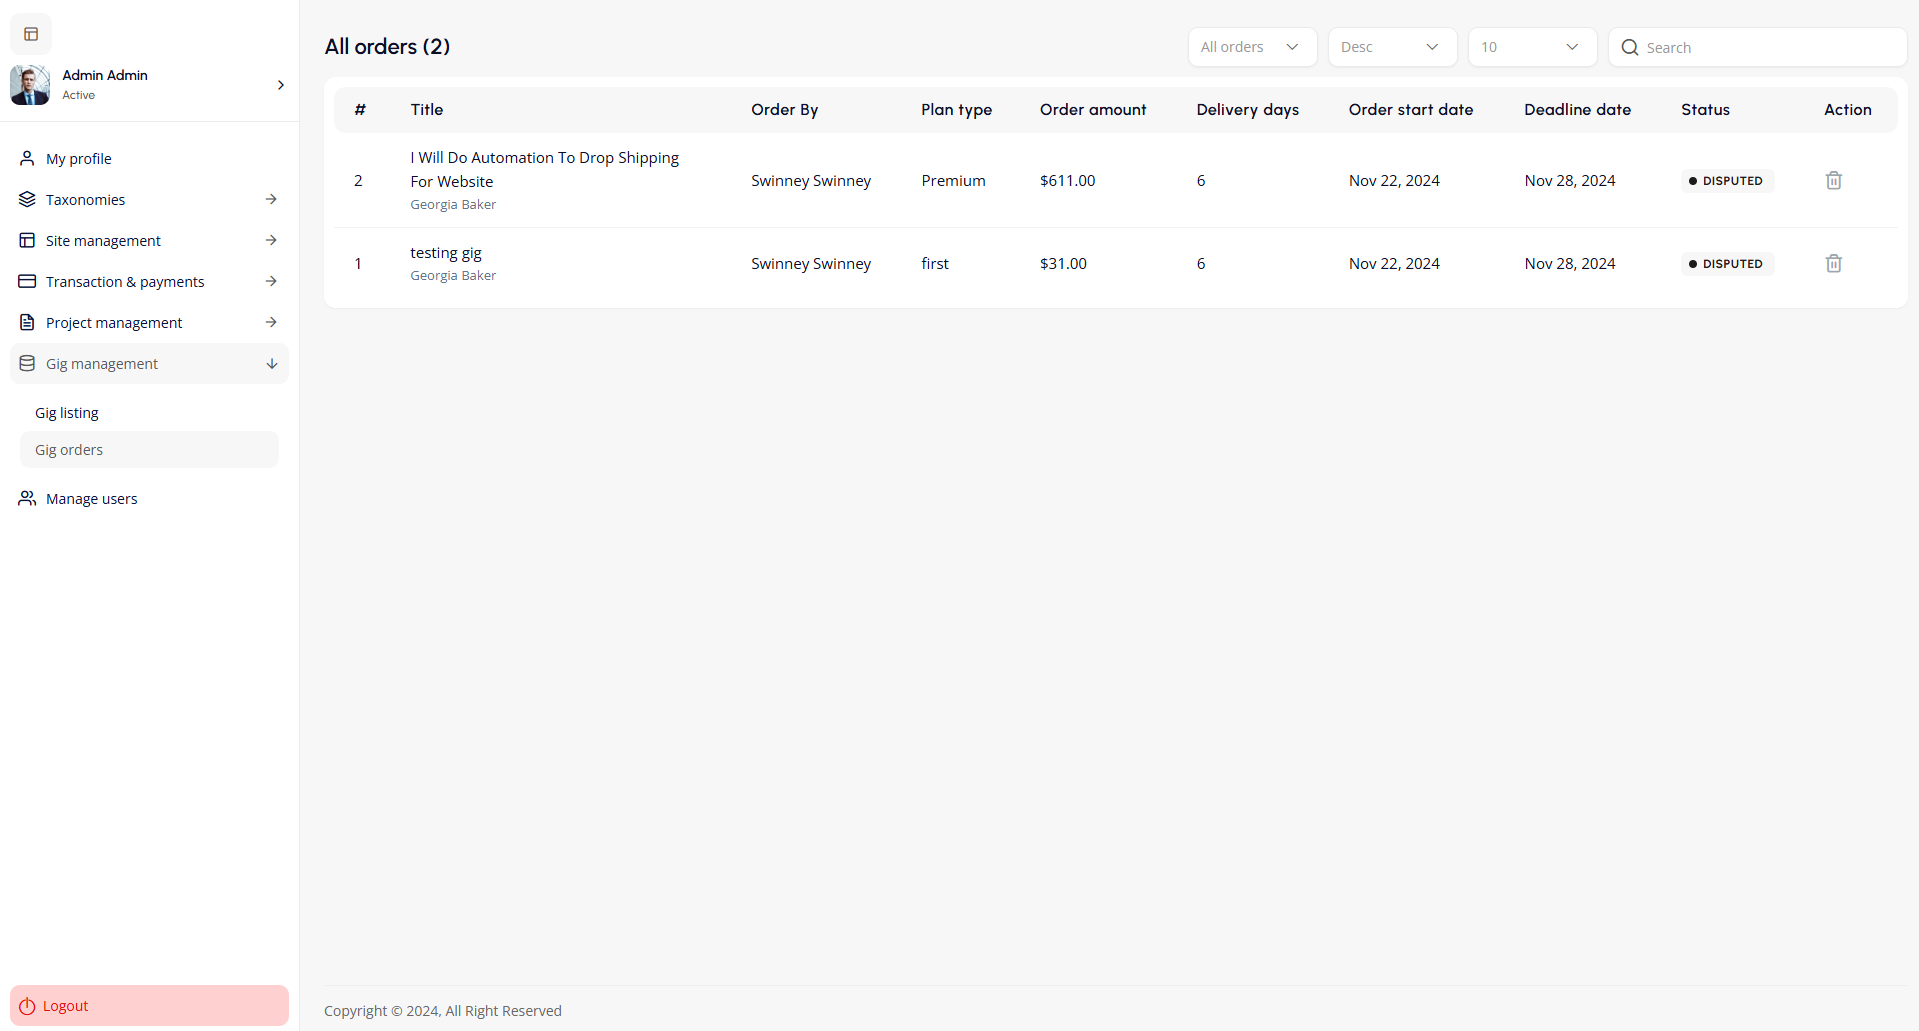
Manage Users
The Manage Users section enables the admin to manage all users on the platform.
User Table
- Displays user details such as email, created date, hourly rate, verification status (e.g., VERIFIED), and account status (e.g., ACTIVATED).
- Actions Column: Provides options to view user profiles and manage their accounts.
Add New User
Admins can add new users by entering details in the User Information Modal:
- First Name, Last Name, and Email: Basic user information.
- User Role: Dropdown to assign roles (e.g., Buyer, Seller, Admin).
- Password and Confirmation: To set up user credentials.
Save the new user by clicking the Save User button.
Filtering and Search
- Dropdown and search bar to filter users by role, status, or name.
This interface simplifies the process of managing, adding, and editing user accounts.
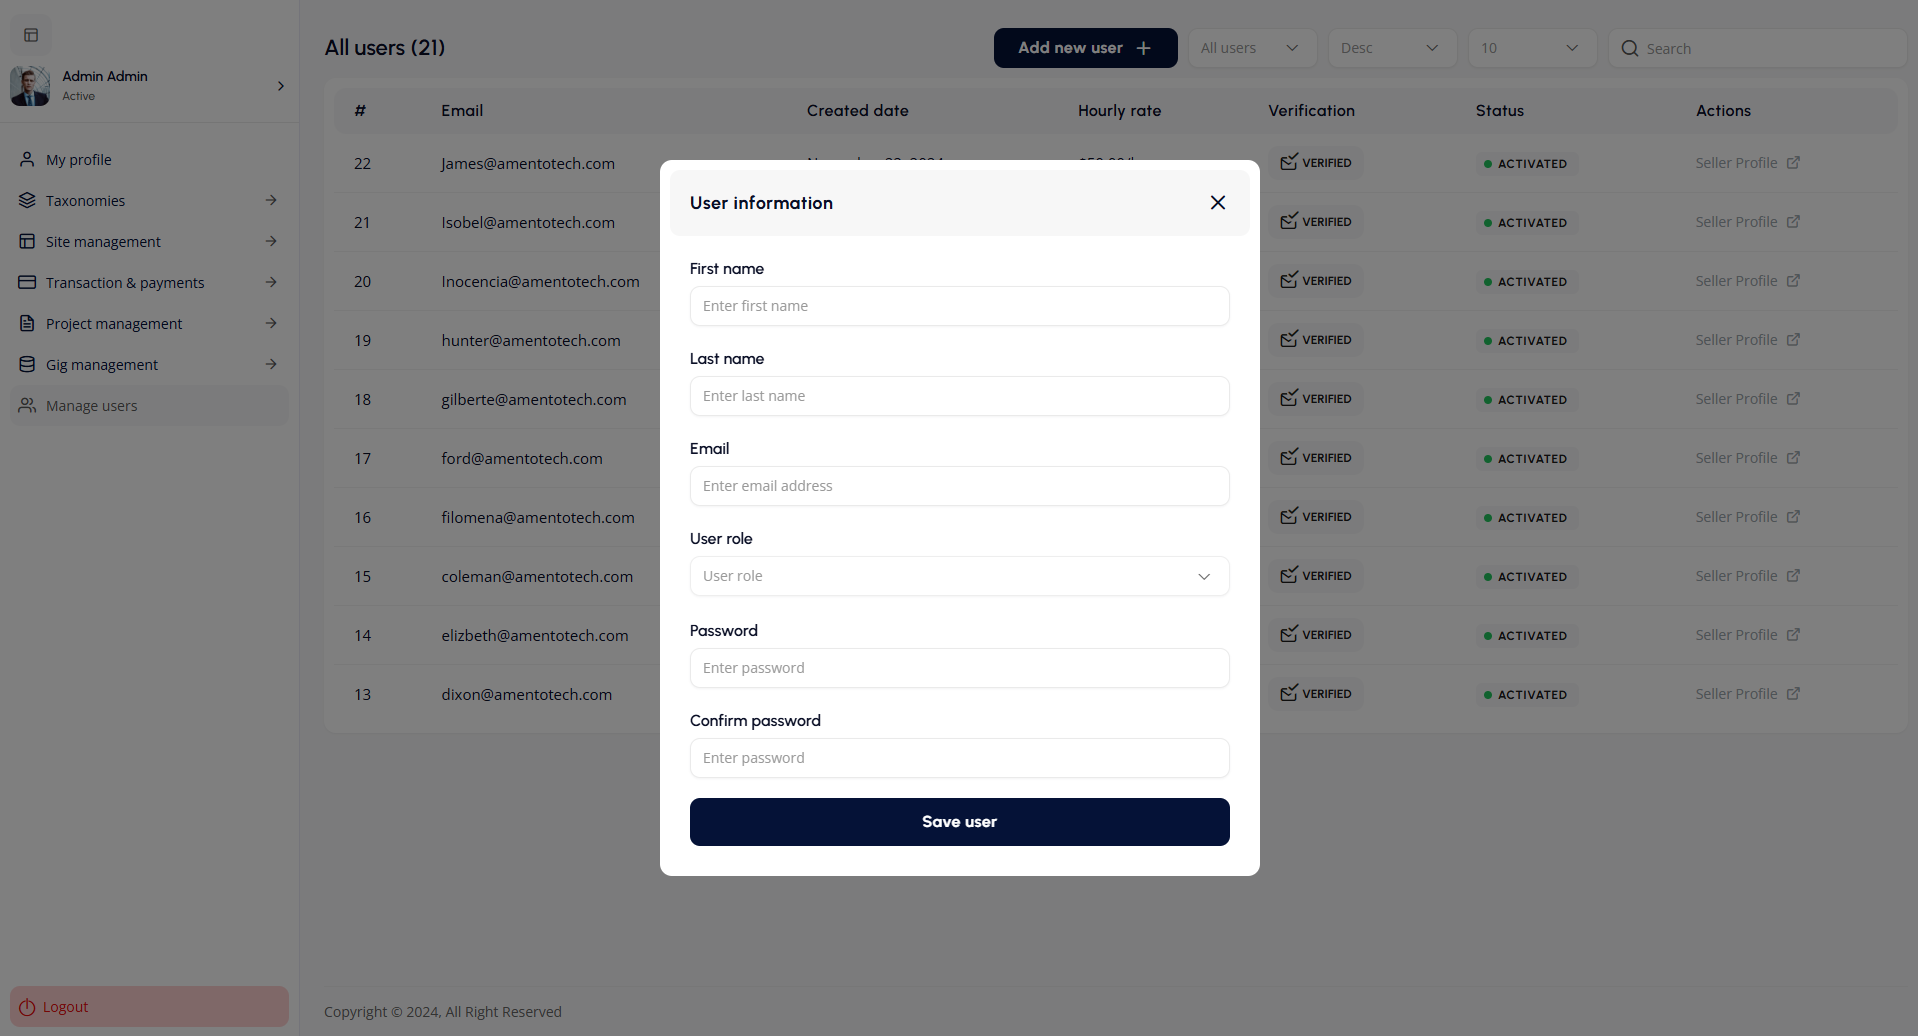
Logout
Click on the "Logout" button at the bottom of the side navigation to securely exit the admin panel.
These credentials are for demonstration purposes only and should be replaced with actual admin credentials in a production environment.